
Title: Best Alternatives to Patio Blinds: Awnings, Pergolas, Shade Sails and More Meta description: Compare the best alternatives to patio blinds, awnings, pergolas, shade sails, umbrellas, curtains, screens and more, with costs, pros, cons and DIY tips.
Alternatives to Patio Blinds: Best Shade, Privacy & Costs

Phoebe Foster
15 Jul 2026
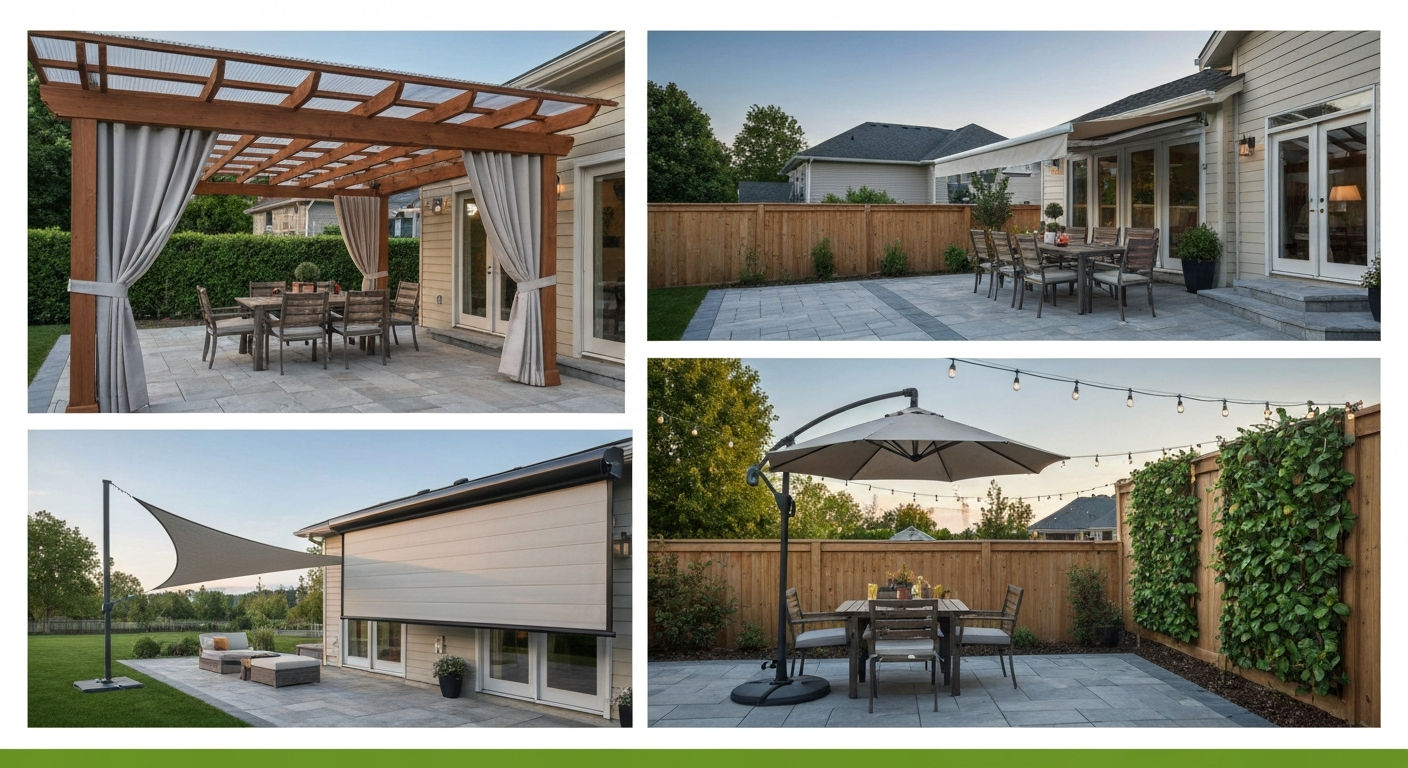
If patio blinds feel like the wrong fit, too flimsy in wind, too much maintenance, or just not the look you want, you have more than a dozen solid options that handle shade, privacy, and weather far better for most homeowners. Retractable awnings, pergolas, shade sails, outdoor curtains, canopy structures, and even living walls can all do what blinds do, often with longer lifespans and better performance in real outdoor conditions. The right choice depends on your climate, budget, site layout, and how much work you want to put in upfront versus ongoing. For a comprehensive comparison of these and other patio shade alternatives, see our full guide. For a broader look at outdoor patio alternatives, see our detailed guide comparing benefits, costs, and installation considerations. For more ideas tailored to outdoor layouts, see our guide to backyard patio alternatives.
What this guide covers and who it's for
This guide is for homeowners and renters who want to improve their patio, deck, or garden space and have decided that traditional roll-up or vertical blinds are not going to cut it. Maybe the blinds you tried warped in the sun, rattled in every breeze, or just looked cheap. Maybe you are starting fresh and want to understand all your realistic options before spending money. Either way, this article walks you through twelve categories of patio blind alternatives with honest pros, cons, typical installed costs as of mid-2026, lifespan expectations, maintenance demands, and installation complexity. There is also a decision flow to help you match your situation to the right solution, a comparison table for quick scanning, climate-specific guidance, DIY sections for budget-conscious readers, and notes on permits and HOA considerations.
How to pick the right option for your situation
Before you land on any product, answer six questions. Your answers will eliminate most of the list quickly and leave you with two or three realistic candidates.
- Shade need: Do you need overhead shade, side privacy screening, or both? Overhead-only needs point toward awnings, shade sails, umbrellas, pergolas, and canopies. Side privacy needs point toward outdoor curtains, retractable screens, sliding panels, and trellises.
- Privacy need: Is blocking the neighbor's line of sight a priority? If yes, solid or semi-solid options (curtains, screens, sliding panels, living walls) rank higher than open structures.
- Weather exposure: How much wind, rain, or snow does your site get? Windy sites favor low-profile fixed awnings or sturdy pergolas over shade sails and large umbrellas. Snow-load climates need structures rated for weight. Rainy climates benefit from waterproof membranes on pergolas or hard roofs.
- Budget: Are you working with under $500, $500–$3,000, or $3,000+? This single filter narrows the field dramatically. Umbrellas and DIY shade sails live at the low end; motorized retractable screens and custom pergolas live at the high end.
- DIY ability: Are you comfortable with basic carpentry, concrete mixing, and hardware installation, or do you need a contractor for everything? Several options here are genuinely DIY-friendly; others require professional measurement and installation to be safe.
- Site constraints: Do you have an existing roof edge or wall to attach to, or do you need a freestanding structure? Attached options (awnings, curtains on a house wall) require appropriate fastening into framing. Freestanding options (pergolas, shade sail posts, large umbrellas) need footings or ballast bases.
A simple decision flow: Start with budget. If under $500, go umbrella, DIY shade sail, or outdoor curtains. For more budget-focused options under $500, see cheap patio alternatives. If $500–$3,000, consider a retractable awning, a DIY pergola kit, a quality cantilever umbrella, or motorized curtains on a rod system. If $3,000+, a custom pergola, motorized retractable awning, retractable screen system, or hard roof addition becomes viable. Once budget is set, apply your weather and privacy filters. Windy coastal site plus privacy need? Retractable screens or a solid pergola with curtains. High sun, no privacy concern, mild wind? Shade sail or retractable awning. Cold-winter climate with snow? Pergola with a polycarbonate or metal roof panel insert, or a hard roof addition. Tight HOA or rental situation? Umbrella or free-hanging curtains that leave no permanent marks.
All the options at a glance
| Option | Primary benefit | Typical installed cost | Lifespan | DIY-friendly? | Best climate fit |
|---|---|---|---|---|---|
| Retractable awning | Overhead shade, retractable in bad weather | $1,500–$6,000+ | 10–15 years | Moderate (motor models: hire a pro) | Sun-heavy; moderate wind |
| Fixed awning | Permanent overhead shade | $600–$3,000 | 10–20 years | Yes, with basic tools | Most climates; avoid heavy snow without support |
| Pergola (open) | Structure + partial shade + aesthetics | $2,100–$6,000+ | 15–25+ years | Yes (kit or custom DIY) | Most climates; add cover for rain/snow |
| Pergola (covered) | Full overhead protection + aesthetics | $3,500–$12,000+ | 20–30+ years | Moderate to pro | All climates depending on cover material |
| Shade sail | Budget overhead shade, modern look | $200–$1,500 DIY; up to $3,000 pro | 8–12 years (fabric) | Yes, with proper hardware | Sunny, moderate wind; not ideal for heavy snow or storms |
| Patio umbrella | Portable overhead shade | $80–$500 (standard); $300–$1,500 (cantilever) | 3–8 years | Yes — no tools | Most climates; bring in during storms |
| Outdoor curtains | Side privacy + shade + decor | $50–$600 DIY; $500–$2,000 pro hang | 5–10 years (Sunbrella-grade) | Yes | Most climates; take down before winter |
| Retractable screens | Full enclosure, insects + privacy | $2,500–$6,000+ per opening | 10–15 years | No — professional install | All climates; ideal for bugs, moderate rain |
| Trellises / living walls | Privacy + aesthetics + cooling | $100–$1,500 DIY | Structure: 10–20 yrs; plants: ongoing | Yes | Humid/moderate climates; needs irrigation in dry areas |
| Sliding panels | Side privacy, modern aesthetic | $300–$2,000+ | 10–15 years | Moderate | Most climates; avoid high-wind exposure |
| Canopy / gazebo | Portable or semi-permanent overhead cover | $150–$3,000+ | 3–10 years | Yes (pop-up models) | Most climates; soft-top models not for heavy snow |
| Hard roof addition | Permanent, all-weather protection | $8,000–$30,000+ | 20–50 years | No — requires contractor + permit | All climates; best for heavy rain, snow, or year-round use |
| Misters / fans | Temperature reduction (comfort supplement) | $50–$800 DIY; $500–$2,500 pro | 5–10 years | Yes (basic mister kits) | Hot, dry climates (misters); hot humid climates (fans) |
| Decor-based solutions | Shade + aesthetics on a tight budget | $30–$500 | Varies | Yes | Any climate; supplemental only |
Awnings: flexible shade that stores away when you need it to
Awnings mount to an exterior wall above a door or window and extend outward to create a shaded zone below. Retractable models roll or fold into a cassette housing; fixed models stay put permanently. I have installed both types on projects ranging from a basic aluminum-frame fixed unit on a back door to a motorized 16-foot retractable on a south-facing deck, and the performance difference is significant.
Retractable awnings
- Pros: Retracts in wind or rain to avoid damage; adjustable sun angle via pitch setting; motorized versions add convenience and can integrate with wind sensors; keeps fabric cleaner longer since it is stored when not in use
- Cons: Higher cost than fixed; mechanical parts (springs, cassette, motor) can fail and need servicing; still requires solid wall attachment into structural framing; motorized models need a power source run to the mounting location
- Typical installed cost: $1,500–$6,000+ depending on width, motorization, and fabric grade
- Lifespan: 10–15 years for the fabric; frame often outlasts the fabric by several years
- Maintenance: Monthly rinse with a hose; periodic deeper clean with mild soap per fabric manufacturer guidance (solution-dyed acrylic fabrics like Sunbrella are the industry standard); inspect hardware annually; lube arm pivot points each spring
- Installation complexity: Manual models are a DIY project for someone comfortable drilling into exterior framing and using a level; motorized models benefit from a professional for electrical work and precise alignment
- Best-use scenarios: South- or west-facing patios with heavy afternoon sun; homeowners who want flexibility to retract in storms; areas with unpredictable weather
Fixed awnings
- Pros: Simpler structure with no moving parts; lower cost than retractable; permanent rain and UV protection without any action from you; can be built to handle moderate snow loads if properly sized
- Cons: No adjustability; fabric and frame take continuous UV and weather exposure, which shortens service life; cannot retract ahead of a storm; some HOAs restrict permanent attachments
- Typical installed cost: $600–$3,000 depending on size and material
- Lifespan: 10–20 years with proper fabric and frame maintenance
- Maintenance: Rinse fabric monthly; inspect attachment hardware annually; re-tension or replace fabric every 8–12 years
- Installation complexity: Moderate DIY — requires lag screws into wall studs or a ledger, correct pitch for water runoff, and sealed penetrations to prevent leaks
- Best-use scenarios: Entry doors, small patios with consistent sun exposure, homeowners who want set-and-forget shade without mechanical complexity
One important note on both types: local building codes in many states (including Florida, which references ASCE 7 wind load standards explicitly) require that awnings and canopies attached to a structure be designed to resist calculated wind loads. If you are in a hurricane zone or high-wind corridor, verify with your building department before purchasing. Some municipalities require a permit for any attached structure.
Pergolas: the structure that does the most for your outdoor space
A pergola is a post-and-beam structure with an open or partially covered roof. It is the most versatile option on this list because it can function as a shade structure, a privacy anchor for hanging curtains, a support for climbing plants, or the bones of a near-full outdoor room. I have built both freestanding and house-attached versions; the freestanding ones require more planning around footings but give you flexibility on placement.
Open pergolas
- Pros: Strong visual impact; creates a defined outdoor room feel; durable with proper materials (cedar, redwood, composite, or aluminum all perform well); excellent base for adding shade sail inserts, polycarbonate panels, outdoor curtains, or climbing plants later; improves home resale value in most markets
- Cons: Open roof provides partial shade only — not full overhead protection from rain or intense midday sun unless you add a cover; significant upfront cost and build time; requires permits in most jurisdictions (footings, structural attachment)
- Typical installed cost: $2,100–$6,000 for a standard-sized (roughly 10x12 to 12x16 foot) pergola; custom designs and premium materials (composite, aluminum) push costs above $10,000
- Lifespan: Cedar and redwood last 15–25+ years with staining every 2–3 years; composite and aluminum last 25+ years with minimal maintenance
- Maintenance: Wood pergolas need cleaning and re-staining or sealing every 2–3 years; composite and vinyl need occasional washing only; inspect post bases annually for rot or moisture intrusion
- Installation complexity: A DIY pergola kit (pre-cut lumber, hardware included) is achievable over a long weekend for two capable adults; custom builds require a concrete footing for each post, proper beam-to-post connectors, and accurate layout — a multi-day project minimum
- Best-use scenarios: Homeowners planning a long-term outdoor living space; spaces that need both shade and a design anchor; yards where a permanent structure is permitted and desired
Covered pergolas
Adding a cover, polycarbonate panels, corrugated metal, shade cloth, a louvered roof system, or even a fabric sail insert, converts an open pergola into a weather-protected space. Louvered aluminum roof systems are increasingly popular because they let you adjust the amount of light and ventilation electronically. These integrated systems are expensive ($8,000–$25,000+ installed) but essentially create an outdoor room you can use in light rain. At the more budget-friendly end, a roll of polycarbonate roofing on a DIY pergola frame costs $300–$800 in materials and gives you full rain protection.
DIY pergola basics
A standard freestanding pergola uses 6x6 posts set on concrete footings or adjustable post anchors (anchors work well on existing concrete slabs), 2x8 or 2x10 beams spanning between posts, and 2x6 or 1x6 purlins running perpendicular on top. For example, published freestanding pergola DIY plans like 20x20 Pergola Plans (MyOutdoorPlans) specify 6×6 posts on concrete footings or post‑anchors, 2×8/2×10 beams, and slats, and include full lumber, hardware, tool lists and multi‑day build estimates. Post spacing of 8–10 feet is typical. Concrete footings should extend below the frost line in cold climates. Most published DIY plans estimate a weekend build with two people once materials are on site. Always check with your local building department, most jurisdictions require a permit for any pergola attached to a house, and many require one for freestanding pergolas above a certain square footage.
Shade sails: modern, affordable, and great for awkward spaces
Shade sails are tensioned fabric panels anchored to two or more fixed points at different heights to create a sloped, triangular or quadrilateral shade canopy. They look contemporary, work brilliantly in sunny yards with good anchor points, and cost far less than any structural alternative. The catch is that they are only as safe as their anchor points, and this is where most DIY shade sail installations fail.
- Pros: Low cost compared to structural options; modern aesthetic; can cover odd-shaped areas that a standard awning or pergola cannot; easy to take down seasonally for cleaning or storage; HDPE knitted shade cloth is breathable, which reduces heat buildup under the sail
- Cons: Requires engineered anchor points — posts set in concrete or structural attachment to the house; improper tensioning leads to sagging, pooling rainwater, and failure in wind; not a rain cover unless you use a coated (waterproof) fabric; most manufacturers recommend removing sails in sustained high winds above 20–25 mph; limited privacy benefit
- Typical cost: $200–$800 for a quality DIY sail including hardware (turnbuckles, pad eyes, wire rope, shackles); $1,500–$3,000 for a professionally installed system with engineered posts; custom fabricated large sails cost more
- Lifespan: High-quality HDPE shade fabric typically carries a 10-year limited manufacturer warranty; real-world lifespan is 8–12 years depending on UV exposure, cleaning frequency, and whether the sail is stored during harsh weather
- Maintenance: Rinse with a hose periodically; machine-wash on a gentle cycle (most HDPE sails are machine-washable); inspect all hardware — turnbuckles, shackles, pad eyes — annually for corrosion or fatigue; re-tension each season
- Installation complexity: Moderate DIY — straightforward if you already have two solid anchor points (house wall + existing fence post); increases significantly if you need to set new anchor posts in concrete
- Best-use scenarios: Sunny suburban yards with existing structures to anchor to; modern aesthetic preference; budget-conscious homeowners who can accept seasonal takedown
For a DIY shade sail, your materials list is: the sail itself (buy commercial-grade HDPE or coated polyester, avoid cheap single-layer fabric from discount retailers), stainless steel or galvanized pad eyes and shackles rated for the tension load, turnbuckles (at least one per attachment point for tensioning), wire rope or webbing connectors, and lag screws or through-bolts for wall anchors. Size your hardware to at least twice the expected load, sails in wind see forces well beyond their static weight.
Patio umbrellas and cantilever umbrellas: the no-commitment solution
For renters, small patios, or anyone who is not ready to commit to a permanent or semi-permanent structure, a quality patio umbrella is hard to beat. I have used both center-post and cantilever models across different setups, and the cantilever design is genuinely transformative for dining areas because it puts the shade exactly where you want it without a pole in the middle of the table.
- Pros: No installation required; fully portable and repositionable; wide range of sizes (6-foot to 13-foot diameter cantilever models) and price points; can be moved to storage in winter in minutes; no permits, no HOA issues in virtually all cases
- Cons: Requires a heavy base (inadequate bases are the number-one cause of umbrella tip-overs — retailers generally recommend a base weight matching the manufacturer's specification for the umbrella diameter and local wind exposure); fabric degrades faster than structural solutions with constant UV; not a rain cover; cantilever models need significantly heavier bases than center-post models
- Typical cost: Center-post umbrellas range from $80–$300 for consumer-grade models up to $400–$600 for commercial-grade; cantilever umbrellas run $300–$1,500 depending on size, frame material, and motorization; bases cost $50–$300 separately
- Lifespan: 3–5 years for entry-level fabric; 6–10 years for solution-dyed acrylic (Sunbrella-grade) frames with quality frames; aluminum frames significantly outlast fiberglass-rib economy models
- Maintenance: Close and secure during wind events; clean fabric with mild soap and water; store or use a cover during winter; inspect the tilt mechanism and crank annually
- Installation complexity: Zero — place, fill the base with water or sand, open the umbrella
- Best-use scenarios: Renters; small decks or balconies; supplemental shade for specific seating zones; anyone who wants maximum flexibility; poolside spots where a permanent structure is not practical
If you are shopping for a cantilever model, pay close attention to the base weight rating. A 13-foot cantilever umbrella on a windy afternoon creates substantial lateral force. Manufacturers specify minimum base weights for each model, a common mistake is buying the right umbrella and the wrong base.
Outdoor curtains: the easiest privacy upgrade you can make
Outdoor curtains hang from a curtain rod, tension wire, or pergola beam and provide side privacy, partial shade, and a significant aesthetic upgrade for almost no effort. If your patio already has a pergola or a covered structure with a beam to attach to, curtains are the fastest way to add an enclosed-room feel without any construction.
- Pros: Very low cost entry point; huge range of styles, colors, and opacities; easy to take down and wash or store; completely reversible with no damage to the structure; add a soft, room-like feel that hard structures cannot replicate
- Cons: Side shade only — no overhead protection; most budget outdoor fabrics fade, mildew, or tear within 2–3 seasons; quality outdoor fabric (solution-dyed acrylic) costs significantly more but is worth it; curtains blow in wind unless weighted or tied back
- Typical cost: $50–$200 for budget polyester outdoor curtains; $200–$600 for Sunbrella-grade finished panels; custom-made outdoor curtains from a marine/outdoor fabric supplier run higher; rod and hardware add $30–$150
- Lifespan: Budget fabric: 2–4 seasons; solution-dyed acrylic (Sunbrella): 5–10 years with proper care; Sunbrella carries a 5-year limited fabric warranty against UV degradation, fading, and mildew
- Maintenance: Monthly rinse; periodic gentle soap wash; remove or store during winter in freezing climates; avoid leaving wet curtains bunched up (mildew risk even on quality outdoor fabric)
- Installation complexity: Extremely low — a basic outdoor curtain rod or tension wire with ring clips, lag-screwed into a beam or post
- Best-use scenarios: Pergola owners who want to enclose the space; patios where neighbor privacy is the main concern; renters who want a change without permanent modification; anyone on a tight budget who wants a big visual impact
Retractable screens: the closest thing to an outdoor room
Retractable screens mount in a cassette housing (typically on the fascia or a structural header) and pull down or across an opening on demand. High-end systems like Phantom Screens retract completely into the cassette when not in use, which protects the screen mesh from UV degradation and extends the system's life considerably compared to fixed screen enclosures. They are the most expensive option on this list short of a hard roof addition, but they also deliver the most complete protection from insects, moderate rain, and neighbors.
- Pros: Insect and privacy screening; retracts out of sight when not needed, preserving your view; available in solar, privacy, and open-weave mesh options; motorized versions integrate with smart home systems; hidden when retracted means far less UV exposure to the screen material
- Cons: High cost — $2,500–$6,000+ per opening for motorized systems; professional installation is strongly recommended (precise measurement of the opening, proper cassette mounting, and alignment are critical); motor and screen mechanism require occasional professional servicing; not suitable for very wide openings without intermediate posts
- Typical cost: $2,500–$6,000+ per opening for motorized retractable screens; manual pull-down versions cost less but are still in the $1,000–$2,500 range per opening professionally installed
- Lifespan: 10–15 years for the screen fabric when stored in a cassette; mechanical components vary by manufacturer — check warranty terms
- Maintenance: Brush or vacuum the screen mesh periodically; clean the cassette and side tracks annually; lubricate the drive mechanism per manufacturer specs; keep the bottom bar free of debris that could jam the retract
- Installation complexity: Not recommended as a DIY project for most homeowners — requires precise opening measurement, structural header confirmation, and clean cassette alignment
- Best-use scenarios: Covered patios or lanais where insects are a serious problem; homeowners who entertain frequently and want maximum flexibility; coastal or humid climates where mosquitoes and no-see-ums make open patios impractical; high-end renovation projects
Trellises and living walls: shade that grows with your garden
A trellis is a simple lattice or wire framework that supports climbing plants, vines, climbing roses, wisteria, jasmine, hops, or fast-growing annuals. A living wall takes that concept vertical, using a modular planting system or a pocket planter grid to grow plants directly on a wall face. Both options take more patience than most alternatives (plants need time to establish) but they deliver something no other option on this list does: natural cooling through transpiration, habitat for pollinators, and a genuinely beautiful outdoor screen.
- Pros: Low material cost; adds significant aesthetic value; provides privacy and partial shade as plants establish; living walls reduce ambient temperature through transpiration — university extension research supports trellised vines as a passive cooling strategy for building walls; supports biodiversity
- Cons: Takes a growing season or more to provide meaningful coverage; requires ongoing plant care (watering, pruning, fertilizing, pest management); not appropriate as a primary rain or sun shield; wrong plant choice can damage structures (aggressive vines like English ivy or wisteria can penetrate siding and mortar)
- Typical cost: $100–$500 for a DIY cedar or pressure-treated trellis with climbing plant starts; modular living wall systems run $300–$1,500+ depending on size and planting system
- Lifespan: The structure lasts 10–20 years (cedar or treated lumber); plants are ongoing — some perennial vines last decades
- Maintenance: Pruning 2–4 times per year; watering (drip irrigation is a practical addition for living walls); structural inspection annually; plant replacement as needed
- Installation complexity: Low for a basic trellis; moderate for a modular living wall with irrigation
- Best-use scenarios: Homeowners with a design-forward aesthetic; properties where privacy from a specific sightline is the goal; humid, temperate, or mild climates where plants thrive with minimal supplemental water; anyone who wants a solution that improves over time
Plant selection matters enormously here. For quick coverage without structural damage, consider annual vines (morning glory, black-eyed Susan vine, climbing nasturtium) or manageable perennials like climbing hydrangea, clematis, or passionflower depending on your climate zone. Avoid wisteria on anything you are not willing to aggressively prune, it will engulf a trellis and probe for any weakness in adjacent siding within a few years.
Sliding panels, canopies, hard roofs, and comfort solutions
Sliding panels
Sliding fabric or polycarbonate panels run on a track system mounted to a pergola or overhead beam. They work similarly to indoor panel track blinds but in an outdoor-rated format. A set of sliding fabric panels can subdivide a large pergola into a partially enclosed space, adjust to block sun from a changing angle, or stack completely open when you want an unobstructed view. Cost ranges from $300–$2,000+ depending on size and material, installation is moderate (track mounting, panel hanging), and lifespan mirrors outdoor curtain fabrics at 5–10 years for quality materials.
Canopies and pop-up gazebos
Pop-up canopies and gazebos are the most portable option in this entire guide. A 10x10 steel-frame canopy with a polyester top costs $150–$400 and sets up in under 15 minutes. The honest limitation is that budget pop-ups are not built for anything beyond calm-weather use, the frames bend, the fabric tears, and leaving one up through a summer storm is a good way to lose it entirely. Invest in a commercial-grade aluminum frame model (typically $400–$800+) if you want something that holds up to seasonal use. Permanent wood-frame gazebos with metal roofs sit at $1,500–$5,000+ installed and are a different category entirely, closer to a pergola with a hard roof.
Hard roof additions (patio covers)
If you want year-round all-weather protection, a hard roof, whether a patio cover attached to the house roofline, a standalone solid structure with a metal or tile roof, or a covered pergola with polycarbonate panels, is the only option that truly delivers. Costs start around $8,000–$15,000 for a basic attached aluminum patio cover and can reach $30,000+ for a full permitted addition matching the home's existing architecture. This option requires a building permit in virtually every jurisdiction, and in most cases you will want a licensed contractor. The payoff is a space you can use in rain, intense sun, and even light snow, essentially adding a usable square footage to your home.
Misters and fans as comfort supplements
Misters and fans do not replace shade but they make a shaded space dramatically more comfortable in hot weather. A basic DIY misting kit for a 10x10 patio runs $50–$150 (tubing, nozzles, hose connection); professionally installed high-pressure misting systems that produce a nearly dry fog cost $500–$2,500. Misters work best in hot, dry climates like Texas, Arizona, or the Southwest, in humid climates, adding moisture to the air when it is already at 80% humidity makes things worse, not better. Outdoor fans are climate-agnostic and genuinely effective; a quality weatherproof ceiling fan for a covered pergola runs $150–$400 installed. Pairing a fan with any shade structure above is one of the highest-value comfort upgrades per dollar you can make.
Decor-based solutions
Dense potted plants, outdoor room dividers, bamboo screens, and reed fencing all function as low-cost shade and privacy supplements. A row of tall potted arborvitae or bamboo in planters creates a movable privacy screen for under $200. Woven bamboo or reed screen panels (typically sold in 6x8 foot rolls) attach to an existing fence or railing with zip ties and cost $20–$60 per panel. These are supplemental solutions, they do not replace structural shade, but for renters or anyone needing a quick, budget fix, they are worth knowing about.
Climate-specific guidance
| Climate / Region | Top recommended options | Options to avoid or modify |
|---|---|---|
| Hot, sunny, dry (Southwest, Texas) | Shade sails, retractable awnings, pergolas with shade cloth, misters | Pop-up canopies (fade fast); cheap outdoor curtains (UV damage) |
| Hot and humid (Southeast, Gulf Coast) | Retractable screens (insects), covered pergolas, motorized awnings with wind sensors | Shade sails without quick-release hardware (mold risk on fabric); misters (add humidity) |
| Mild, variable (Midwest, Mid-Atlantic) | Pergolas with removable covers, retractable awnings, outdoor curtains (seasonal) | Fixed lightweight canopies (wind risk in spring storms) |
| High wind (coastal, plains) | Fixed awnings (properly anchored), heavy pergolas, retractable screens | Large shade sails without engineered posts; large patio umbrellas without weighted bases |
| Heavy rain (Pacific Northwest, wet climates) | Covered pergolas (polycarbonate or metal roof), hard roof additions, retractable screens | Open pergolas without a cover; shade sails (non-waterproof fabric pools water) |
| Cold winters / snow load (Midwest, Northeast, Mountain) | Hard roof rated for snow load, aluminum pergolas with snow-rated covers, removable canopy panels | Soft-top pop-up canopies; shade sails left up through winter; awning fabric left extended |
Permits, HOA rules, and when to hire a pro
This is the part of patio planning that most guides gloss over, and it is the part that causes the most expensive problems. Here is what you actually need to know.
- Attached structures almost always require a permit: Any structure attached to your house — awnings, hard roof additions, covered pergolas, retractable screen systems — involves fasteners into structural framing and in most municipalities requires a building permit. The permit process confirms that the attachment is safe and that wind load requirements (referenced in codes like ASCE 7) are met.
- Freestanding structures frequently require permits too: Pergolas, gazebos, and shade structures above a certain size (commonly 200 square feet, but this varies by jurisdiction) typically require a permit. Footings must be inspected in many jurisdictions.
- HOA restrictions are common: Many HOAs restrict color, material, height, and visibility of patio structures. Some prohibit shade sails entirely due to aesthetic concerns. Get written HOA approval before purchasing or installing anything permanent.
- Rentals: If you are renting, any structure requiring drilling, footings, or wall attachment needs landlord written permission. Stick to umbrellas, freestanding canopies, and non-penetrating outdoor curtain systems.
- When to hire a pro: Motorized systems (awnings, screens), hard roof additions, structures requiring engineering review, any electrical work, and any project in a high-wind or snow-load zone. The cost of a professional installation is almost always worth it for safety and code compliance on structural projects.
Pairing shade solutions with the rest of your patio setup
Your shade or privacy solution rarely works in isolation, it anchors a larger outdoor space that benefits from thoughtful combinations. A pergola becomes dramatically more comfortable when you pair it with outdoor curtains for side privacy and a ceiling fan for air movement. A retractable awning over a dining area pairs well with a quality patio umbrella nearby to cover an adjacent seating zone the awning does not reach. Misters and fans are natural partners for any fixed shade structure in a hot climate. Flooring choice also matters: lighter-colored paving (light concrete, light travertine, or composite decking in lighter tones) reflects less heat back up into the space than dark stone or standard concrete, which makes your shade solution more effective. Decor-based elements like outdoor rugs, potted plants, and bamboo screens work best as a complement to a structural solution rather than a replacement for one.
Quick recommendation by budget and priority
| Budget | Top priority: Shade only | Top priority: Privacy | Top priority: Full weather protection | Top priority: Aesthetics |
|---|---|---|---|---|
| Under $500 | Shade sail (DIY) or patio umbrella | Outdoor curtains on a tension rod | Pop-up canopy (commercial grade) | Trellis with climbing plants |
| $500–$3,000 | Retractable awning (manual) | Retractable screens (per opening, basic) or privacy curtain system on a pergola | Covered pergola DIY kit with polycarbonate roof | Open pergola (DIY kit) |
| $3,000–$8,000 | Motorized retractable awning or custom pergola | Motorized retractable screens | Covered pergola (pro install) | Custom pergola with curtains and fans |
| $8,000+ | Louvered pergola roof system | Full retractable screen enclosure | Hard roof patio addition | Covered pergola or patio room addition |
The best alternative to patio blinds is the one that actually solves your specific problem, whether that is cutting the afternoon glare in a Phoenix summer, keeping mosquitoes out on a Georgia evening, or giving you a private outdoor living room in a crowded suburban neighborhood. For a quick shortlist of top-rated choices and how they compare, see our guide to the best patio options. Patio blinds are a reasonable starting point for some situations, but for most homeowners, one of the structural, fabric, or screen alternatives in this guide will do the job better, last longer, and look significantly more intentional. Start with the decision flow, confirm your site constraints and HOA rules, and then match your budget to the realistic cost range for the option that fits. If budget is your main concern, check the inexpensive patio alternatives section for practical, low-cost options like umbrellas, DIY shade sails, and potted plant screens. For detailed comparisons of fabrics, woods, metals, and composites, see our guide to alternative patio materials.
FAQ
SEO title and meta description for an article about alternatives to patio blinds
Title: 12 Practical Alternatives to Patio Blinds: Costs, Pros & DIY Guides Meta description: Compare awnings, pergolas, shade sails, umbrellas and more—costs, lifespan, DIY steps and climate guidance for patio shade solutions (<=160 chars).
What are the major alternatives to patio blinds that homeowners should consider?
Major alternatives: awnings (retractable & fixed), pergolas (open & louvered), shade sails, patio umbrellas, outdoor curtains, retractable screens, trellises & living walls, sliding panels/baffles, freestanding canopies/pop‑ups, hard roofs (patio covers/roof additions), misters & outdoor fans (comfort systems), and decor‑based solutions (trees, pergola vines, decorative screens). Each option targets shade, privacy, weather protection, aesthetics or budget‑driven priorities.
Comparison summary: pros, cons, typical cost ranges, lifespan, maintenance, installation complexity and best-use scenarios
Comparison table (condensed): - Awnings (retractable/fixed): Pros: strong sun/rain protection, motorized options; Cons: wind vulnerability unless engineered; Cost: $600–$6,000+ installed; Lifespan: 7–15 yrs (fabric & hardware vary); Maintenance: periodic fabric cleaning, motor/service; Complexity: low‑med (DIY basic, pro for large/motorized); Best use: sunny patios needing strong UV/rain cover; good for mid‑climates. - Pergolas (open/louvered): Pros: durable structure, aesthetic, adaptable with covers; Cons: open roof unless louvered/infills added; Cost: $2,100–$10,000+ (installed); Lifespan: 10–40 yrs (material dependent); Maintenance: staining/painting, fastener checks; Complexity: med‑high (pro recommended for larger). Best use: design focal point, partial shade, integrates vines/curtains. - Shade sails: Pros: low profile, modern look, good for irregular spaces; Cons: requires engineered anchors, wind lift risk; Cost: $200–$2,500+ (DIY to pro); Lifespan: 8–12 yrs for HDPE; Maintenance: tension checks, seasonal removal in extreme weather; Complexity: med (anchor engineering needed); Best use: sunny, open areas with multiple anchor points. - Patio umbrellas: Pros: low cost, portable, immediate coverage; Cons: limited coverage, wind vulnerable; Cost: $50–$1,000+ (quality frames & bases); Lifespan: 2–10 yrs; Maintenance: storage in winter, fabric cleaning; Complexity: low (DIY). Best use: small seating areas, renters, movable shade. - Outdoor curtains: Pros: low cost, privacy, aesthetic; Cons: limited rain protection, can billow in wind; Cost: $50–$500+ per panel set; Lifespan: 3–10 yrs (fabric dependent); Maintenance: regular cleaning, hardware checks; Complexity: low (DIY). Best use: privacy screens, wind blocking, pairing with pergolas. - Retractable screens: Pros: insect control, privacy, retractable for flexibility; Cons: cost for motorized and large openings; Cost: $800–$6,000+ per opening; Lifespan: 5–15 yrs; Maintenance: cassette cleaning, mesh replacement; Complexity: med‑high (pro or precise DIY); Best use: screened patios, insecty climates. - Trellises / living walls: Pros: natural shade, cooling, aesthetic & habitat benefits; Cons: plant maintenance, seasonal variation; Cost: $50–$2,000+ (DIY to modular systems); Lifespan: years for structure, ongoing for plants; Maintenance: watering, pruning; Complexity: low‑med (depends on system); Best use: privacy walls, cooling by evapotranspiration, temperate climates. - Sliding panels / baffles: Pros: adjustable privacy/solar control, modern look; Cons: track maintenance, potential for wind noise; Cost: $300–$3,500+; Lifespan: 10–30 yrs; Maintenance: tracks/fasteners; Complexity: med (often pro). Best use: patios needing adjustable screening and design continuity. - Canopies / pop‑ups: Pros: portable, cheap; Cons: short life in high wind/UV; Cost: $50–$800; Lifespan: 1–5 yrs; Maintenance: fabric care; Complexity: low (DIY). Best use: temporary events, renters. - Hard roofs (patio covers): Pros: best weather protection (rain/snow), durable; Cons: highest cost, may trigger permits; Cost: $4,000–$30,000+; Lifespan: 20–50+ yrs; Maintenance: roofing upkeep; Complexity: high (pro/permits required). Best use: year‑round use, wet/snow climates. - Misters & outdoor fans: Pros: immediate cooling without structural change; Cons: no privacy or rain protection, maintenance/water use; Cost: $100–$2,000+ for systems; Lifespan: 3–10 yrs; Maintenance: filter/nozzle cleaning, winterization; Complexity: low‑med (DIY kits or pro). Best use: hot, dry climates to lower perceived temperature. - Decor‑based (trees, planters): Pros: natural, long‑term shade and property value; Cons: slow to establish, root/site impacts; Cost: $50–$1,000+; Lifespan: decades (trees) with ongoing care; Maintenance: pruning, irrigation; Complexity: low (planting) but horticultural planning required; Best use: long‑term solutions, ecological benefits.
Climate and site-specific guidance (sun, wind, rain, snow, coastal)
Guidance by condition: - High sun/UV: Use UV‑rated fabrics (solution‑dyed acrylics or HDPE) and structures with overhangs (awnings, hard roofs, pergolas with covers). Prioritize fabrics with UV testing and routine cleaning. - High wind: Avoid large unsupported sails and lightweight pop‑ups. Use engineered anchors, choose wind‑rated awnings or fixed hard covers, or remove/secure temporary items. Local codes reference ASCE 7 for wind loads—engineer attachments in high‑wind zones. - Heavy rain: Prefer solid roofs (hard roofs, awnings with good pitch, sealed canopies) or designs that shed water. Shade sails typically shed but can pool if not properly angled. - Snow loads: Use structural hard roofs or heavy timber pergolas designed for snow loads; remove flexible fabric covers seasonally in snow regions. Building codes require snow load design per local code. - Coastal exposure: Use corrosion‑resistant hardware (316 stainless, hot‑dipped anchors), marine‑grade fabrics, consider fewer moving parts, and increase inspection frequency for salt damage. - Small/irregular sites: Shade sails, umbrellas, retractable screens or small pergolas adapt best. Consider proximity to trees/power lines when planning anchors and permits.
DIY and inexpensive options: which ones are best, basic steps and materials lists
Best inexpensive/DIY choices: shade sails, pergola (basic), patio umbrella setups, outdoor curtains, trellis with vines, pop‑up canopies, simple misting kits. Example DIY: Basic shade sail (small seating area) - Materials: UV‑rated HDPE shade cloth sized to area, 3–4 anchor posts (4×4 or 6×6 treated posts with concrete footings) or house anchor points, stainless steel pad eyes/eye bolts, turnbuckles, shackles, webbing or wire rope, corner patches (if sewing), measuring tape, level, concrete mix, post hardware. - Steps (summary): 1) Measure area and plan sail geometry for drainage. 2) Place anchors: locate posts or reinforced house anchor points at correct distances and heights. 3) Set posts in concrete (allow cure). 4) Attach hardware (pad eyes, turnbuckles). 5) Fit sail, tension gradually (diagonal tension), ensure 12–18% stretch allowance and slope for drainage. 6) Inspect after storms and retension seasonally. Example DIY: Simple pergola (small, basic timber) - Materials: 4 treated 6×6 posts, concrete, 2×8 or 2×10 beams, 2×6 rafters/slats, galvanized/SS hardware, post anchors, paint/stain. - Steps: 1) Lay out and set posts in concrete with proper spacing. 2) Cut and attach beams with notches/fasteners. 3) Install rafters and cross slats. 4) Finish with stain or paint. Follow local anchor and footing guidance. Low‑cost tips: buy HDPE cloth by the yard for DIY sails, repurpose heavy patio umbrellas with weighted bases, use exterior fabric remnants to sew curtains, and install removable solutions for seasonal storms.
Decision criteria and simple decision flow to match needs to solutions
Key decision criteria: primary goal (shade, privacy, rain protection, aesthetics), budget, permanence, wind/snow exposure, permitted/HOA limits, DIY ability, desired coverage area. Simple decision flow (short): 1) Primary need = full weather protection (rain/snow)? → Choose hard roof or awning. 2) Primary need = shade + design flexibility? → Pergola (with covers) or shade sails. 3) Primary need = temporary/portable? → Umbrella or pop‑up canopy. 4) Primary need = insect control + visibility? → Retractable screens. 5) Primary need = privacy + green aesthetic? → Trellis/living wall or outdoor curtains. 6) Site constraints: high wind/coastal? → Favor engineered fixed structures, corrosion‑resistant hardware, or removable seasonal solutions. Use budget and permit constraints to narrow; for multi‑needs, combine solutions (e.g., pergola + retractable screens + misters).
Next Articles
Garden Patio Alternatives: Options for Drainage, Comfort, DIY
Compare garden patio alternatives for drainage, comfort, and low maintenance with DIY layout steps and a decision shortl
Inexpensive Patio Alternatives: Cheap Surface and Shade Fixes
Budget patio makeover ideas: cheap surfaces, shade and weather fixes, DIY vs hiring tips, costs, and installs for any ya
Backyard Patio Alternatives: Best Options by Budget and Use
Compare backyard patio alternatives by budget and use, with site prep, drainage, costs, and DIY vs pro install tips.