The best patio layout is the one that matches how you actually use your backyard, not the one that looks best in a magazine. For most homeowners, that means separating your dining zone from your lounge zone by at least a few feet, keeping a clear 36-to-48-inch path from your back door to every sitting area, orienting your main seating away from afternoon glare, and putting the grill where smoke doesn't blow into people's faces. Get those four things right and almost any layout works. Everything else is refinement.
Best Patio Layout: Plans, Zoning, and Spacing for Any Yard

Phoebe Foster
9 Jun 2026
What 'best' actually means for your patio
Before you buy a single paver or sketch a single zone, you need to be honest about how your household actually uses outdoor space. A couple who mostly sits with a bottle of wine needs a completely different layout than a family that grills three nights a week and has kids running in and out. Neither is wrong, they just point to very different setups.
Oklahoma State University Extension frames this as 'programming' your outdoor rooms: think through arrival space, entertaining and living space, dining space, play space, utilitarian/storage space, and garden space. You probably don't need all of them. Pick the two or three that matter most to your family and let those drive every decision that follows.
Your constraints matter just as much as your wish list. Write down your answers to these before you open any design app or call a contractor:
- How large is the usable patio footprint (measure in feet, length x width)?
- Where are the back doors and windows, and which directions do they face?
- Is the yard flat, sloped, or broken into levels?
- What direction is west (afternoon sun hits hard from that side)?
- Are there setback rules from your local municipality or HOA?
- Do you have kids, dogs, elderly family, or anyone with mobility needs?
- What's your realistic budget: under $2,000, $2,000–$10,000, or more?
Climate is the other big constraint most guides skip over too fast. In Texas or Arizona, shade isn't a luxury, it's mandatory or the patio goes unused from May through September. In the upper Midwest, you want a layout that captures afternoon sun in spring and fall and can handle a patio heater in the shoulder seasons. Humid coastal climates need airflow baked into the layout from the start. Know your climate category before you commit to any layout.
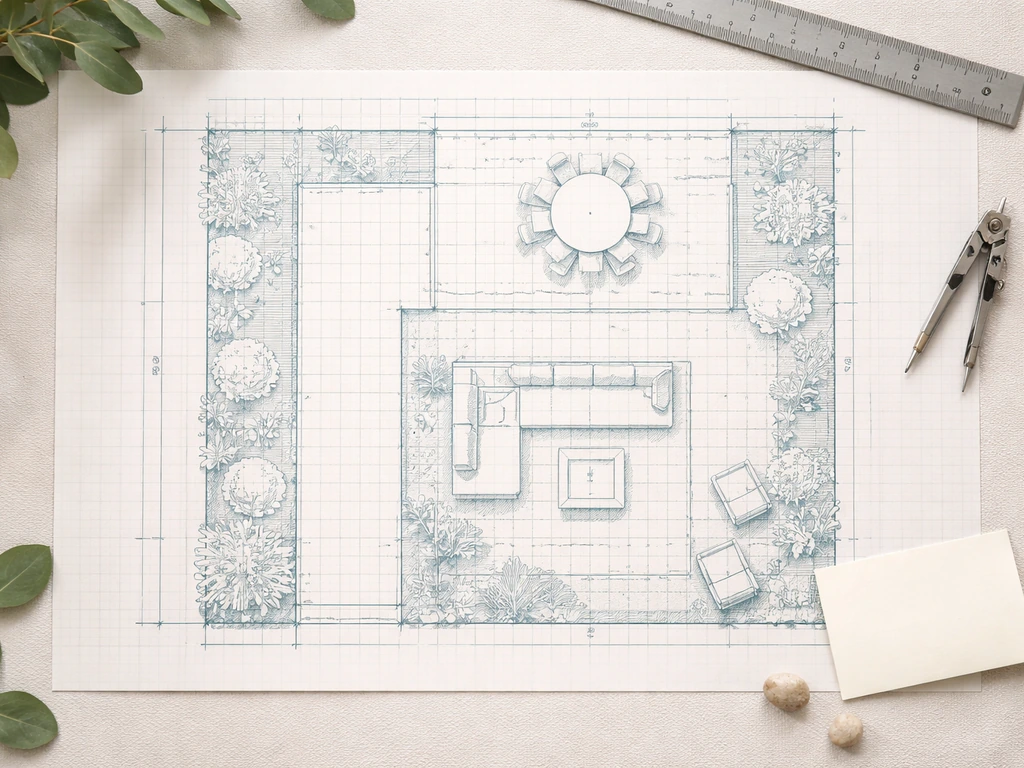
Measure, sketch, and map your zones before anything else
Get a tape measure and spend 20 minutes outside before you do anything else. Measure the full length and width of your usable outdoor area. Mark the location of every door, window, gas line, hose bib, electrical outlet, and downspout on a simple hand-drawn grid. Use 1 square = 1 foot as your scale. This sketch will save you money and arguments with contractors later.
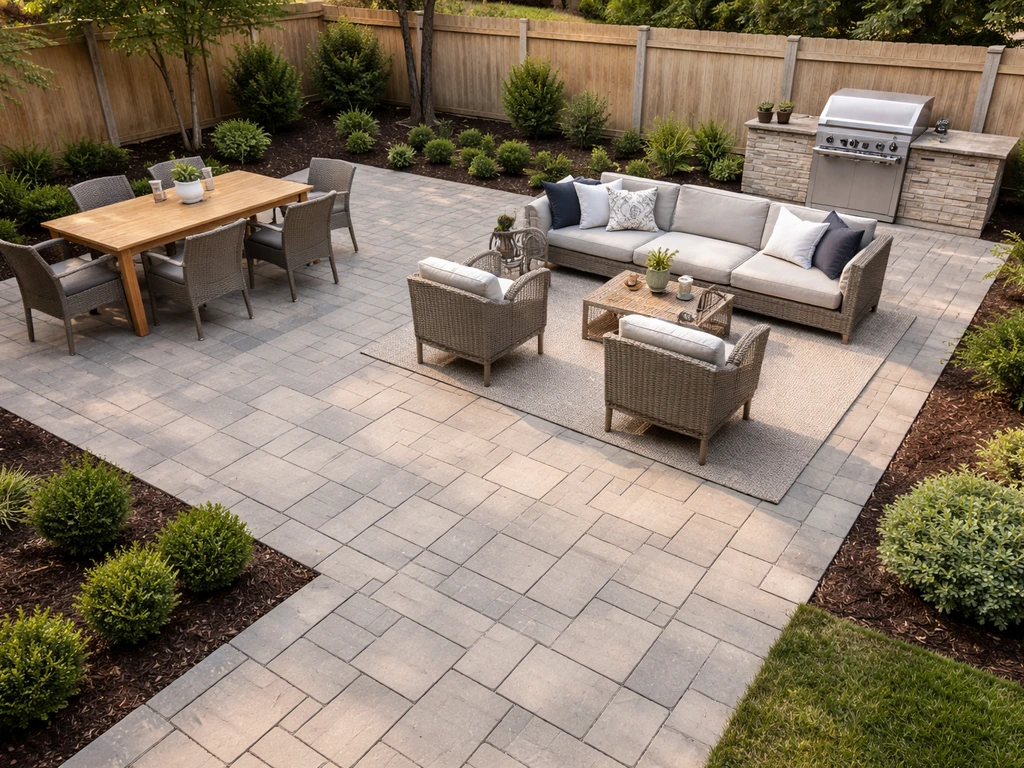
Once you have the footprint on paper, block in your zones loosely. Top patio designs follow the same logic: plan your zones first, then refine based on climate, comfort, and traffic flow. Most patios need at least two zones: a dining area and a lounge or conversation area. Larger patios can add a cooking zone, a fire feature zone, or a play zone. Sketch each zone as a rough rectangle, then check that your main circulation paths between them are at least 36 inches wide. If you have anyone in the household who uses a wheelchair, walker, or stroller regularly, bump that minimum to 48 inches for comfort.
Two clearances that trip people up: pulling a dining chair back from a table requires about 36 inches of clearance behind it for comfortable movement, and a functional conversation grouping (two chairs facing each other) needs at least 8 to 10 feet of clear space to avoid feeling like you're sitting in each other's laps. Measure your actual furniture before drawing zones, not after.
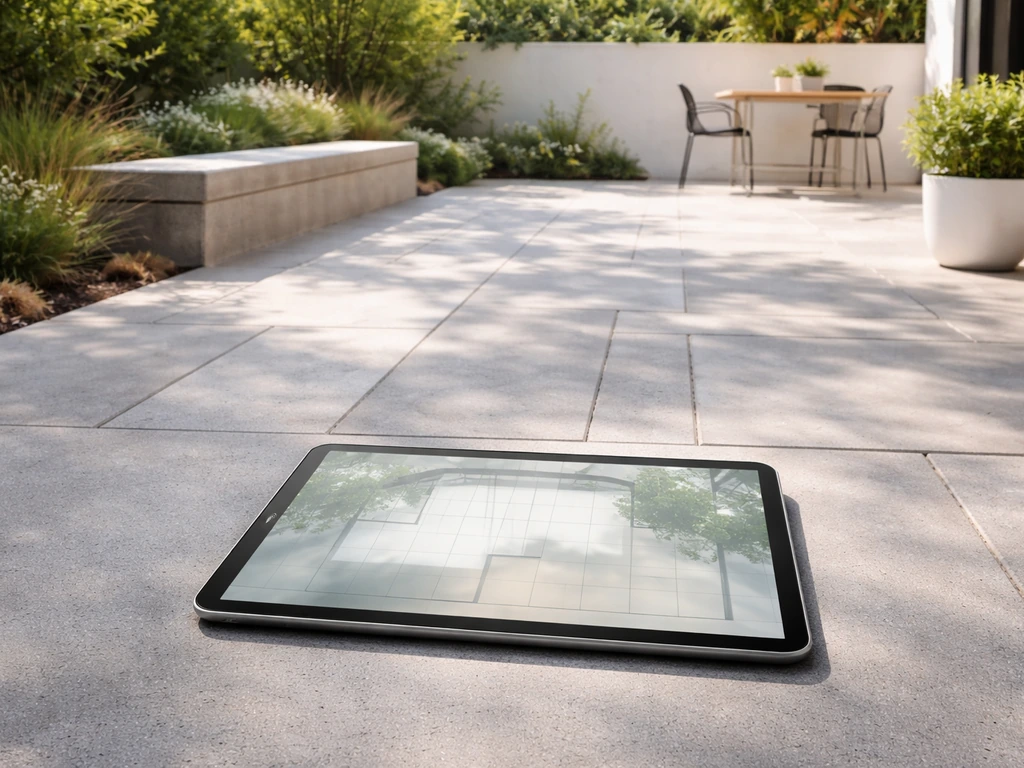
If you want to go digital, tools like patio design apps and AI-based layout planners can speed up the sketching phase considerably. But even those tools work better when you start with accurate hand measurements. Garbage in, garbage out.
The main layout options and when each one works best
Most residential patios fall into four shape categories. Here's how to read each one and decide if it fits your situation.
Small or square patios (under 200 sq ft)
A small patio forces you to prioritize. Pick your single most-used activity (usually dining or lounging) and design around that one function. A bistro table for two with two chairs, a small container planter, and one overhead string-light fixture is a complete, functional layout for a 10x12 space. Trying to squeeze in a grill, a sectional, and a dining table in under 200 square feet creates a cluttered obstacle course. Instead, consider a small built-in bar ledge along a fence or wall to handle the grill function without eating floor space.
Rectangular patios (the most common)
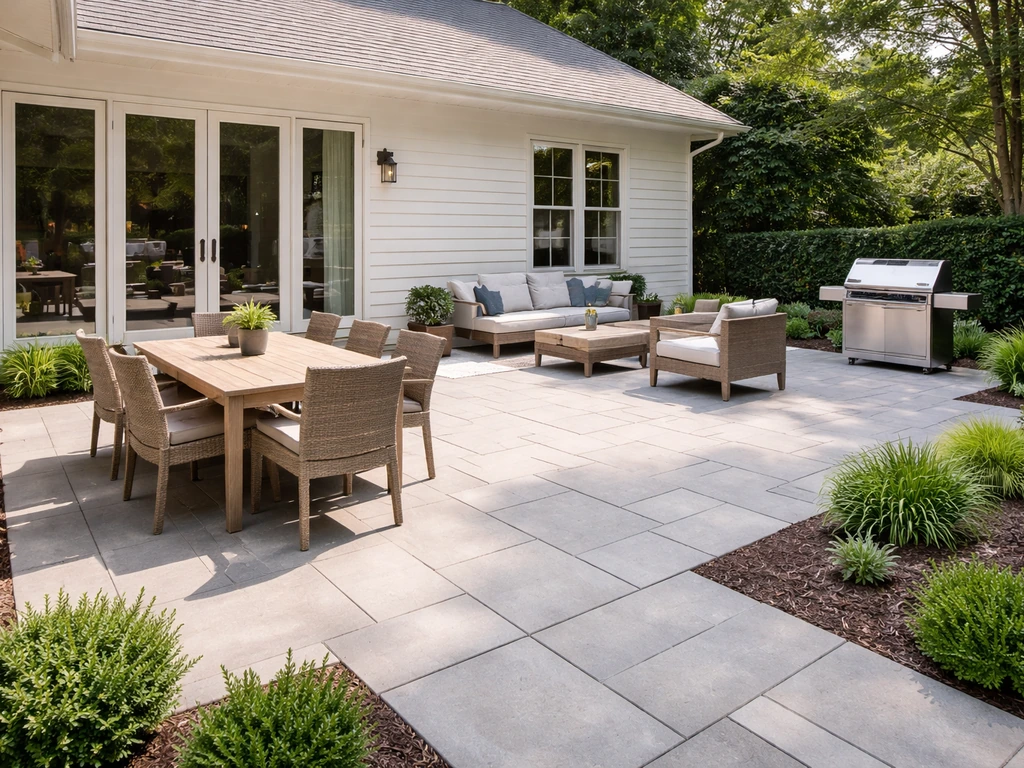
A rectangle is the easiest shape to zone. Place dining closest to the house (near the kitchen door), lounge seating in the middle or far end, and the grill off to one side with a natural traffic buffer between it and the seating. A 12x20 rectangular patio comfortably holds a 6-person dining set (roughly 9x9 footprint with chairs pulled out) and a small conversation cluster. A 14x24 gives you room to add a separate grill zone or a fire pit at the far end without crowding.
L-shaped patios
An L-shape is ideal when your house has two doors opening onto the patio, or when you want a natural separation between a lively entertaining zone and a quieter lounge corner. Put the short leg of the L near the kitchen door for dining and food prep, and use the long leg for seating or a fire feature. The inside corner of the L is a natural spot for a planter, a fire pit, or a bar cart that anchors both zones visually. L-shapes also work well on sloped lots because you can step the two legs down at different elevations.
Curved, irregular, and odd-shaped patios
Curved edges and irregular shapes come up more than people expect, especially when a patio wraps around a pool, follows a sloped grade, or works around an existing tree or garden bed. The zoning logic doesn't change: you still need distinct areas for dining, lounging, and cooking. The trick is to use furniture arrangement and rugs (for hard surfaces) to carve out visual 'rooms' within the irregular shape rather than fighting the edges. Curved conversation groupings with a round fire table at the center look intentional in these spaces and hide the awkward geometry well.
| Layout Shape | Best For | Main Limitation | Minimum Size to Work Well |
|---|---|---|---|
| Small/Square | Couples, limited space, single-use focus | Can't accommodate multiple activity zones | 100–150 sq ft |
| Rectangular | Families, multi-zone entertaining, most budgets | Can feel long and narrow if width is under 10 ft | 180–240 sq ft |
| L-Shaped | Two access doors, zone separation, sloped yards | Corners can feel dead without an anchor element | 250–350 sq ft |
| Curved/Irregular | Pool surrounds, garden integration, visual interest | Harder to DIY, furniture placement less intuitive | 200+ sq ft depending on shape |
Traffic flow, clearances, and sightlines: make it feel easy, not cramped

The number one complaint homeowners have about their patio after it's built is that it feels cramped. Almost every time, the cause is insufficient clearance around furniture combined with poor traffic routing. These are fixable before you build if you plan for them.
Start at your back door. The door landing itself needs at least 36 inches of clear, flat space (per IRC requirements for exterior door landings), and you need a clear path from that landing to every seating zone. For a primary circulation path that multiple people will use at once, 42 to 48 inches is much more comfortable than the 36-inch code minimum. If someone in your household uses a wheelchair or you want a fully accessible patio, 48 inches is the practical minimum for that main path.
Secondary paths between zones can be narrower, but keep them at 36 inches or more. A 28-inch gap between a dining chair (when pulled out) and a planter or wall feels fine to one person squeezing past but becomes a bottleneck during a party. Build in the clearance now, not later.
Sightlines matter more than most people realize. When you're seated in the lounge area, you should be able to see the back door, the grill area, and anyone entering the yard. This isn't just about aesthetics; it's about keeping an eye on kids, managing a grill from a seated position, and making the space feel open rather than blocked off. Position tall elements like privacy screens, pergola posts, and large planters at the edges of zones rather than between them.
If your patio includes steps connecting different levels, stairs must be at least 36 inches wide per IRC requirements to allow safe movement, and you'll want a landing at the top and bottom of any stair run that's also at least 36 inches deep. Plan these transitions into your layout sketch early because they eat more space than people expect.
Where to put dining vs. lounge based on sun, shade, wind, and views
This is where your compass and a few observations about your yard will save you from a big mistake. Spend a Saturday afternoon on your patio and note where the direct sun hits at noon, at 3pm, and at 5pm. The west side of any patio takes the hardest afternoon sun hit. In hot climates, that means any unshaded zone on the west side of the patio will be unusable in summer afternoons. In mild climates, a west-facing dining area can be beautiful in the late afternoon.
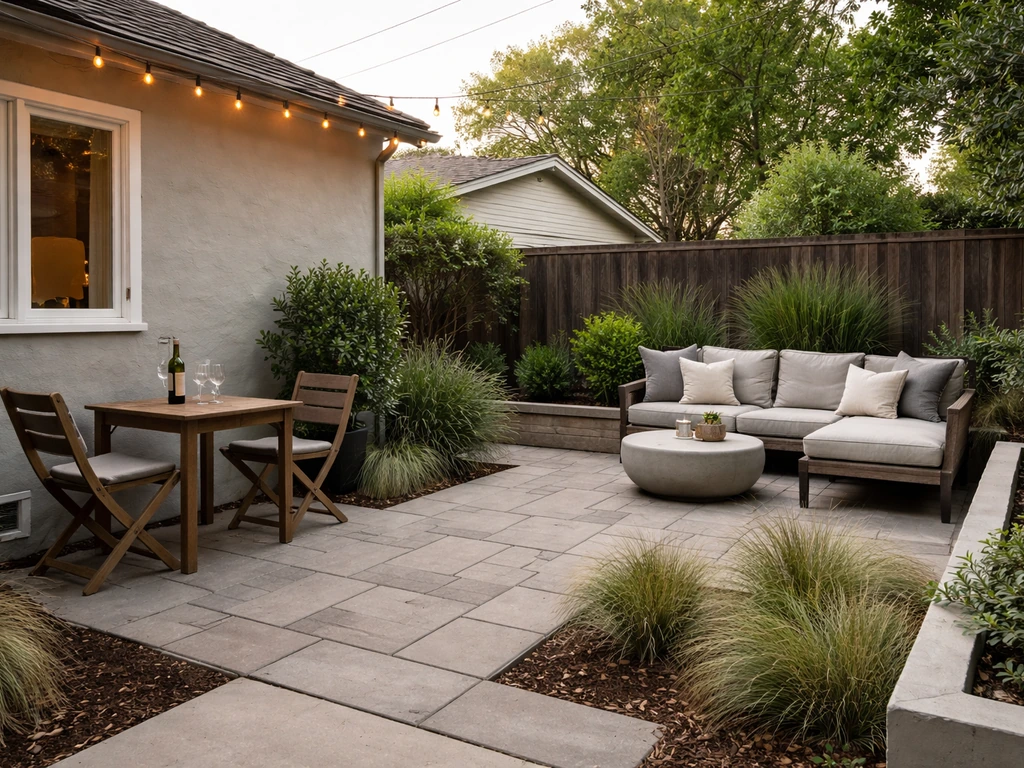
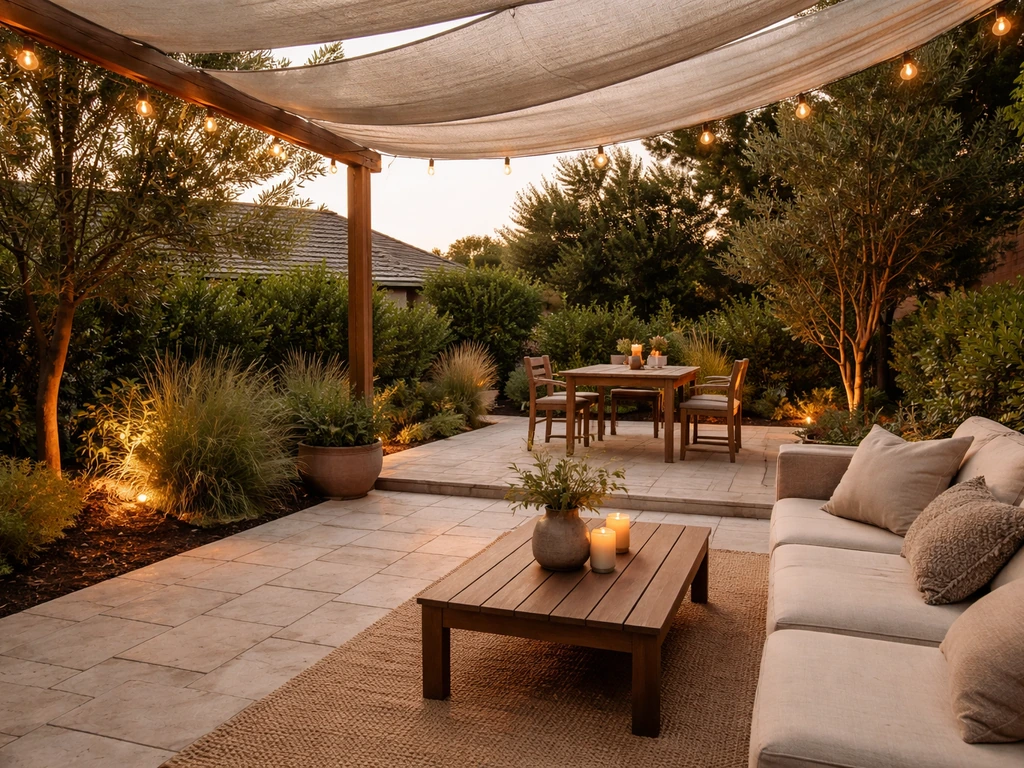
As a general rule, put your dining zone closest to the house (near the kitchen) and under or near whatever shade structure you have or plan to add. Dining under a pergola or umbrella is significantly more comfortable in summer than in full sun, and people sit at a dining table longer than they stand at a grill. Your lounge or conversation zone can handle more variability because people can adjust their seating angle.
Wind is the other comfort factor that's easy to observe but often ignored. If your yard funnels afternoon wind from a particular direction, think about where that puts smoke from the grill relative to your seating. Grill placement should put the prevailing wind at your back when you're standing at the grill so smoke blows away from you and the seating area. A privacy screen or dense planter on the windward side of the lounge zone makes a significant difference in comfort.
If your patio has a view worth preserving (a garden, a pool, a tree line, a distant landscape), orient the seating to face it. This sounds obvious, but it gets forgotten when people lay out patios against the house wall and end up with every chair looking at the house exterior. Angle conversation groupings 45 degrees away from the house when possible. It immediately makes the space feel more expansive.
For privacy, vertical elements like lattice panels, tall ornamental grasses, or a pergola with curtains are more effective per dollar than tall solid fences when used within the zone layout itself. A 6-foot privacy screen placed strategically at the corner of a lounge zone blocks neighbor sightlines without making the whole patio feel like a box.
Fitting in the grill, fire feature, pergola, lighting, fans, and flooring
Once your zones and circulation paths are mapped, these elements need to be integrated one at a time. Each has specific placement rules that affect how your layout works.
Grill placement
A freestanding grill needs a minimum of 3 feet of clearance on all sides from combustible structures. Manufacturer installation guides specify minimums as tight as 3 inches (76mm) from non-combustible construction at the back, but those are absolute minimums, not comfortable operating clearances. Built-in grill enclosures have their own ventilation clearance requirements. In practice, place the grill at least 10 feet from your home's siding or any overhead combustible surface, and always within your main cooking zone rather than stuck in a corner with no traffic path beside it.
Fire pit and fire features
A fire pit needs a conversation ring around it, typically a 10-to-12-foot diameter circle to accommodate seating at a comfortable distance from the flame. Place fire features at the far end of the patio from the house, ideally 10 feet or more from any structure or overhead element. Check your local code: many municipalities have specific setback requirements for open fire features.
Pergola or cover
A pergola or patio cover should be positioned over your primary use zone (usually dining or lounging), not as a freestanding element in the middle of nowhere. Its footprint determines your shade zone, so design it to cover the area where people will actually sit. In hot climates, the shade from a solid patio cover can meaningfully reduce heat load entering the home, which is a bonus beyond comfort.
Ceiling fans and misters
Outdoor ceiling fans must be mounted with blade tips at least 7 feet above the floor per standard safety clearance requirements. This means you need a pergola, covered patio, or porch roof of at least 8 to 9 feet in height to mount a fan comfortably. Fans should be positioned over seating zones, not over pathways. Misters attach to the perimeter of a pergola or shade structure and should be oriented to spray inward over the seating area, not toward the house siding or electrical outlets.
Lighting
Plan lighting in three layers: ambient (overhead string lights or a ceiling fan with a light kit), task (focused light over the grill and dining table), and accent (path lights along circulation routes and uplights in planters). Decide where your lighting runs during the layout phase, before flooring is installed. Running conduit or low-voltage wiring under pavers after the fact is expensive and annoying.
Flooring and material direction
Your flooring choice and the direction it runs affect how the space feels. Pavers or planks running lengthwise make a narrow patio feel longer; running them across the short axis makes the patio feel wider. Use a transition material (a border row of a contrasting paver, a change in deck board direction) to visually separate zones without building a physical barrier. On sloped lots, make sure your patio surface is graded to drain away from the house: 1/8 inch per foot is the standard minimum slope for drainage.
Budget, DIY vs. hiring, and what to decide first
Layout planning itself costs nothing if you do it yourself with a tape measure, graph paper, and honest thinking. If you want a head start, you can use free AI patio design tools to explore layouts before you buy materials. The decisions you make during layout planning are the most impactful for your budget because they determine the size of the surface you need to build, whether you need electrical or gas runs, whether you need a structural pergola versus a freestanding one, and how much material you'll need. Get the layout right before you spend a dollar on materials or contractors.
Here's a practical sequence for deciding what to tackle yourself versus hire out:
- Measure and sketch the layout yourself. This is always a DIY task and takes less than an hour.
- Determine if your project requires permits. Patios under a certain square footage (varies by municipality, often under 200 sq ft) typically don't need a permit. Adding a pergola, electrical, or gas usually does.
- Assess your surface and grade. A flat, level yard with no drainage issues is DIY-friendly for paver or gravel patios. Slopes, drainage problems, or existing concrete that needs breaking out usually warrant hiring a pro.
- Decide on utilities first. Gas lines for an outdoor grill or fire table, and electrical for fans and lighting, need to be roughed in before your flooring is installed. Hire licensed trades for this work.
- Build or buy your pergola or cover. Pre-engineered freestanding pergola kits are a reasonable DIY project for most homeowners. Attached pergolas that connect to the house structure typically require a permit and benefit from professional installation.
- Install flooring and hardscape. Gravel, decomposed granite, and simple paver patios are beginner-friendly DIY projects. Large-format porcelain tile, natural stone, and stamped concrete are better left to professionals.
- Furnish and finish. Furniture arrangement, string lights, planters, and decor are always DIY.
Budget reality check: a basic DIY paver patio runs roughly $5 to $15 per square foot in materials depending on your region and paver choice. A professionally installed paver patio runs $15 to $35 per square foot installed. A simple freestanding pergola kit costs $800 to $3,000 and a weekend to install. A custom-built attached pergola from a contractor typically starts around $4,000 to $8,000. Plan your layout first, then use those zone dimensions to calculate real material quantities and get accurate quotes.
If you're hiring a contractor, bring your sketch to the first conversation. Ask them specifically about drainage, footing requirements for any structure, permit requirements in your municipality, and whether your planned grill clearances meet local code. A contractor who can't answer those questions clearly isn't the right one for the job.
Start with the layout and zone plan. If you want the most effortless outdoor living, look for the best patio home communities that build these zoning and comfort considerations into the layout from day one. Everything else, from material selection to cover type to the fan model you pick, flows from that foundation. Get it right on paper first and the rest of the project gets a lot easier.
FAQ
How do I decide where to put the grill if my patio is tight and there is limited clearance beside seating?
Choose a grill position that still keeps a real traffic buffer next to it, not just a small gap. If you cannot maintain at least a usable 36-inch circulation path around dining chairs and between zones, redesign the seating so the grill sits at the edge of a cooking zone rather than in line with the main walkway.
What’s the simplest way to prevent the patio from feeling cramped without making it bigger?
Reduce how much furniture extends into the main path. Measure chair “pull-out” space from the table before you commit, then ensure the main door-to-seating route stays at 42 to 48 inches when multiple people will pass at once, while secondary gaps remain at 36 inches or more.
Can I put the dining and lounge areas in the same zone instead of separating them?
Yes, if your household mainly entertains in one style, but you need a clear functional boundary. Use a change in flooring direction or a border row to visually split the area, and keep conversation seating angled so diners are not blocked when people move between chairs.
What should I do if my patio has only one usable door path from the back of the house?
Design the circulation as a single spine route from the door landing to every sitting area. Avoid forcing people to weave between chairs, instead route secondary paths between zone edges, and place tall elements at zone boundaries so sightlines from the lounge to the entry remain open.
How do I handle accessibility if someone in my home uses a wheelchair or walker but the patio is not wide enough everywhere?
Plan one fully accessible main path, usually from the door landing to the dining seat area, lounge seating, and at least one route to the cooking zone. Keep that primary route at 48 inches, and treat narrower areas as secondary only, so mobility movement is predictable.
Do I need different clearance rules for built-in grill enclosures compared with freestanding grills?
Yes. Built-in enclosures often require specific ventilation and spacing that can be different from generic grill-clearance guidance. Confirm the manufacturer’s installation clearances and also make sure the enclosure sits within the cooking zone so you do not create a pinch point beside the seating.
What’s the best way to plan for wind and smoke if prevailing wind changes throughout the day?
Observe wind direction at the times you actually grill, not only in the morning. Then place the grill so the wind is from your back when you stand at the grill, and use a windward privacy screen or dense planting near the lounge edge rather than between the grill and seating.
How should I adjust my patio layout if it’s sloped or has a noticeable grade change?
Keep the zoning logic the same, but treat surfaces and steps as part of the layout, not an afterthought. Grade the patio to drain away from the house (about 1/8 inch per foot minimum), and if you use steps between levels, plan proper landings so paths remain continuous and safe.
Should I center my seating on the main view, or is it better to angle it?
If you have a valuable view, align at least part of the seating toward it, but consider angling conversation groupings about 45 degrees away from the house when possible. This often improves openness and makes the patio feel larger while still preserving what you can see.
What’s the best starting point for lighting so I do not regret it later?
Decide the lighting “runs” during the layout stage, especially the path lights along circulation routes and the task lighting over dining and the grill. Also plan for control placement, such as a convenient switch near the door landing, because retrofitting wiring under pavers is usually expensive.
How do I pick between running pavers lengthwise versus across the short axis?
Use orientation to shape the perceived dimensions. If the patio feels narrow, run material across the short axis or add a contrasting border row to widen the visual footprint of the main lounge and dining zones.
When should I check local permits, and what items commonly trigger permit requirements?
Check early, before finalizing the layout, because permits can be required for structures like pergolas attached to the house, fire features with setbacks, electrical for lighting/fans, and sometimes for gas lines. Bring your zone sketch to your first contractor or permitting consult so they can confirm what you plan is code compliant.
Next Articles
Best AI Patio Design Free Tools to Plan Your Patio
Find the best free AI patio design tools and turn AI layouts into a buildable, budget-ready plan with next steps
Best Free Patio Design App and Free Software Guide
Top free patio design app and software picks, what free means, key limits, and steps to plan and build.
Best Patio Design Ideas: Layout, Materials, Shade, Lighting
Best patio design guide with layouts, material picks, shade, privacy and lighting plus a DIY vs hire checklist.