The top patio designs right now lean toward multi-zone layouts with a defined dining area, a separate lounge or fire pit spot, and clear paths between them. Whether you go with concrete pavers, stamped concrete, tile, natural stone, or gravel depends on your climate, budget, and how much upkeep you're willing to do long term. This guide walks through every decision you'll face, from picking a layout style and material to adding the finishing touches that make a patio feel like a real outdoor room. If you want to visualize ideas fast, a best free patio design app can help you plan layouts and materials before you commit.
Top Patio Designs: Layout, Materials, and Comfort Tips

Phoebe Foster
25 Jun 2026
Popular patio styles and layout ideas right now
Most patios fail not because of bad materials but because of a bad layout. The biggest mistake homeowners make is treating the patio as one undivided slab and then wondering why it feels awkward. The designs getting the most attention in 2026 all share the same idea: define distinct zones and give each one a purpose.
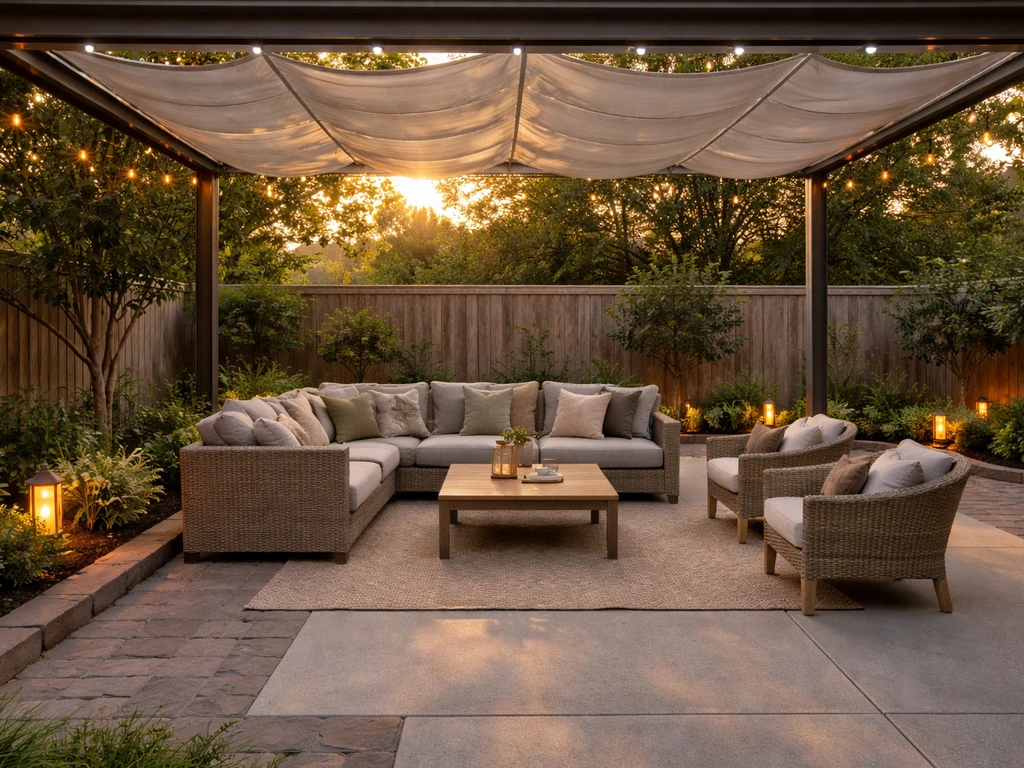
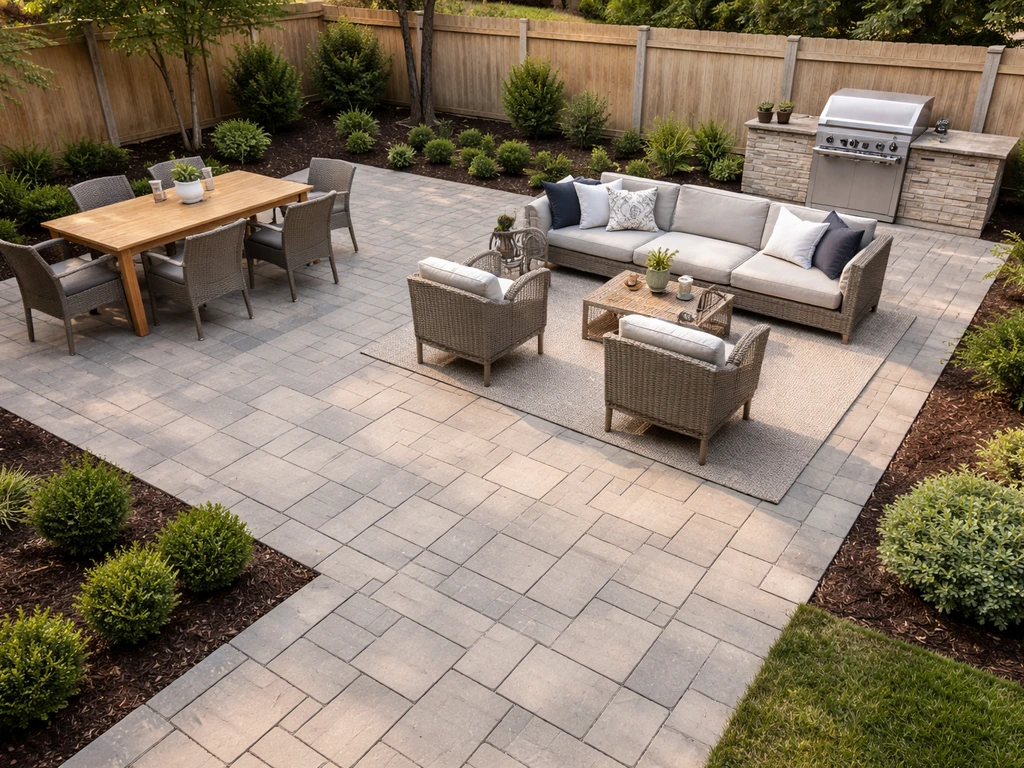
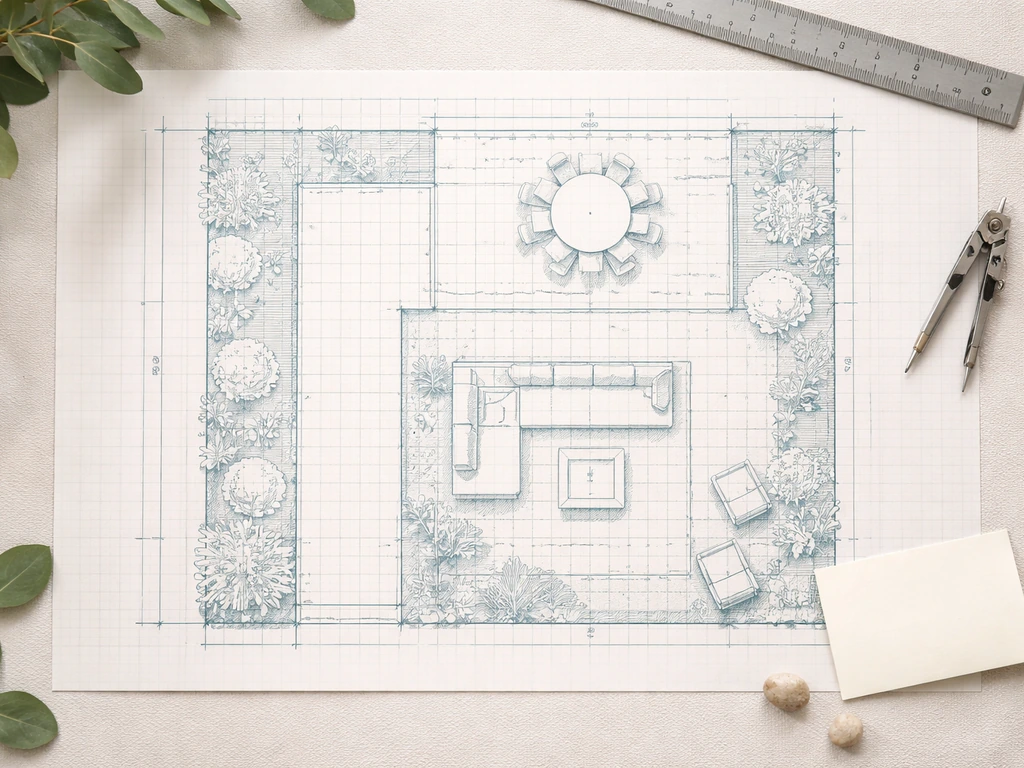
Multi-zone layouts
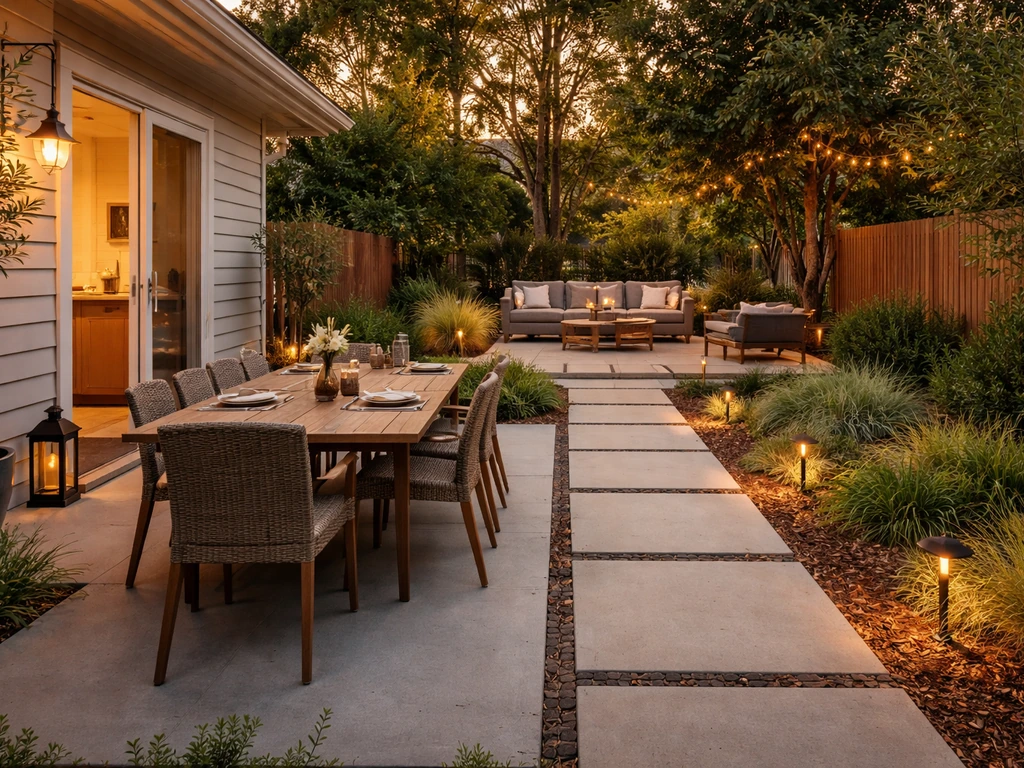
A two-zone layout works for most backyards. Put the dining area closest to the kitchen door for easy food traffic, then place a lounge or conversation area further out, anchored by a fire pit or low coffee table. If you have the space, a third zone for a grill station or outdoor kitchen keeps cooking smells and heat away from seating. Plan at least 3 feet of circulation space between furniture groupings so people can move without squeezing past chairs. For a family-sized dining set (seats 6), you'll want roughly a 12x14 foot zone just for that table plus chair pull-out clearance.
Design styles trending in 2026
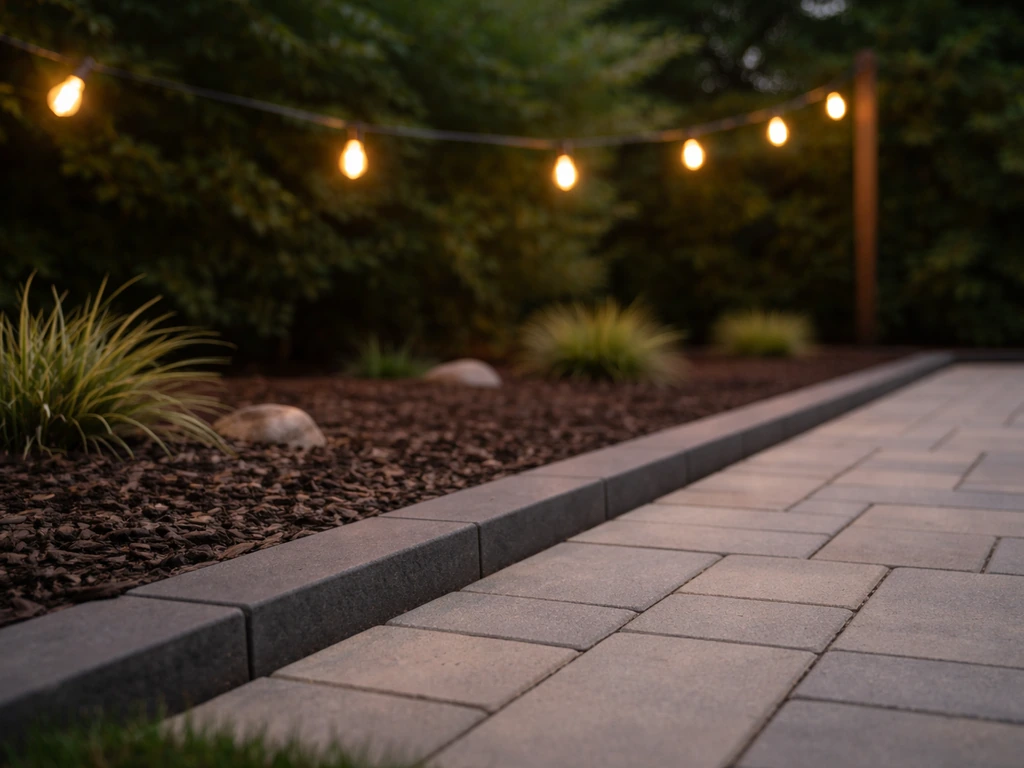
- Modern minimalist: clean-edged concrete or large-format porcelain tile, neutral tones, slim-profile furniture, and low landscape lighting along the perimeter
- Organic/natural: irregular flagstone or travertine pavers, curved edges, lush planting beds mixed into the layout, and wood or rattan furniture
- Transitional: rectangular paver grid in a warm gray or tan, a mix of wood and metal furniture, pergola overhead, and a blend of string lights and ground-level lighting
- Mediterranean/Tuscan: terracotta or tumbled travertine tile, built-in planters, a low stucco wall for privacy, and a bubbling water feature
- Cottage/farmhouse: brick pavers or reclaimed wood decking, lots of potted greenery, an arbor covered with climbing plants, and casual mismatched seating
Matching your layout to your backyard footprint
Small yards (under 300 sq ft of usable space) do best with one well-designed zone rather than a crowded two-zone attempt. A 10x12 or 12x16 patio with a bistro set and a small built-in bench feels intentional. Medium yards (300 to 600 sq ft) can support a two-zone design with a clear visual break like a change in material, a step down, or a planting strip.
Large yards give you room to work with, but without zone definition the patio still feels like a parking lot. Use an L-shape or a split-level design to create natural separation. If you're still working on the big picture, looking at overall patio layout principles before locking in a design is worth the extra time.
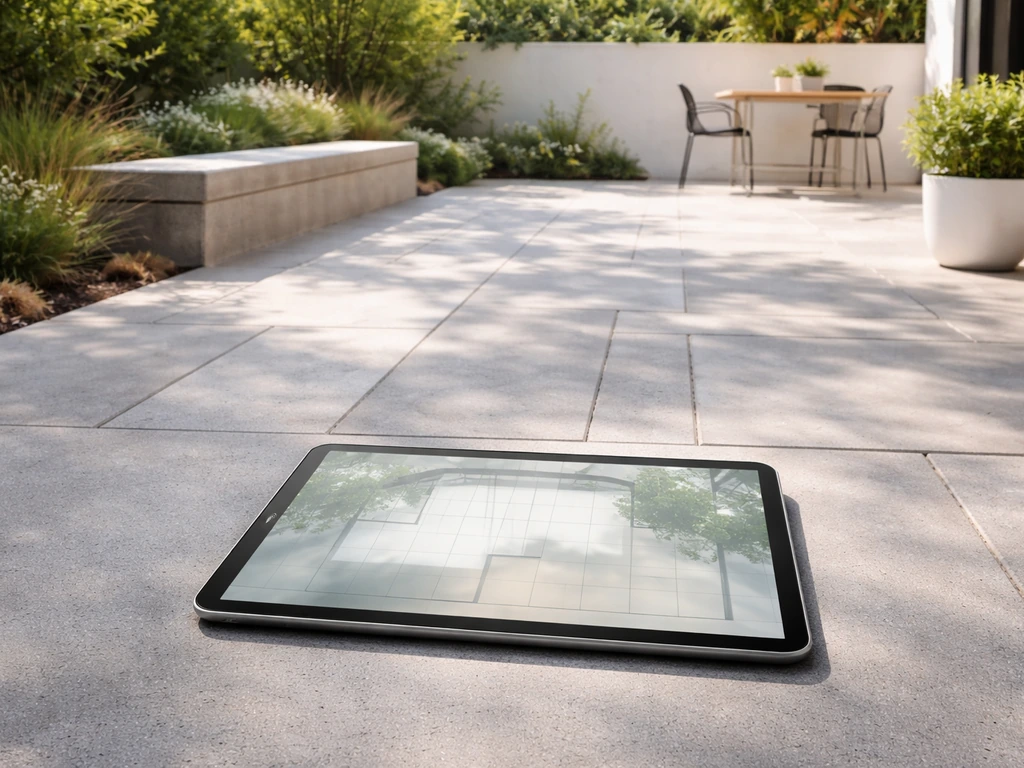
If you want a fast starting point, try a best AI patio design free tool to generate layout options you can refine with the zoning tips above.
Choosing the right patio material
Every material has real tradeoffs. Here's what the numbers and field experience actually tell you about each one.
| Material | Installed Cost (per sq ft) | Durability | Maintenance | Best Climate Fit | DIY Friendly? |
|---|---|---|---|---|---|
| Poured concrete | $6–$15 | High (with control joints) | Low–Medium | Most climates; can crack in freeze-thaw zones | Moderate (forms + finishing skill needed) |
| Stamped concrete | $10–$18 | High if sealed | Medium (reseal every 2–3 yrs) | Warmer climates preferred | Harder DIY — finishes are time-sensitive |
| Concrete pavers | $12–$25 | Very high; individual pieces replaceable | Medium (reseal every 3–5 yrs) | Excellent in freeze-thaw climates | Yes, with proper base prep |
| Natural stone pavers | $15–$30 | Excellent | Medium (sealing varies by stone) | Most climates; heavy frost can shift thin pieces | Difficult — weight and cutting |
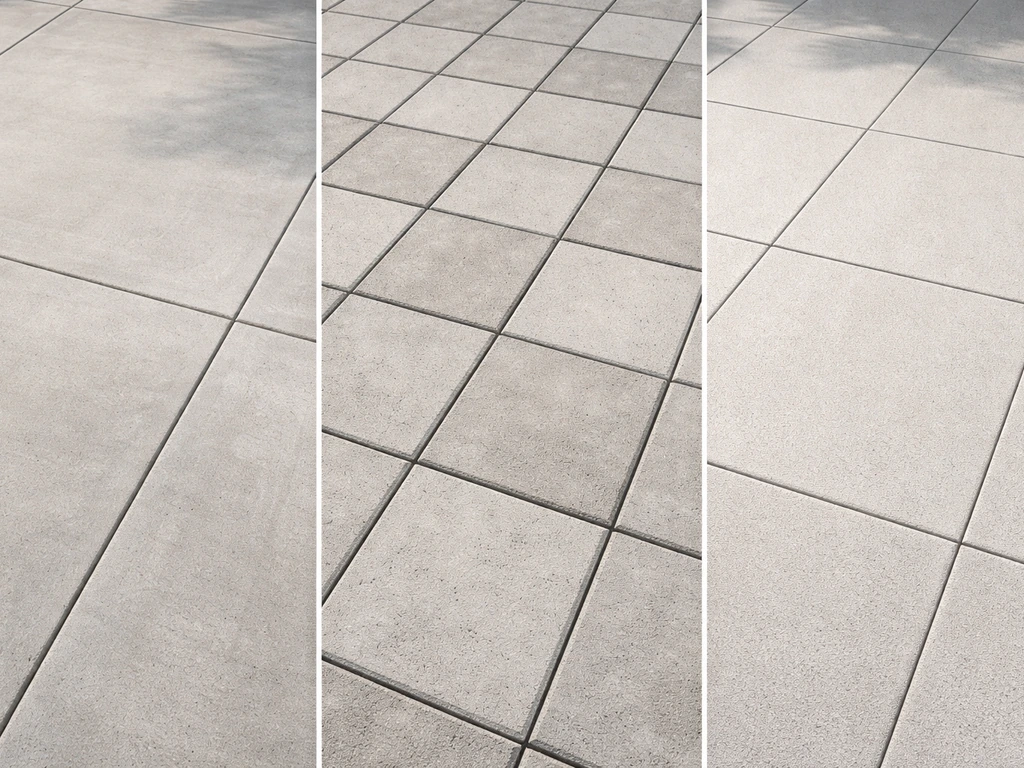
| Outdoor tile/porcelain | $10–$22 | High if properly installed | Low once set | Hot/dry climates; freeze-thaw can crack grout | Moderate — grouting skill required |
| Gravel/decomposed granite | $2–$8 | Moderate (shifts over time) | Low–Medium (raking, top-off) | All climates; drains well | Very DIY-friendly |
Concrete: affordable but it needs some attention
Plain poured concrete is still the most cost-effective option per square foot, typically running $6 to $10 installed for a basic slab and up to $15 or more with color or texture. The biggest thing most installers get wrong is slope and joints. The slab needs to pitch away from your house, at least 1/8 inch per running foot, and some building standards call for up to 1/4 inch per foot for the first 10 feet.
Without that, water pools near your foundation. Control joints are equally important: they create planned weak points so the inevitable shrinkage cracks happen where you want them, not randomly across the surface. In climates with hard winters, freeze-thaw cycles are the main durability threat, and a plain slab without air-entrained concrete can spall and crack within a few years.
Pavers: the premium option that earns its price
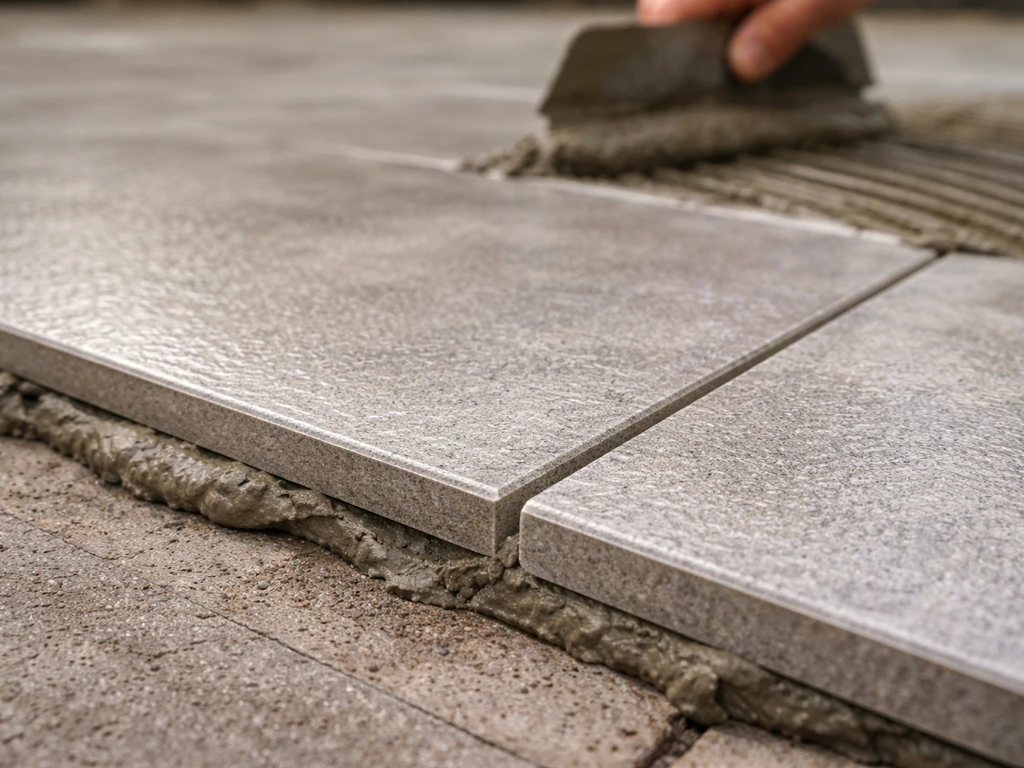
Concrete or natural stone pavers cost more upfront, $12 to $30 per square foot installed depending on the material, but they're genuinely easier to repair because you replace individual pieces instead of patching a slab. The installation stack matters a lot: compacted crushed-stone base, then a 1-inch bedding sand layer screeded flat, then the pavers, then jointing sand swept into the gaps.
Edge restraints around the perimeter are non-negotiable, without them the whole field slowly creeps outward and the bedding sand escapes. Keep an eye on your jointing sand; if it starts washing out and the joints look hollow, top it off before the pavers start rocking. Plan to reseal every 3 to 5 years. Wait at least 90 days after installation before sealing so the joint sand fully cures.
Don't over-apply sealer, it hazes the surface and traps moisture.
Tile: sharp look, but climate matters
Large-format porcelain tile gives the cleanest modern look and is nearly maintenance-free once set. The critical thing outdoors is slip resistance. Look for tiles with a dynamic coefficient of friction (DCOF) of at least 0.42 for wet surfaces, that's the ANSI A137.1 threshold for level wet floors, and outdoor use demands at least that much grip. In freeze-thaw climates, grout joints can crack and water infiltration can pop tiles off a concrete substrate within a season or two. If you're in the Midwest or Northeast, tile is a higher-risk choice unless you use a crack-isolation membrane and very low-absorption porcelain.
Gravel and decomposed granite: budget-friendly and surprisingly versatile
Gravel is often underestimated. At $2 to $8 per square foot, it drains beautifully, handles all climates, and is extremely DIY-friendly. The downsides are that it migrates, it's uncomfortable in bare feet, and it needs occasional raking and top-off. Decomposed granite compacts into a firmer surface and works well for a more put-together look. Both pair nicely with defined borders (steel edging, concrete curbing, or timber) to contain the material and keep the layout crisp.
The finishing details that make a patio feel complete
Materials set the foundation, but the details are what make a patio feel like it was designed rather than just poured. If you are exploring the best patio home communities, look for neighborhoods that design shared outdoor spaces with these finishing details in mind patio feel complete. These are the elements that consistently make the biggest difference.
Lighting
String lights are the most popular outdoor lighting choice for good reason: they're inexpensive, warm, and easy to run without an electrician. Hang them overhead between a pergola and your house, or between two posts at 8 to 10 feet high, and the patio instantly feels like a room at night. Layer in low-voltage path lights along the perimeter and step lights if you have grade changes. For dining zones, a wall-mounted sconce or a hanging pendant inside a pergola adds directed light right where you need it. Solar options have gotten genuinely good for low-stakes accent lighting, but anything you actually need to read by or cook under should be hardwired or plugged into a weatherproof outlet.
Privacy
Privacy is one of the top things people wish they had planned for. A 6-foot cedar fence is the classic solution, but it's not always the most attractive one. Consider a combination of a 4-foot wall or fence with tall ornamental grasses or bamboo in planters on top. Horizontal wood slat privacy screens have a clean modern look and can be attached to an existing fence frame. For immediate privacy without construction, a row of Italian cypress, arborvitae, or tall ornamental grasses in the ground creates a living wall that fills in within one to two growing seasons.
Pergolas and overhead structure
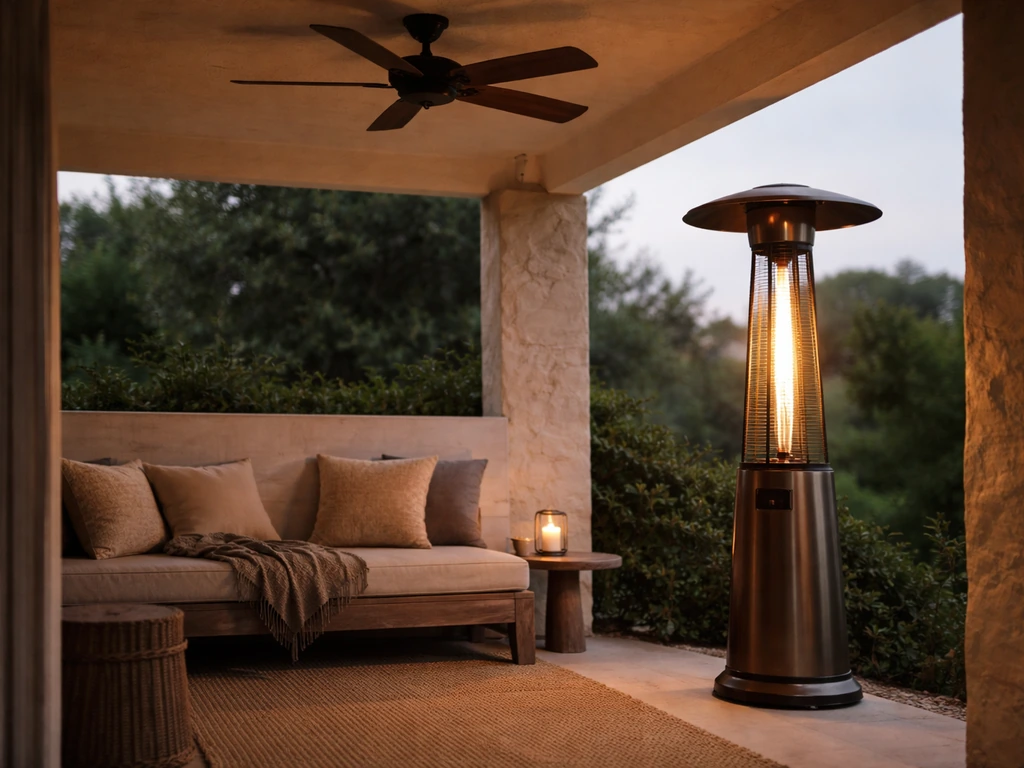
A pergola defines the space more than almost anything else you can add. Even an open-lattice pergola with no solid shade cover changes how the patio feels, it creates a ceiling, defines the zone, and gives you a place to hang lights, plants, and a ceiling fan. Louvered aluminum pergolas (brands like Sunesta, Azenco, or Struxure) are a step up: adjustable slats let you control sun and rain with a remote.
They run $15,000 to $40,000 or more installed, but they genuinely extend usable patio time year-round. A basic wood DIY pergola kit can run $2,000 to $6,000 in materials and a weekend of labor if you're handy. Attached pergolas need to be flashed properly into the house wall to prevent water intrusion, this is one area where hiring someone who has done it before is worth the cost.
Built-in features and decor
Built-in seating (like a concrete or stone bench along a retaining wall) eliminates the furniture clutter problem and lasts indefinitely. A built-in planter at the edge of a patio doubles as a border and a privacy element. Outdoor rugs define seating zones visually and add softness, just make sure the rug allows water to drain through so it doesn't trap moisture on your surface. Outdoor throw pillows, a side table, and a fire pit are relatively low-cost additions that consistently make patios feel lived-in and inviting. Neutral base tones in your hardscape give you the most flexibility to change out soft goods seasonally.
Making your patio comfortable in any climate
A beautiful patio that's unusable because it's too hot, too cold, or too exposed to wind is a wasted investment. Climate comfort features are just as important as the material choice, especially if you live somewhere with extreme summers or cold winters.
Shade strategies
The most effective shade is overhead shade that blocks the sun before it hits the surface and the people on it. A solid patio cover or louvered pergola is the gold standard. Shade sails are a cost-effective middle ground ($200 to $1,000 installed) and can cover odd-shaped areas that a standard pergola won't. Large market umbrellas (9-foot minimum for a dining table) work well but need a heavy base or an in-ground mount to handle wind. In hot climates like Texas or Arizona, the orientation of your shade matters: a cover open to the east but blocked from the west sun will be dramatically cooler by afternoon than a fully open space.
Fans and misters
An outdoor ceiling fan under a covered patio can make a 95-degree afternoon feel 10 to 15 degrees cooler through the wind-chill effect. Look for fans rated for damp or wet locations depending on how exposed the area is. Misting systems are popular in dry climates (Texas, Arizona, New Mexico) where they can drop ambient temperature by 20 to 30 degrees through evaporative cooling. In humid climates like the Gulf Coast or Southeast, misters add moisture you don't need and are generally not worth the investment. Low-pressure mist kits ($50 to $200) attach to your hose and work for light use, while high-pressure systems ($1,000 to $3,000 installed) produce a finer mist that evaporates before it soaks you.
Heaters and fire features
For shoulder-season use in cooler climates, patio heaters extend your outdoor time significantly. Freestanding propane heaters are the easiest option (no installation, just connect a tank), but wall-mounted or ceiling-mounted electric infrared heaters are cleaner, more efficient, and don't require refilling tanks. Propane heaters have specific clearance requirements from combustibles, always check the manufacturer's chart for your model, and follow NFPA guidance for placement.
For UH Series units, the installation manual lists model-specific “clearances to combustibles” distances by unit side and overhead/vent connection clearance requirements from combustibles.
Fire pits are a popular alternative for warmth and ambiance: a general planning baseline from NFPA guidance suggests keeping fire pits at least 10 feet from anything that can burn. Always check local ordinances before installing a fire pit or outdoor heater, as rules vary significantly by city and county.
Regional climate quick guide
| Climate/Region | Top Material Choice | Key Comfort Feature | Watch Out For |
|---|---|---|---|
| Hot/dry (Southwest, TX) | Travertine, concrete pavers, tile | Misting system, shade sail or pergola | Fading sealers, intense UV on wood |
| Humid/hot (SE, Gulf Coast) | Concrete pavers, porcelain tile | Ceiling fan, shade cover | Mold on wood, mister humidity buildup |
| Freeze-thaw (Midwest, NE) | Concrete pavers, stamped concrete with air entrainment | Propane heater, fire pit | Tile cracking, grout failure, slab spalling |
| Mild/temperate (Pacific NW, SE Coast) | Most options work well | Optional fan or heater | Algae/moss on pavers, drainage planning |
| High wind (Plains, mountain) | Heavy pavers, concrete | Windscreen, weighted pergola | Furniture displacement, umbrella damage |
Planning your budget and deciding what to DIY
Patio budgets vary wildly, but a realistic framework helps you avoid the most common mistake: underestimating total project cost by forgetting base prep, drainage, lighting, and furniture. Here's how to think about it.
Realistic cost ranges
A basic 12x16 concrete slab (192 sq ft) runs roughly $1,150 to $2,880 in material and labor at $6 to $15 per square foot. The same footprint in concrete pavers could run $2,300 to $4,800, and in natural stone $2,900 to $5,760. Those numbers don't include base excavation and prep (add $500 to $1,500 for most standard jobs), drainage improvements if needed, lighting, a pergola, or furniture. A complete patio project with a pergola, lighting, and modest furnishings in a mid-range material can easily reach $15,000 to $30,000 for an average-sized backyard. That's not meant to scare you, it's meant to help you prioritize. Start with the hardscape foundation and add the extras over time.
What you can realistically DIY
- Gravel or decomposed granite patio: excellent DIY project, just rent a compactor and get the base right
- Concrete paver installation on a small to medium patio: very doable with good base prep; renting a plate compactor and taking time with the screed is the key
- Pergola kit assembly: most prefab pergola kits are designed for two adults with basic carpentry skills
- String lights and low-voltage landscape lighting: straightforward and no electrician needed in most cases
- Outdoor furniture assembly, rug placement, and decor: obviously DIY
- Misting system (low-pressure, hose-connected): DIY-friendly
When to hire a contractor
- Poured concrete: finishing a slab correctly requires timing, tools, and experience; one bad pour is expensive to redo
- Stamped or stained concrete: even more time-sensitive than plain concrete — hire someone with a portfolio of similar work
- Any work touching your home's structure (attached pergola flashing, gas line for outdoor kitchen or fire pit)
- Drainage regrading: poor drainage is the most common long-term patio problem; a landscaper or grading contractor is worth the cost
- Hardwired lighting, GFCI outlets, or ceiling fan wiring: hire a licensed electrician
- Large-format tile on concrete substrate: grouting outdoors in the right conditions and with the right products takes experience
How to vet a patio contractor
- Ask for a portfolio of completed patio projects in your climate, not just photos from a brochure
- Confirm they're licensed and insured in your state — ask to see the certificate, not just a verbal confirmation
- Get at least three itemized bids so you can compare line items, not just totals
- Ask specifically how they handle slope and drainage — a contractor who doesn't immediately talk about water management is a red flag
- Check recent reviews on Google and Houzz, and ask for two or three references you can actually call
- Get the timeline in writing, including when materials will be on-site and what constitutes project completion
What to expect for maintenance and long-term upkeep
Every patio material needs some level of attention over time. Knowing what's coming helps you budget for it and catch problems before they become expensive repairs.
Concrete slabs
A well-poured concrete slab with proper control joints and slope is low maintenance for the first 5 to 10 years. You'll want to seal it every 2 to 3 years to protect against staining and surface wear. Hairline cracks in the control joint areas are normal and expected, that's the system working as intended. Larger random cracks, spalling in cold climates, or efflorescence (white mineral deposits) are signs of drainage or mix issues that need attention before they spread. Pressure washing works well for cleaning, but use reasonable pressure, you don't need the highest setting, which can etch the surface.
Pavers
Pavers are the easiest hardscape to repair, pull up a cracked or stained paver, replace it, and no one knows it happened. Annual maintenance is simple: sweep out debris, check jointing sand levels and top off where needed (low joint sand is how pavers start rocking), and inspect the edge restraints for any movement. Reseal every 3 to 5 years. Wait for a dry spell and make sure the surface is fully clean first.
One important caution: don't reseal too frequently. Layering sealer on top of uncured or incompletely dried previous sealer causes a milky haze that's hard to remove. Power washing helps prep for resealing but keep the pressure and angle controlled, aggressive washing at a steep angle can expose the aggregate and roughen the surface texture permanently.
Tile and natural stone
Porcelain tile is the lowest maintenance of the hard surfaces, it doesn't absorb stains, doesn't need sealing in most cases, and cleans easily. The maintenance weak point is the grout, especially outdoors. Grout can crack, stain, and grow mold. Inspect grout lines annually and regrout any cracked sections before water infiltrates and undermines the substrate. Natural stone like travertine or flagstone should be sealed on installation and resealed every 1 to 3 years depending on porosity and traffic. Limestone and travertine are particularly sensitive to acidic cleaners, so stick to pH-neutral products.
Wood and composite decking
Natural wood (cedar, redwood, ipe) needs to be sealed or stained every 1 to 2 years to prevent weathering, cracking, and rot. Ipe is denser and more durable but also more expensive and harder to work with. Composite decking (Trex, TimberTech, and similar) requires almost no annual maintenance beyond cleaning, doesn't need sealing or staining, and won't rot. It costs more upfront than pressure-treated wood but saves significantly on labor and product costs over a 10 to 15 year period. In hot sunny climates, check that your composite product is specifically rated for high UV exposure, as cheaper composite boards can fade and warp in intense direct sun.
Gravel and decomposed granite
Gravel needs the least technical skill to maintain but does need occasional attention. Rake it flat after heavy rain, top it off every year or two as material migrates or compacts, and pull weeds before they establish roots. A heavy-duty landscape fabric underneath (not the cheap thin stuff) dramatically reduces weed pressure without blocking drainage. Decomposed granite can harden with stabilizer added, which reduces migration but also means occasional re-applications when the surface starts to loosen.
Long-term maintenance at a glance
| Material | Annual Tasks | Every 2–5 Years | Expected Lifespan |
|---|---|---|---|
| Poured concrete | Clean, inspect cracks | Reseal every 2–3 years | 25–40+ years |
| Stamped concrete | Clean, inspect | Reseal every 2–3 years | 20–35 years |
| Concrete pavers | Top off joint sand, inspect edges | Reseal every 3–5 years | 30–50+ years |
| Natural stone pavers | Clean, inspect grout/joints | Reseal every 1–3 years | 30–50+ years |
| Porcelain tile | Clean, inspect grout | Regrout if cracked | 20–30 years (grout is the weak point) |
| Composite decking | Clean | Inspect fasteners | 25–30 years |
| Natural wood decking | Clean, inspect | Stain/seal every 1–2 years | 15–25 years with care |
| Gravel | Rake, weed | Top off material | Indefinite with upkeep |
Whatever design direction you choose, the best patio is one that fits how you actually live, your climate, your budget, your appetite for maintenance, and the way you want to use the space. Start with a clear layout that defines zones, pick a material that makes sense for your region, add the comfort features that match your worst weather days, and build in the finishing details over time.
A great way to narrow down your options is to look at the best patio design ideas that match your layout goals and lifestyle needs. A patio doesn't have to be built all at once. Getting the hardscape right first and layering in pergolas, lighting, and furnishings over a season or two is a smart way to spread cost without compromising the final result.
FAQ
What layout should I choose if I entertain a lot but don’t want a large patio?
Use a two-zone plan with a compact dining zone nearest the kitchen for fast food traffic, then a lounge zone that doubles as extra seating (for example, a fire pit with bench seating or an L-shaped sectional). Prioritize wide circulation paths (aim for about 3 feet) so guests can move without bottlenecks, and consider a built-in grill station only if cooking traffic will otherwise cross seating.
How do I decide between pavers and poured concrete for long-term costs?
If you expect freeze-thaw damage or you want easy localized repairs, pavers usually win because you can swap individual units. If your priority is lowest upfront cost and you are willing to maintain sealing and monitor for slab issues, poured concrete can be more economical. Either way, factor in base prep, correct slope, and drainage, because poor drainage creates the same expensive problems regardless of surface.
How much slope do I need, and how can I tell if my patio is pitched correctly?
Plan for at least 1/8 inch per running foot away from the house, and more for longer first-run distances in some standards. A practical check is to observe where water flows after rain, if you see pooling near the foundation or along one edge, the pitch is likely off. Fixing slope later usually means lifting or resurfacing, so this is worth verifying early during installation.
Do I need edge restraints for every patio material?
Yes, in practice you should plan for perimeter restraints whether you choose pavers, gravel, or tile, because without containment the surface slowly creeps and joints or bedding can fail. For pavers, edge restraints are especially important since joint sand can escape and units can rock. For gravel, sturdy edging is what keeps the border crisp and prevents migration.
What’s the biggest mistake people make with jointing sand on pavers?
Using too little or letting it wash out before you correct it. When joints become hollow, pavers start to move and you get rocking and uneven spots. After installation, recheck joint sand after wet weather and top off during a dry period, avoid over-saturating when you are completing the final sweep.
Is porcelain tile always a bad idea in cold climates?
It’s higher risk, not automatically impossible. If you live in a freeze-thaw region, mitigate by using a proper crack-isolation system, choosing very low-absorption porcelain, and ensuring the substrate is stable and drains correctly. If you skip these steps, grout cracking and water infiltration can lead to tile loss within a season or two.
How can I reduce slipperiness if I choose tile?
Beyond selecting a high DCOF rating, keep the patio’s drainage slope correct so water does not sit, and use cleaning products that do not leave a slick film. Also consider the layout, for example, keep walking routes slightly away from areas where water tends to collect, like the bottom of stairs or low corners.
What’s the best way to make a small patio feel bigger without adding square footage?
Limit to one primary zone, then use visual cues to reduce clutter, keep furniture legs and sight lines open where possible, and add a simple defined border. A bistro set with a compact bench can feel intentional on a 10x12 or 12x16 footprint, and using vertical privacy elements (screens, tall plantings) can frame the space without shrinking the usable area.
How should I handle patio drainage around a house without regrading everything?
First look for pooling patterns after rain, then address drainage with targeted improvements such as correcting downspout discharge locations, adding a drain line, or reworking a low spot. If you are planning new hardscape, base compaction and the bedding system matter, because water can track through weak layers. If drainage is already failing, delaying fixes often leads to repeated surface failures, especially with slabs and tile.
When should I seal pavers or concrete, and what should I avoid?
Wait at least 90 days before sealing concrete so moisture and curing products have fully released. For pavers, reseal every 3 to 5 years, but avoid stacking multiple coats too quickly, layering on top of not fully cured previous sealer can cause hazing that is difficult to remove. Use a dry spell and make sure the surface is thoroughly clean before applying any sealer.
Can I use outdoor rugs on any patio surface?
You can, but choose an outdoor rug that allows water to drain through. If the rug traps moisture, it can increase mold risk and accelerate surface issues, especially on tile grout or porous stone. Periodically lift and check for trapped dampness after heavy rain.
What are good shade choices if I get strong afternoon sun?
In hot climates, prioritize shading that blocks west sun, choose covers and pergola orientations that stay closed to the late-day sun rather than just the morning. Shade sails can cover awkward shapes, but you still need secure anchoring for wind. If you use umbrellas, choose a stable base or an in-ground mount so the setup holds during breezy conditions.
Do ceiling fans and misters work in humid climates?
Ceiling fans usually help in any climate, look for a damp or wet-rated unit when exposure is high. Misters generally perform poorly in humid areas like the Gulf Coast or Southeast because extra moisture is not needed and can make the space feel clammy, in dry climates mist systems can lower perceived temperature through evaporation.
How far should a fire pit be from structures and combustibles?
A conservative planning baseline is at least 10 feet from anything that can burn, and local rules may be stricter. Always check your city or county ordinances before installing a fire pit or outdoor heater, placement and fuel type can change compliance requirements.
What should I budget for besides the patio surface itself?
Add the hidden line items early, base excavation and prep, drainage corrections, lighting wiring and fixtures, any pergola installation, edging, and even furniture. A patio that seems affordable for just the slab or units can escalate once you include the foundation details, because base work and drainage are often what determines whether the surface will last.
How do I know whether my patio is worth fixing now or replacing?
If you’re seeing hairline cracks at control joints, that usually fits normal slab behavior, but random large cracking, spalling, or efflorescence suggests drainage or mix problems. For pavers, localized movement is a repair signal, if the base or restraints are failing broadly, you may need a more extensive rebase. If tile grout repeatedly cracks and water infiltration is recurring, you may need substrate or membrane corrections before replacing more surface sections.
Next Articles
Best Patio Layout: Plans, Zoning, and Spacing for Any Yard
Choose the best patio layout with zones, spacing, zoning rules, and DIY steps for dining, lounging, grilling
Best AI Patio Design Free Tools to Plan Your Patio
Find the best free AI patio design tools and turn AI layouts into a buildable, budget-ready plan with next steps
Best Free Patio Design App and Free Software Guide
Top free patio design app and software picks, what free means, key limits, and steps to plan and build.