The top patio for your home is the one that matches how you actually live outside, built with materials that hold up in your climate and laid out so you use it every single day rather than just on special occasions. That sounds obvious, but most patio mistakes come from copying a look without thinking through drainage, shade, seating clearance, or what the surface feels like underfoot in August or January. This guide walks you through every real decision, from picking your layout and flooring to adding shade and hiring the right person for the job.
The Top Patio Guide: Design, Materials, Upgrades and Next Steps

Phoebe Foster
11 Jun 2026
What does 'the top patio' actually mean for your home?

Before you touch a shovel or browse pavers, you need to define what premium means in your context. A top patio for a family in Houston that grills three times a week looks completely different from the top patio for someone in Chicago who hosts two dinner parties a year. Start by asking yourself a few direct questions: Is this space for dining, lounging, or both? How many people do you regularly need to seat? Do you need accessibility for older family members or anyone with mobility considerations? Is the location attached to the house, freestanding, or elevated?
Sizing matters more than most people think. Lowe's planning guidance is blunt about this: size the patio to actually support your intended use. A standard outdoor dining set for six needs roughly a 12x12-foot clear zone at minimum, and that's before you factor in clearance to walk around chairs. If you're thinking about high-top bar seating or a rooftop-style setup, those have different footprint requirements than a ground-level lounge. And if accessibility is a priority, keep in mind that accessible route standards call for running slopes no steeper than 1:20 (5%), with ramp sections not exceeding 1:12. Plan for that from the start rather than trying to retrofit it later.
Write down your must-haves versus nice-to-haves. Must-haves might include shade, a gas line for an outdoor kitchen, or level access from the back door. Nice-to-haves might be a built-in fire pit or a pergola with string lights. This list is what separates a patio that genuinely serves you from one that just photographs well.
Best materials and layouts for a high-end, comfortable patio
Layout should follow function. An L-shaped layout works well for combining a dining zone with a separate seating or lounge area, and it naturally anchors a corner of the yard. A simple rectangle or square is easiest to build, lowest cost, and the easiest to furnish well. Freeform or curved layouts look stunning in larger yards but add complexity and cost to both installation and future repairs.
For materials, you're mainly choosing between concrete pavers, natural stone, porcelain pavers, and composite decking if you're doing a raised or attached platform. Each one has real trade-offs in durability, maintenance, cost, and climate performance.
| Material | Durability | Slip Resistance (Wet) | Freeze/Thaw Performance | Maintenance | Rough Cost Installed (per sq ft) |
|---|---|---|---|---|---|
| Concrete Pavers | Very high, individual units replaceable | Good with textured finish | Good if properly installed | Seal every 2-3 years, joint sand upkeep | $10–$25 |
| Natural Stone (Bluestone, Travertine) | High, varies by stone type | Moderate; tumbled finishes help | Varies; some stones absorb water and crack | Sealing recommended; occasional re-jointing | $20–$40+ |
| Porcelain Pavers | Extremely hard surface, low absorption | High PTV/R ratings available; check the spec | Excellent when properly rated (ASTM C373/C1026) | Very low; no sealing needed | $18–$35 |
| Composite Decking | High; engineered for moisture/UV resistance | Good on textured surfaces | N/A for elevated decks | Low; rinse and occasional wash | $25–$45 installed |
Porcelain pavers have become a popular premium choice for good reason: they have extremely low water absorption (verified by ASTM C373 testing), which is what makes them resistant to freeze/thaw cracking in colder climates. The trade-off is that installation requires more care. You cannot run a plate compactor over them, and the slope needs to be set correctly before the pavers go down. Composite decking from brands like TimberTech, MoistureShield, and Deckorators is the go-to for raised or attached platforms, with engineered fade/stain resistance and manufacturer warranties that typically cover structural performance for 25+ years depending on the product line.
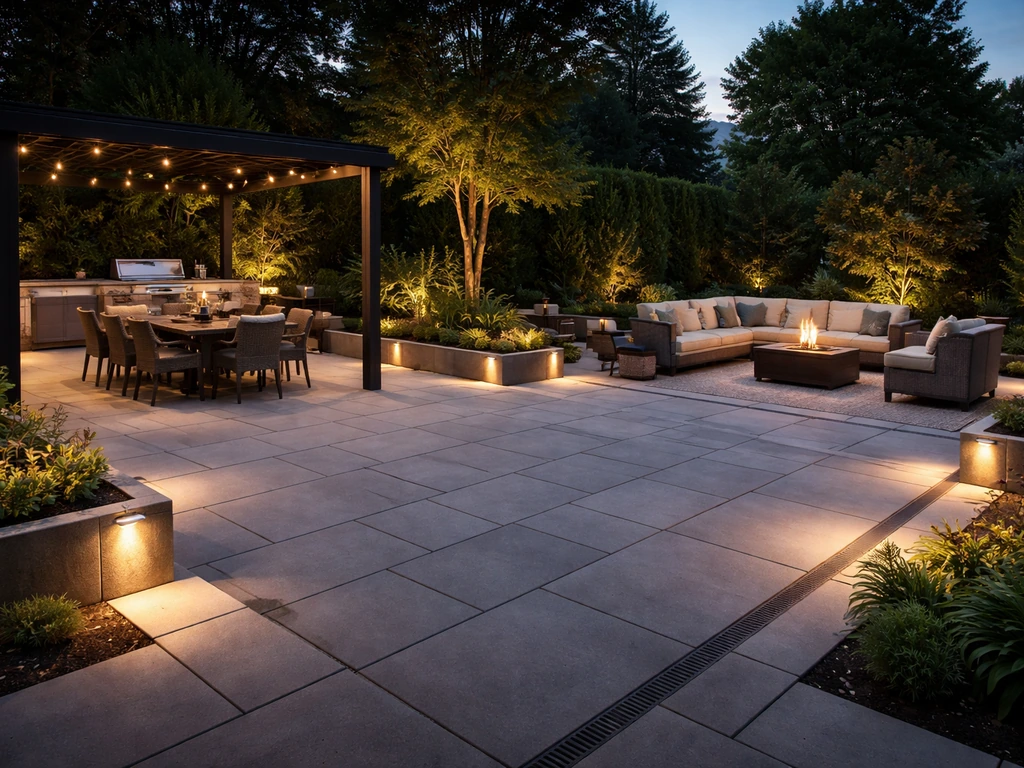
Weather-proofing and outdoor comfort upgrades
This is where most patios fail. People spend money on beautiful flooring and furniture, then abandon the space in July because there's no shade and it's 105 degrees, or in May because the afternoon sun makes it unbearable. Comfort upgrades are not optional for a top patio; they're the difference between using the space and not.
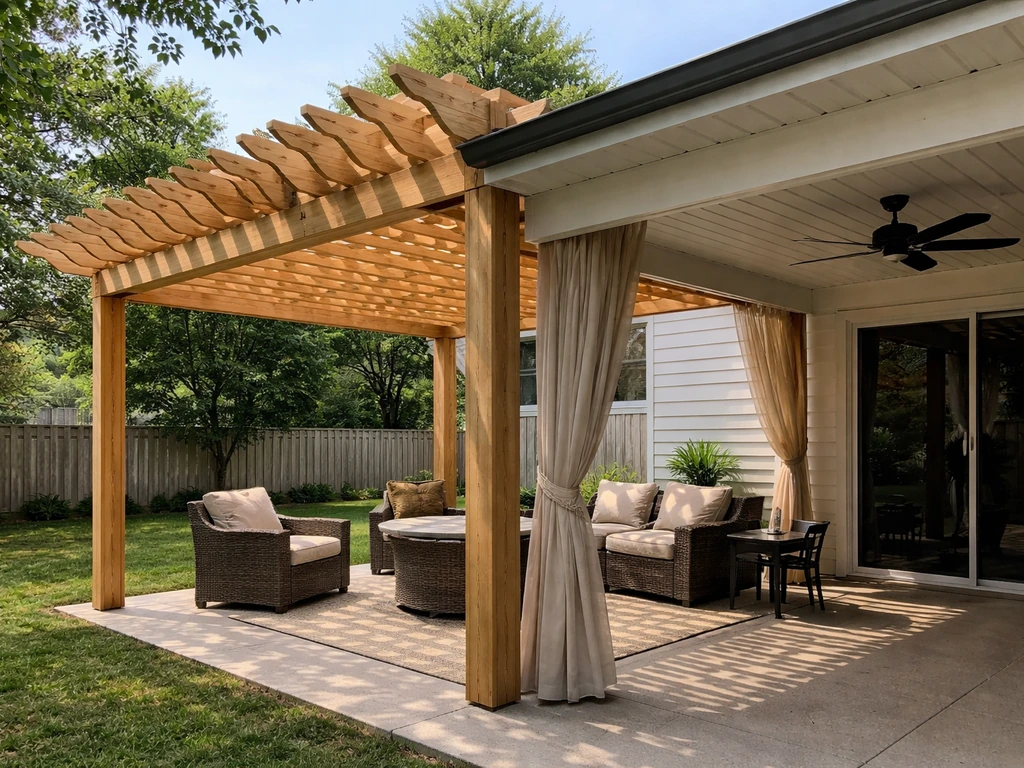
Shade structures
Permanent shade options include pergolas (open-lattice, which reduce glare but not heat as much), solid patio covers or insulated roof panels (which genuinely lower surface temperature), and attached awnings. If you're in a hot, sunny climate like Arizona, Texas, or Southern California, an insulated patio cover makes a measurable difference. A basic pergola looks great but doesn't block much radiant heat. Retractable shade sails give you flexibility but need to be taken down in high wind events or they'll tear.
Misters and fans
Misting systems drop the perceived temperature by 10 to 20 degrees in dry climates. They work less well in humid areas like Florida or the Gulf Coast because the air is already saturated and the mist just makes you wet. Outdoor ceiling fans are effective almost everywhere and are rated by wet or damp location. Blade clearance from the ground should be at least 7 feet for safety, and you need to follow your fan manufacturer's clearance specs from walls and obstacles. Wet-rated fans are required for any area exposed to direct rain; damp-rated fans are fine for covered patios.
Heating for shoulder seasons
If you want to extend patio use into fall or early spring in cooler regions, overhead infrared heaters are more efficient than freestanding propane heaters. They heat objects and people rather than the air, which is why they feel warmer faster. Mount them to your patio cover or pergola beam and make sure the electrical circuit is rated for the load.
Flooring, drainage, and durability decisions
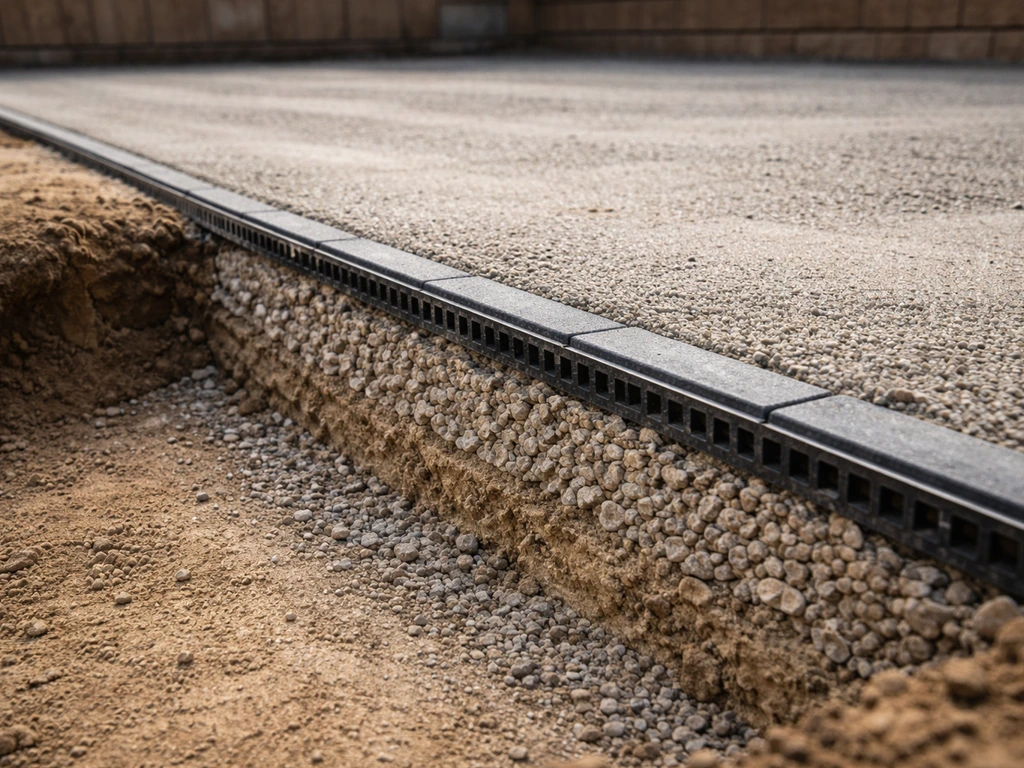
Drainage is unglamorous but it's the single most important structural decision you'll make. A patio that holds water will heave, crack, stain, and create a slipping hazard within a few years no matter how expensive the pavers are. The standard rule: slope your paved surface at least 2% away from the house foundation. For most patios, that's about a 1/4-inch drop per foot. Tilebar and Home Depot's installation guides both specify this minimum, and it applies whether you're laying porcelain, concrete pavers, or natural stone.
Under the surface, the base system is what determines long-term stability. A proper paver installation uses a geotextile filter fabric between native soil and the compacted aggregate base. This separates the two layers so fine soil particles don't migrate up and contaminate the drainage layer over time. The aggregate base typically runs 4 to 6 inches deep for a residential patio, deeper if you have clay-heavy soil or significant foot traffic. In areas with poor soil, a geogrid layer can be added to the base for additional structural reinforcement.
Polymeric sand is the standard choice for paver joints today. It locks the joints, resists weeds, and limits insect intrusion. One thing people don't expect: wait at least 30 days after installation before cleaning or sealing paver surfaces to allow the sand to fully cure and for any efflorescence (the whitish mineral deposit that sometimes appears on new pavers) to dissipate naturally. Don't confuse efflorescence with polyhaze, which is a residue from polymeric sand and responds to different cleaning methods.
Style, privacy, and practical decor
Lighting
Lighting transforms a patio from a daytime-only space into something you actually use in the evenings. The key is layering: combine overhead or ambient light (string lights, a ceiling fixture, or wall sconces) with lower-level task or accent lighting (step lights, path lights along the perimeter, or in-ground lights near planting beds). Belgard's hardscape lighting guidance makes a point that's easy to overlook: the goal is to make the space feel safe and functional after dark while keeping glare low enough for comfortable conversation. Put overhead lights on a dimmer. Hardwire what you can rather than relying on solar fixtures, which tend to be unreliable in tree-shaded areas.
Privacy
Privacy screens, pergola curtains, planted hedges, or lattice panels can make a patio feel like an outdoor room rather than an exposed slab. For faster results, large planters with tall grasses or bamboo (use clumping varieties to avoid invasion) give you green screening within one growing season. Cedar or composite privacy panels attached to a pergola post are a more permanent option and double as a windbreak in exposed locations.
Furniture and decor
Stick with outdoor-rated furniture that actually matches your climate. In humid coastal areas, teak, aluminum, and all-weather wicker hold up better than powder-coated steel, which can rust through at welds within a few years. In dry climates, nearly any quality outdoor material holds up well. Area rugs rated for outdoor use add warmth and define zones within a larger patio, but make sure there's drainage underneath them. Outdoor rugs that trap moisture against a paver surface can cause staining and encourage mold.
DIY vs hiring a pro: what makes sense for your project
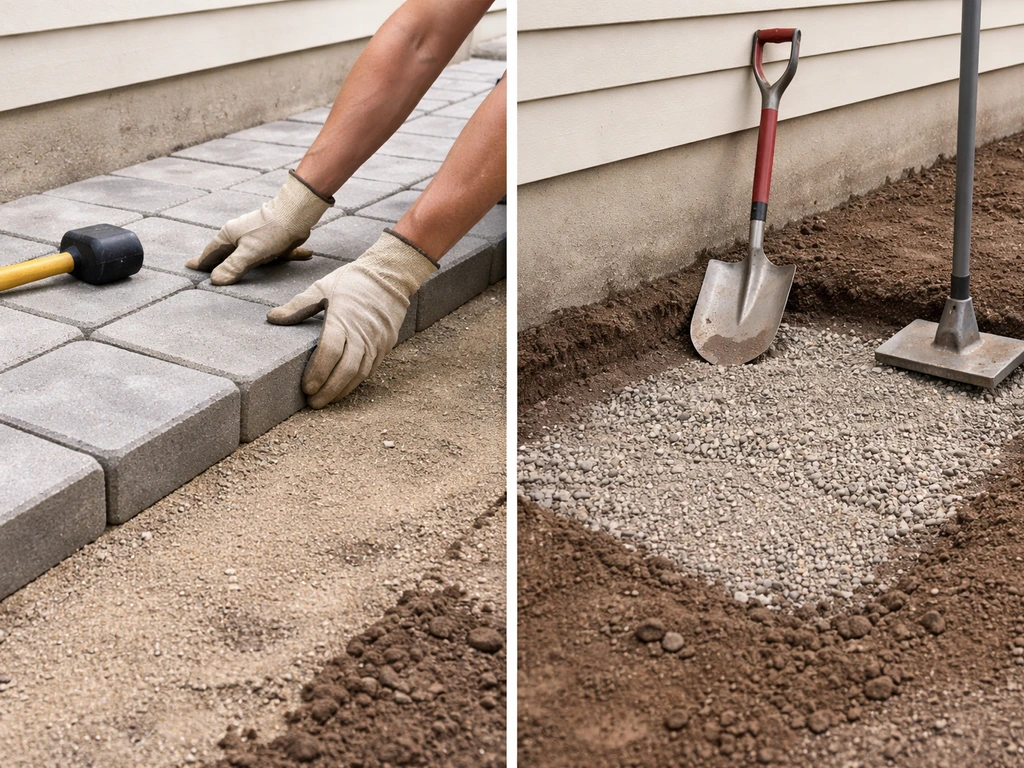
The honest answer is that some parts of a patio project are very manageable as DIY and others are genuinely risky to do yourself without experience. Base prep and grading is the most important skill in patio work. If you get the drainage slope wrong, the whole surface suffers. If you've done outdoor projects before and are comfortable with a plate compactor and string lines, DIY paver installation is very achievable. If you've never done it, hire the base prep out and lay the pavers yourself to split the cost.
Budgets in 2026 for professionally installed paver patios run roughly $10 to $25 per square foot for concrete pavers, and up to $35 or more per square foot for porcelain or premium natural stone. A 400-square-foot patio with a proper base, polymeric sand, and edge restraints can run $8,000 to $14,000 installed, depending on your region and material choice. DIY on the same project can bring the cost down to $2,000 to $5,000 in materials if you do all the labor.
Permits are a real consideration. Many municipalities (including cities in Ontario like Ottawa, Burlington, and Kirkland) require permits for deck or patio work depending on the size, height, and whether the structure provides primary access to the home. If you’re planning a roof top patio toronto build, start by confirming local permit rules, especially for elevated access and drainage deck or patio work. Even if a permit isn't required for a ground-level patio, check local rules before you start. If you're attaching a structure to the house, a permit almost certainly is needed. Don't skip this step and find out at resale.
Questions to ask any contractor before hiring
- Can you show me examples of patio work with the same materials I'm choosing, in a similar climate?
- What does your base system look like, and how deep is the compacted aggregate base?
- Do you use geotextile fabric and edge restraints in every installation?
- What drainage slope are you targeting, and how do you verify it?
- Are permits included in your scope, or is that my responsibility?
- What warranty do you offer on labor, and how do you handle settling or drainage issues after installation?
- What's your realistic timeline from start to usable surface, including cure time for polymeric sand?
A solid contractor will answer all of these without hesitation. Anyone who gets defensive about the base system or vague about drainage is a red flag. The visible surface is maybe 20% of what makes a patio last. The other 80% is what happens underneath.
Picking the right setup for your climate and budget
Your region shapes almost every material and comfort decision you make. Here's how to think through it.
| Climate | Best Flooring | Priority Comfort Upgrade | Watch Out For |
|---|---|---|---|
| Hot and dry (Southwest, Texas) | Porcelain pavers or light-colored concrete pavers | Solid shade cover + misting system | Surface heat absorption; dark pavers get scorching |
| Hot and humid (Southeast, Gulf Coast) | Textured porcelain or composite decking | Ceiling fans + insect screening | Mold on rugs/furniture; rust on metal frames |
| Cold winters with freeze/thaw (Midwest, Northeast) | Freeze/thaw rated porcelain or concrete pavers with proper base | Infrared heaters for shoulder seasons | Water infiltration under base; skip natural stone with high absorption |
| Mild and rainy (Pacific Northwest) | Textured pavers with good drainage slope | Covered pergola or roof panel | Algae/moss on smooth surfaces; undersizing the roof |
| Variable/four-season (Mid-Atlantic, Great Plains) | Concrete pavers or porcelain with rated freeze/thaw resistance | Retractable awning or pergola with roof panels | Settling from freeze/thaw cycles if base is shallow |
Budget reality: you don't need to do everything at once. If funds are limited, prioritize the base and flooring first because fixing drainage issues later costs more than getting it right upfront. Add shade, lighting, and furniture in phases. A well-built $6,000 patio slab you furnish gradually will outlast and outperform a $15,000 patio with a poor base every time.
If you're considering a raised or elevated patio, a rooftop patio, or a high-top seating configuration, those projects have their own structural and permit requirements that go well beyond a standard ground-level build. Roof top patio design adds extra structural loads and water-management needs, so it helps to plan early for both safety and comfort. These raised, elevated, or high-top patio setups are exactly the kind of project where planning for structure and permits up front helps you avoid expensive changes later. The decisions here around drainage, slope, and material selection still apply, but the structural layer adds complexity that almost always warrants professional engineering input.
Your next step is simple: sketch your space with rough dimensions, note where the sun hits hardest and at what time of day, and decide on your two or three non-negotiables. Then get at least three quotes from contractors who work regularly with your chosen material. Ask each one to walk you through their base system. The contractor who explains drainage without being prompted is the one who knows what they're doing.
FAQ
How do I figure out the right patio clearance and walking space for daily use?
Before you choose furniture or layout, measure your daily circulation paths from the house door to the grill, dining spot, and any service area. A good target is enough clearance that you can walk behind someone seated, and keep door swings or gates from landing on the patio surface. If you plan for accessibility, confirm the route is not blocked by trash bins, plant stands, or bar-height stools.
Can I fix drainage problems after my patio is installed, and what should I do first?
Yes, but the upgrade depends on the failure mode. If water is pooling, the fix is usually regrading and correcting the slope before any surface repair. If only joint sand washed out, you may be able to re-sand and seal steps selectively, but sealing will not stop movement caused by drainage problems. Also, any cleaning or sealing should wait until the surface is cured, and you should address efflorescence separately from polyhaze.
What are common installation mistakes that lead to shifting or weeds in paver patios?
If you are using polymeric sand, stop using a plate compactor directly on the pavers themselves, and make sure the pavers are fully set and aligned before any final joint work. The biggest mistake is rushing the compaction and jointing sequence, which can create uneven settlement later. Also confirm edging restraints are installed correctly, because joint sand is not a substitute for proper borders.
Should I seal porcelain pavers or natural stone right away, and when is sealing actually worth it?
Not always. In many climates, sealing is mainly about stain resistance and cleaning performance, and it can also affect how polymeric sand behaves and cures. If you have active efflorescence or ongoing haze, sealing too early can trap residues and make appearance worse. A safer approach is to choose whether you really need stain protection first, then clean using the right method for your specific residue type.
What should I check before installing outdoor infrared or propane heaters on a covered patio?
For heaters, confirm your mounting plan and electrical requirements before purchase. Infrared heaters are typically most effective when mounted under a roof structure or to a pergola beam, and you must ensure the circuit rating supports the load. For propane units, pay attention to placement distance from walls, overhead materials, and foot traffic, because safety clearances vary by model.
How do I choose a ceiling fan for a covered patio, especially for rain exposure?
If you want ceiling fans on a covered patio, the key is rating and placement. Use fans that are specifically rated for wet or damp locations based on whether rain can reach the fixture, and maintain minimum blade clearance from the ground, plus clearances to walls and obstacles per the manufacturer. Also verify that the fan’s wiring method is permitted for outdoor use in your area.
Are retractable shade sails a good option, or should I plan for a more permanent shade solution?
Retractable shade options can help, but they are not set and forget. In windy areas, you will need to plan for wind behavior, including how the fabric is stowed and whether you will remove or secure the system during high wind events. If you care about consistent comfort, consider combining shade with airflow solutions like fans rather than relying only on fabric alone.
Can I use outdoor rugs on pavers without causing staining or mold?
Yes, as long as you design drainage under the rug. Use outdoor-rated rug backing or systems that allow airflow and water to pass through rather than trapping moisture against the paver surface. If you notice recurring damp areas, switch to a rug layout that exposes more surface area, and consider a different underlayment approach to prevent staining and mold.
What is the best way to plan patio lighting so it feels safe without being too bright?
Start by thinking of lights as two jobs: navigation safety and atmosphere. Place path or step lights where people need orientation, then add softer overhead or accent lighting for comfort. Use dimmers for overhead lighting, and avoid glare by using lower brightness and shielded fixtures. If tree shade is heavy, you will likely get more reliable performance with hardwired lighting rather than solar.
What privacy upgrades work well long-term, and what should I watch out for with plants like bamboo?
You can, but you need a privacy plan that accounts for airflow and mature plant size. For fast screening, large planters can work well in one season, but confirm you are using clumping varieties if you choose bamboo to avoid spreading beyond the patio. If you attach lattice or panels to support posts, check wind exposure and whether the attachments can handle seasonal loading.
If I want to save money with a hybrid DIY approach, which tasks are safest to DIY and which should I hire out?
For a DIY-friendly split, outsource the steps that directly control long-term performance: grading, base depth, and slope setup. If your drainage slope is off, the rest of the build will struggle regardless of surface material. If you are competent with leveling tools and compaction, you may DIY paver setting, but hire base prep if you are not confident in the measurements.
Do I always need a permit for a patio, and what situations most commonly require one?
Permits can be triggered by more than just the patio size. Elevated patios, rooftop patios, and any structure that provides primary access usually raise requirements, and attaching a structure to the house often increases scrutiny. Before you schedule work, confirm local rules for drainage handling and roof or elevated deck safety so you avoid delays or failed inspections.
Next Articles

Roof Top Patio Toronto Guide: Best Options and How to Choose
Toronto guide to roof top patio options: features, weatherproofing, feasibility checks, and choosing contractors for roo
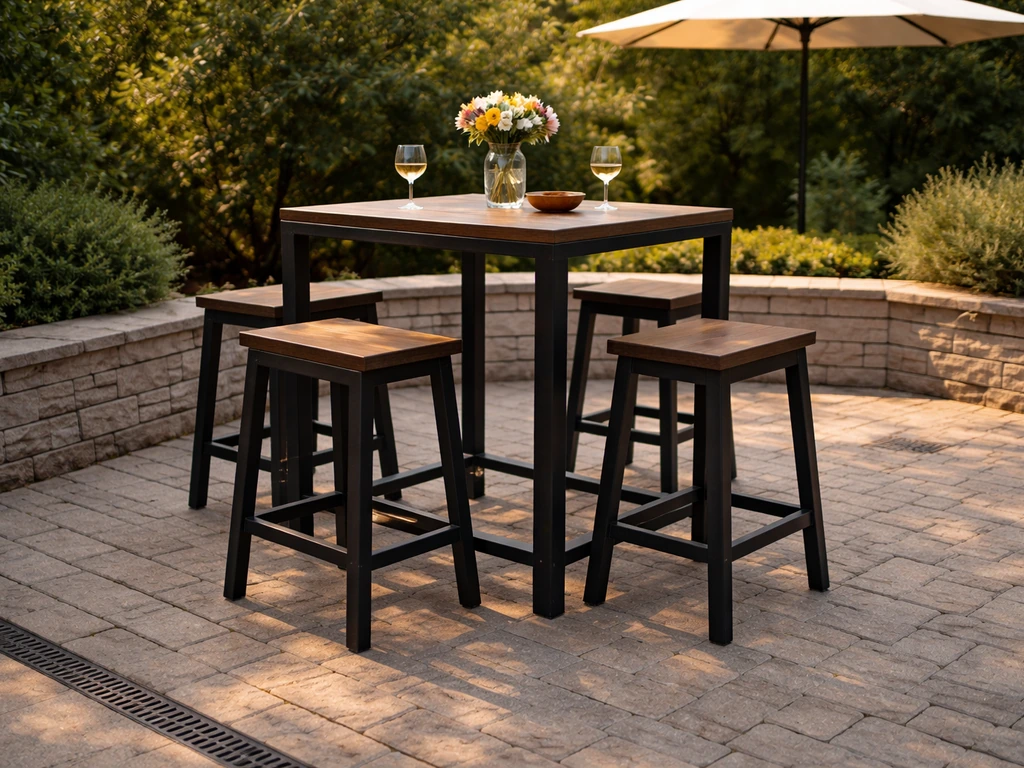
High Top Patio Dining: Plan, Build, and Upgrade Guide
Step-by-step high top patio dining guide: plan layout, choose surfaces, ensure comfort and drainage, add shade and upgra

Do It Yourself Outdoor Patio Ideas: Build, Upgrade, Maintain
DIY outdoor patio ideas for planning, building, upgrading, and maintaining floors, shade, privacy, lighting, and decor.