Designing a rooftop patio is entirely doable for most homes, but it's not the same as planning a ground-level patio. Before you pick furniture or lay a single tile, you need to confirm your roof can handle the load, your waterproofing is solid, and your drainage won't trap water under your new flooring. Get those three things right first, and everything else, from layout to lighting to planters, falls into place. Skip them, and you're looking at leaks, pooled water, and costly structural repairs a year or two down the line.
Rooftop Patio Design Guide: Plan, Build, and Maintain Safely

Phoebe Foster
1 Jul 2026
Feasibility first: structure, waterproofing, and roof integrity
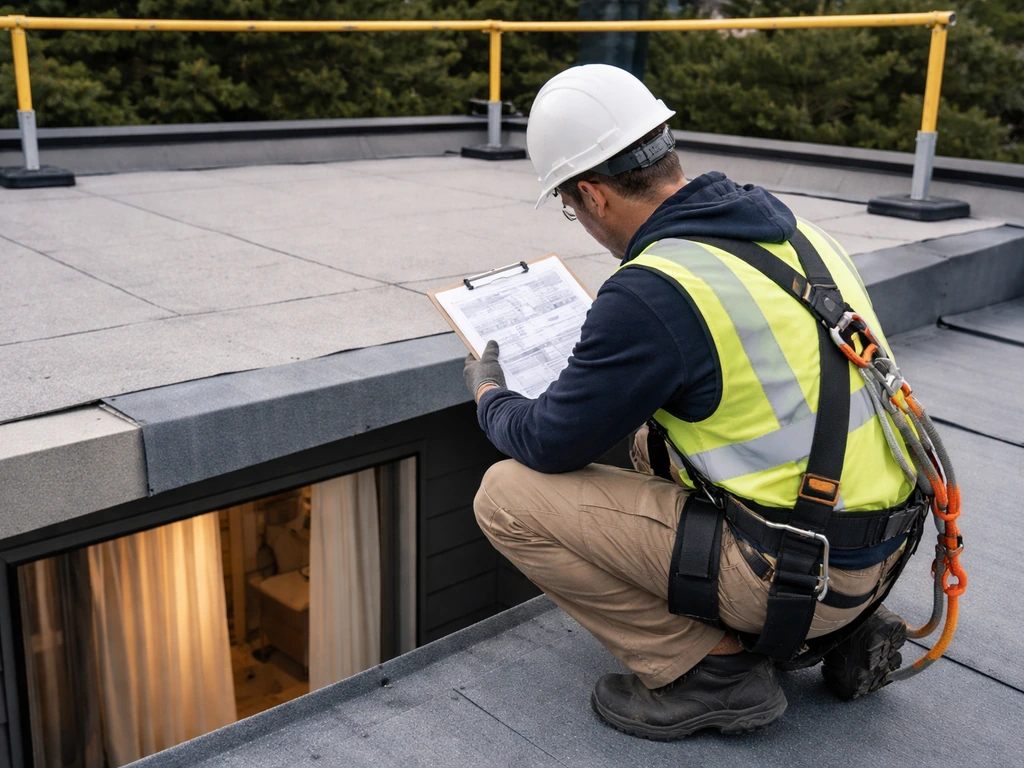
The first question isn't 'what does it look like?' It's 'can my roof actually support this?' A finished rooftop patio with furniture, planters, pavers, and a group of people standing on it adds up fast. The IBC's structural design chapter (Chapter 16) treats balconies and decks at 1.5 times the live load of the area served, which can mean live load requirements pushing toward 60 to 100 psf depending on your jurisdiction. Most residential roofs are designed for maintenance access and snow loads, not for a full outdoor living setup. You need a structural engineer to review the framing before you commit to any design, full stop.
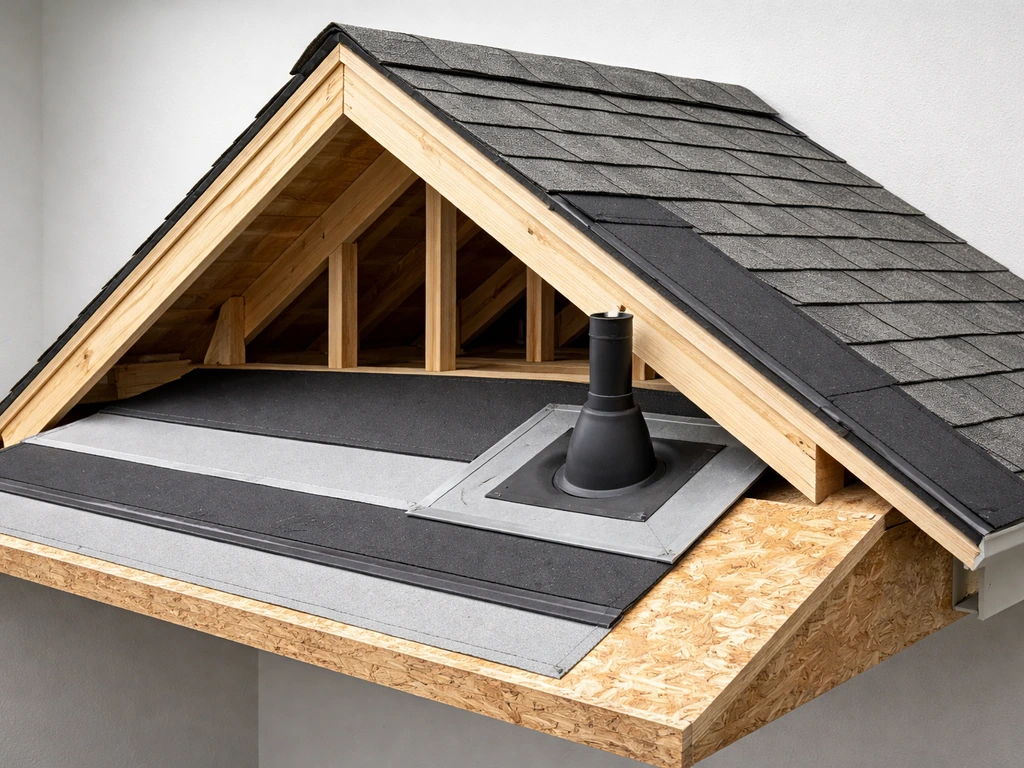
Waterproofing is equally non-negotiable. The most common rooftop deck failures don't happen across the open surface of the membrane. According to NRCA guidance, the majority of waterproofing failures originate at penetration flashings and terminations, meaning where drains, posts, conduits, or anything else punches through or terminates at the membrane. Every time you add a railing post anchor, a drain fitting, or a power conduit to your rooftop, you create a potential failure point. The design goal is to minimize penetrations and detail every single one that does exist with proper flashing.
Drainage is the third pillar. NRCA and roofing design guidance consistently recommend a minimum positive slope of 1/4 inch per foot across the roof surface to prevent standing water. Ponding water accelerates membrane degradation and creates structural loading from water weight. IBC Chapter 15 also requires secondary (overflow) drainage or scuppers sized and positioned so that if your primary drains clog, water can't build up beyond a safe designed depth. If your roof already has drainage issues, those must be resolved before you add any patio system on top.
- Hire a structural engineer to assess load capacity before any planning proceeds
- Have a licensed roofing contractor inspect the existing membrane for current condition, remaining lifespan, and any existing leaks
- Confirm primary and secondary (overflow) drainage is functional and code-compliant
- Identify all existing roof penetrations and verify their flashing condition
- Check that the roof surface has positive drainage (minimum 1/4" per foot slope) or budget for corrections
- Do not start design until all three areas (structure, waterproofing, drainage) are cleared
Rooftop constraints that drive your layout
Rooftops are a different environment than a backyard patio or a high top patio at grade. Wind is the biggest surprise for first-timers. At rooftop height, even a 15 mph breeze feels significantly stronger than at ground level, and gusts can exceed 90 psf of wind uplift pressure in exposed locations. That affects everything: furniture selection, shade structures, planters, and how your flooring system gets restrained. Wind uplift is why engineered paver restraint systems exist, and why retractable awnings need to be designed for your specific wind exposure and retracted during storms.
Sun exposure is usually more intense on a roof than anywhere else on your property, with no tree canopy or neighboring structure blocking it. In southern climates like Texas or Arizona, a west-facing rooftop without shade can hit surface temperatures over 150 degrees F on a summer afternoon. That drives your shade planning, your material selection (light-colored, cool-surface materials perform better), and your furniture choices. Even in Midwest or Pacific Northwest climates, glare and UV exposure on a high, open deck is something you have to design around.
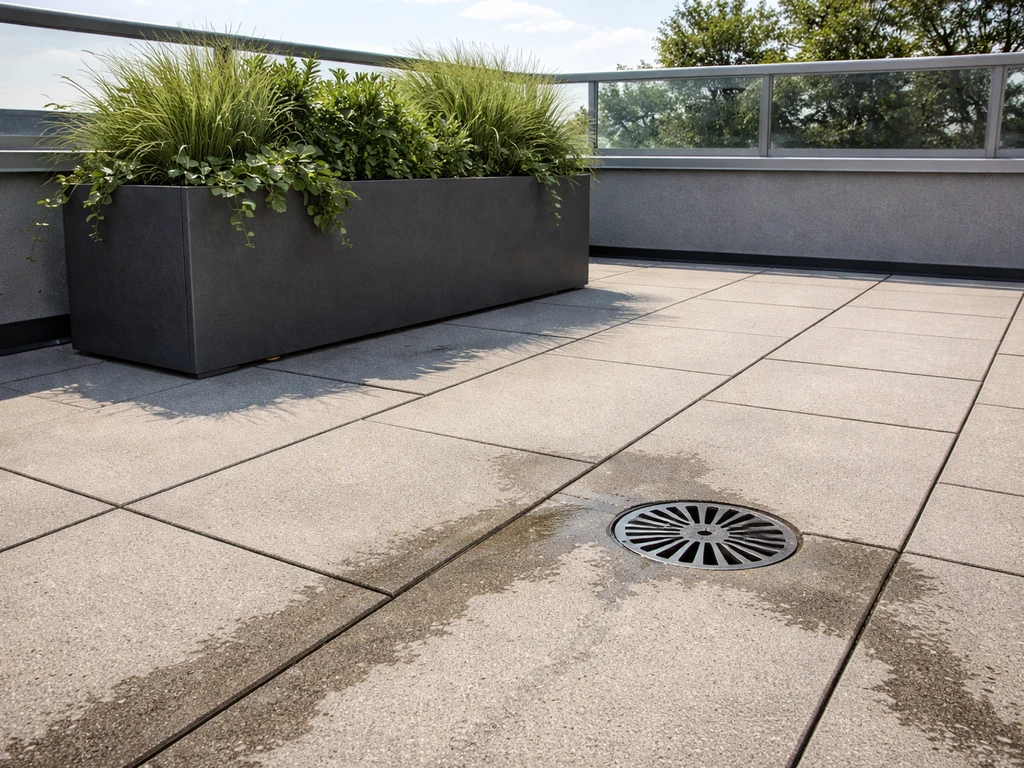
Drainage has to inform your layout from the start, not be retrofitted after. You need to know where your drains are, where overflow scuppers are, and make sure your flooring system keeps both accessible. Blocking a roof drain with a planter, a furniture base, or even a paver that's too close to the drain grate is a common and expensive mistake. Map your drains before you sketch a single zone.
Access is a practical and code-driven constraint. IRC Chapter 3 includes provisions for rooftop access pathways, particularly when rooftop-mounted equipment (HVAC, solar) is present. You typically need a clear, maintainable pathway to mechanical equipment. Even if that's not your situation, building inspectors will want to see that your patio design doesn't create a dead-end egress situation or block emergency access. Work your access door location into the layout early.
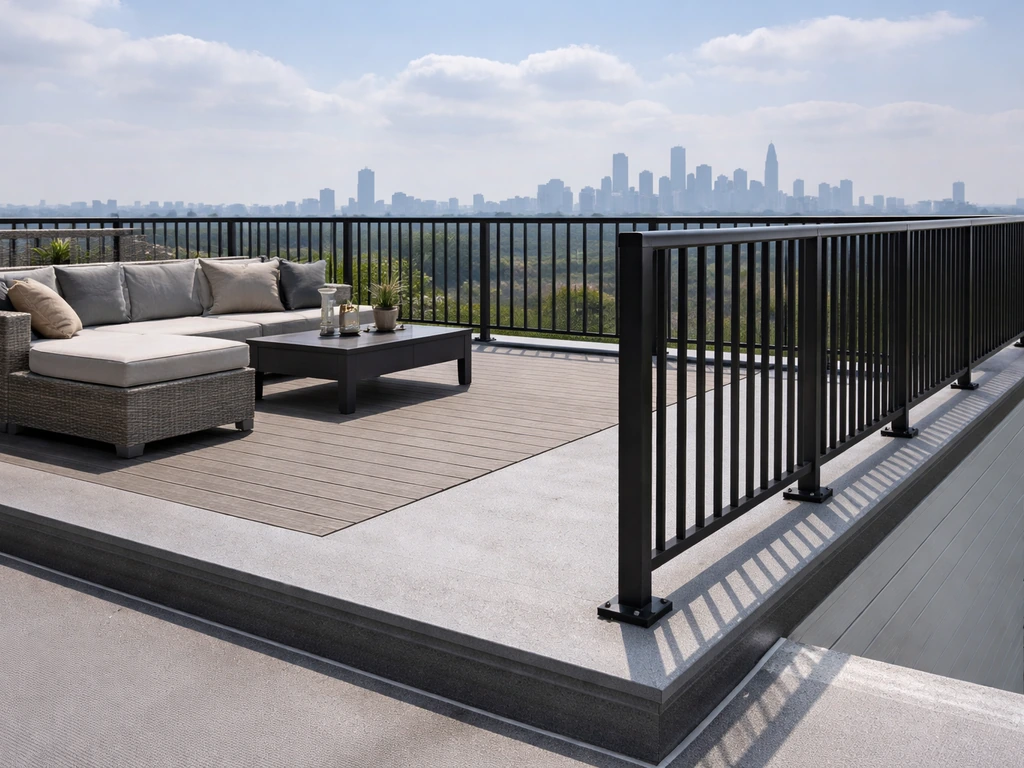
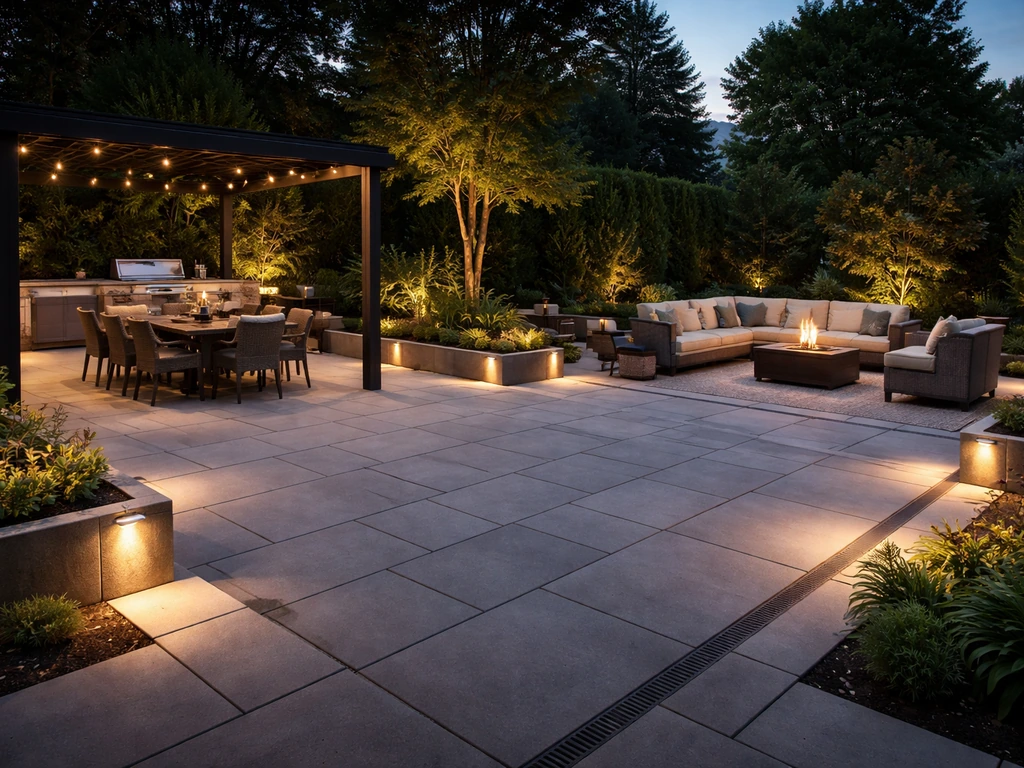
Designing the zones: seating, dining, privacy, and railing planning
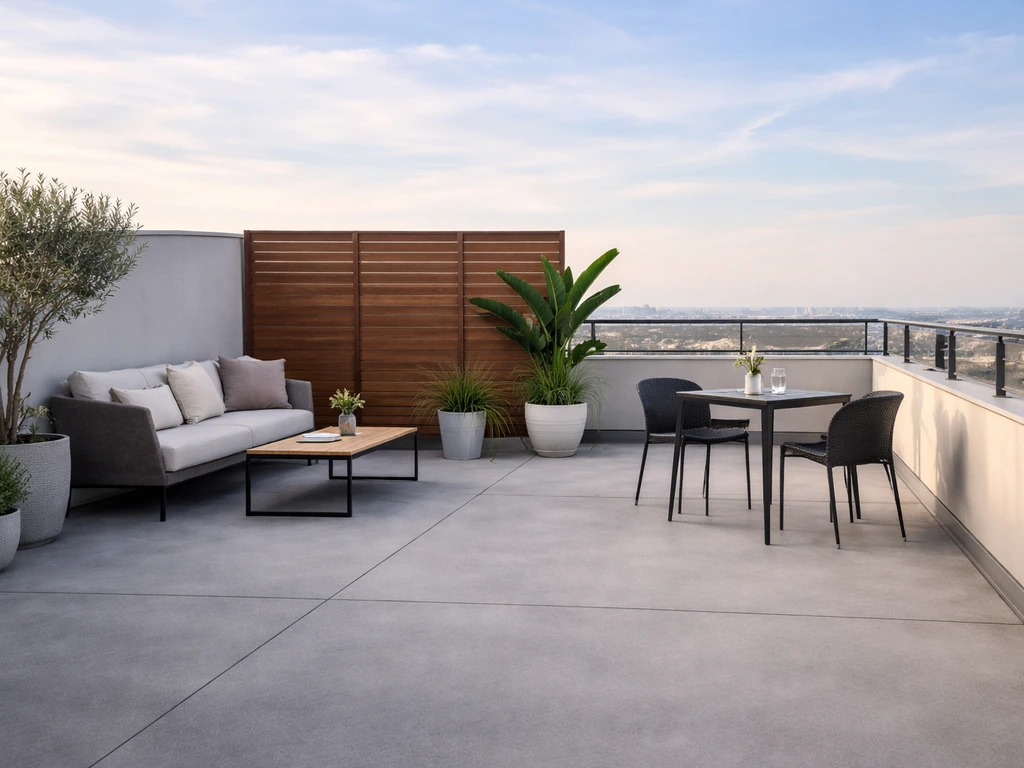
Once you've cleared the feasibility hurdles, layout design on a rooftop follows the same zone-based logic as any outdoor room: a seating area, a dining area if space allows, a transition zone near the access door, and any specialty areas like a bar cart nook or a planting area. The difference is that rooftop space is usually more limited and more exposed, so every zone needs to work harder and double-up on function where possible.
Railings and guards are a structural and code issue, not just a design choice. Under the IRC, guards on decks and balconies where the walking surface is 30 inches or more above the adjacent grade must be at least 36 inches high. Under the IBC, the requirement steps up to 42 inches. Which code applies depends on how your jurisdiction has adopted and amended the codes, so confirm with your local building department. Guards also must withstand a 200-pound concentrated load applied at any point along the top and in any direction under IRC R301.5. That matters for material and post-spacing decisions. Handrails on any stairs must have a graspable circular diameter between 1-1/4 and 2 inches per ICC A117.1.
Privacy screens serve double duty on a rooftop: they block sight lines from neighboring buildings and they break wind. A louvered aluminum privacy screen at 6 feet height does more for comfort on an exposed rooftop than almost any other single feature. Position them on the prevailing wind side first, then consider views second. Solid screens create wind shadows but also create turbulence at their edges; slatted or louvered designs moderate wind more gently across the whole deck.
Circulation matters more on a rooftop because the space is usually defined by fixed parapet walls. Leave at least 36 inches of clear walkway between furniture groupings and railings, more if you're designing for accessibility. Keep pathways to drains and mechanical access clear. A common mistake is designing zones that look great in a plan view but create a cramped, single-file path in actual use.
Choosing rooftop-safe flooring and base systems
Standard decking materials designed for ground-level or wood-framed elevated decks often don't work well directly on a rooftop membrane. The system that works best for most rooftop patios is a pedestal paver system: adjustable pedestals set directly on top of the waterproofing membrane, with pavers or decking planks laid loosely on top. Daltile's 2 cm porcelain pavers installation guide describes installing a [raised pedestal paver system over waterproofed roof assemblies](https://digitalassets. daltile.
com/content/dam/Daltile/website/resources/xteriors/DAL2CMPaversInstallGuide. pdf) on top of certified roofing membranes. DuPont's protected membrane roof guidelines describe this as a 'protected membrane roof' concept, where the overburden system (the pedestal and paver layer) actually shields the membrane from UV degradation, foot traffic, and thermal cycling. Sika's VersiPave and similar pedestal systems reinforce this: improved drainage, membrane protection, maintenance access, and no mechanical fastening through the membrane.
The critical phrase there is 'no mechanical fastening through the membrane.' Every screw or anchor you drive through the waterproofing layer is a potential leak point. Pedestal systems sit on the membrane and rely on weight and engineered restraint systems, such as wind uplift clips that tie pavers to pedestals without penetrating the membrane, to stay in place during high winds. Some products, like the WindStrong paver restraint system, are engineered and tested to resist significant wind uplift (rated in tests up to 90 psf) without a single roof penetration.
| Flooring Option | Works on Membrane? | Drainage Approach | DIY Friendly? | Best For |
|---|---|---|---|---|
| Porcelain pavers on pedestals | Yes (no penetrations) | Water drains between pavers to membrane below | Moderate | Urban rooftops, sleek modern look |
| Concrete pavers on pedestals | Yes (no penetrations) | Same open-joint drainage | Moderate | Budget-conscious, durable, wide variety |
| Composite decking on sleepers/pedestals | Yes (no penetrations) | Open gaps drain to membrane | Moderate to DIY | Warmer residential look, lighter weight |
| Hardwood (ipe, teak) on sleepers | Yes (no penetrations) | Open gaps drain to membrane | Less DIY | High-end aesthetic, heavier maintenance |
| Poured concrete or tile bonded to roof | No (requires penetrations/adhesive) | Grouted surface, slope-dependent | Not recommended DIY | Avoid on existing membranes |
Keep drains accessible. This is where projects go wrong more than anywhere else. Your pedestal system should allow you to lift pavers around drain locations for inspection and cleaning. Design a removable panel or a clear 12-inch zone around every drain. The ANSI/SPRI RD-1 drainage performance standard addresses exactly this concern: drainage systems must remain functional even when debris partially blocks one area. If you seal your drains under fixed paving, you're designing a future leak.
What about the membrane itself?
If your existing roof membrane is old or in questionable condition, replacing or recoating it before installing any patio system is almost always the right call. Popular rooftop membrane systems include EPDM (rubber), TPO, modified bitumen, and fluid-applied coatings. EPDM is flexible, durable, and widely used under pedestal paver systems. TPO and modified bitumen are also common. What matters more than the membrane type is the quality of the seams and flashing details at every penetration and termination. Have a roofing contractor who specializes in rooftop deck installations do this work, not a general contractor.
Shade, cooling, lighting, and comfort features
Shade is the single biggest comfort upgrade you can make on a rooftop, especially in hot climates. Retractable awnings are popular because they're flexible, but they come with a real limitation: wind. At rooftop height, you'll be retracting that awning more often than you'd like. If your roof has any structural element you can attach to (a parapet wall, an adjacent wall, or a freestanding pergola frame), a fixed fabric shade sail or a louvered pergola with adjustable slats gives you more reliable coverage. Size awning systems for your specific wind exposure and check the manufacturer's rated wind speed; many residential awnings are only rated to 20-25 mph before you need to retract them.
Misters are a genuine option for rooftop heat management, and they work extremely well in low-humidity climates like the desert Southwest. In humid climates like the Gulf Coast or Southeast, high-pressure misting just makes everything feel wetter without much cooling effect. If you go with a misting system, note that the EPA classifies residential outdoor mosquito misting systems as pesticide application devices, and some states have specific requirements around their use and placement. Simpler water-misting fans and misting lines attached to a pergola structure work without that regulatory complication.
Fans are underrated on rooftops. A large-diameter outdoor ceiling fan mounted inside a pergola or shade structure moves enough air to make 90-degree heat feel manageable. Look for wet-rated fans with aluminum or ABS plastic blades, not wood, for rooftop exposure. Pair them with a smart switch so you're not going indoors to control them.
Lighting on a rooftop is a design opportunity because you're usually above most obstructions and the sky is your backdrop. String lights are the simplest DIY option and hold up surprisingly well with commercial-grade (not holiday) rated outdoor strings. For a more polished look, low-voltage LED strip lighting along the inside face of parapet walls creates a wash of light without glare. Post-mounted fixtures at railing height add functional task lighting for dining areas. All fixtures must be rated for wet or damp locations depending on their exposure position. Run all electrical through weatherproof conduit and use a GFCI-protected circuit; hire a licensed electrician for any new rooftop electrical work.
Plants, planters, and decor without creating drainage problems
Plants and greenery make a rooftop patio feel like a destination rather than just an elevated slab, but rooftop planters carry real risk if they're placed wrong. A large planter full of wet soil can weigh 50 to 150 pounds per square foot depending on depth and soil type, which quickly creates point-load stress on your structure. Lightweight alternatives: fiberglass planters with a perlite-heavy growing medium cut weight dramatically. Foam-core soil mixes and self-watering planters with reservoir bases are a smart rooftop choice because they reduce how often you're dumping water onto the deck surface.
Never place a planter directly over a drain or in a position that creates a dam against a parapet wall where water can pool behind it. Elevate planters on small rubber feet or a mini pedestal so water can flow under them to the drain. Avoid any planter that doesn't have drainage holes, because trapped water in a sealed planter sitting on your membrane will eventually find a way through.
For decor, stick to pieces that are either lightweight and easily moved in advance of wind events, or heavy enough to be stable without being tethered (which would require a membrane penetration). Outdoor rugs are fine as long as they're UV-stabilized, designed to drain, and moved periodically so the membrane underneath can dry. Solid-bottom rugs that trap moisture against the membrane will degrade it over time. Furniture with wide, flat feet distributes load better than narrow legs, and rubber or plastic foot caps protect the membrane surface from point pressure.
Permits, contractors, budget, and your project checklist
Almost every rooftop patio project above a certain scale requires permits. At minimum, you'll likely need a building permit for the structural modifications, a permit for any electrical work, and possibly a separate roofing permit if the membrane is being replaced or modified. Some municipalities also require a zoning review if the patio adds usable square footage that changes your building's footprint classification. Start at your local building department, describe the project, and ask exactly what's required. Don't try to skip permits on a rooftop; a leak, a structural issue, or a future home sale inspection will surface an unpermitted rooftop build.
For contractors, you want at minimum a licensed roofing contractor for the membrane work and a licensed general contractor or structural contractor for any framing, railing, and finish work. If the project involves load-bearing structural changes, a structural engineer's stamped drawings are required in most jurisdictions. Ideally, you want a contractor who has specifically done rooftop deck builds before, not just ground-level decks, because the membrane detailing and flashing knowledge is different. Ask for references on completed rooftop projects and, if possible, ask to walk one of those projects.
What to ask a contractor before you hire
- Have you built rooftop patios over occupied living space before, and can I see examples?
- Who handles the waterproofing: your crew or a roofing subcontractor?
- How do you handle railing post penetrations to avoid compromising the membrane?
- What flooring system do you recommend and why, specifically for this roof type?
- How will you maintain drain access under the finished flooring?
- Will you pull all required permits, and does your bid include that cost?
- Do you work from stamped structural drawings, and who provides them?
- What is your warranty on waterproofing work and how is it structured?
Realistic budget ranges
Budget varies enormously based on existing roof condition, size, complexity, and region. That said, here's a rough framework for planning purposes as of 2026: a basic rooftop patio with membrane replacement, pedestal pavers, simple railings, and no shade structure typically runs $150 to $300 per square foot fully installed in most U. S. markets.
Add a pergola or shade structure and you're adding $5,000 to $20,000 depending on size and material. A full buildout with lighting, custom railings, planters, fans, and furniture can push $400 to $600 per square foot in high-cost metro areas. Membrane work alone on a 400-square-foot roof surface can run $10,000 to $20,000 if it's a full replacement. Get at least three quotes and make sure each contractor is quoting the same scope.
Your rooftop patio project checklist
- Commission a structural engineer review of roof framing load capacity
- Have a roofing contractor inspect the existing membrane, drains, and flashing
- Confirm or install secondary (overflow) drainage per IBC Chapter 15
- Resolve any existing drainage slope issues (minimum 1/4" per foot positive slope)
- Visit the local building department: get permit requirements in writing
- Define your layout zones on a scaled drawing: seating, dining, access path, drain clearances
- Select a pedestal-based flooring system that avoids membrane penetrations
- Plan railing system to meet 36" (IRC) or 42" (IBC) guard height requirements with load-rated posts
- Specify shade, fan, and lighting features appropriate for your wind and climate exposure
- Design planter placement to avoid blocking drains and stay within structural load limits
- Hire licensed roofing and general contractors with rooftop deck experience
- Get a minimum of three competitive quotes on identical scopes
- Confirm all electrical work will be on a GFCI-protected circuit with wet-rated fixtures
- Build a maintenance plan: annual membrane inspection, drain cleaning, furniture storage before wind events
One last practical note: the most common regret from homeowners who've done rooftop patio builds is not replacing a marginal membrane before the patio went in. Planning a last best patio also means budgeting for membrane integrity, drainage access, and code-compliant railing so the finished space stays safe and serviceable. Once your patio system is installed over it, any membrane work becomes significantly more expensive because the flooring has to come up first. If your membrane has 3 to 5 years of useful life left, replace it now. It's the cheapest insurance you can buy for the whole project.
FAQ
Can I install a roof top patio design over my existing membrane without replacing it? If not, how do I decide?
Not necessarily, but you do need a drainage plan that accounts for where the roof already sends water. If your existing roof uses internal drains, plan your pedestal grid so you can still access those drains for cleaning. If your roof relies on scuppers or splash paths, confirm the patio flooring edge treatment will not redirect water onto walls, into railing bases, or under parapets.
How do I estimate the real load my roof will take for a roof top patio design?
You can’t “eyeball” it. Even if the framing seems strong, rooftop patio loads include furniture, planters, people, and concentrated points (like a grill or hot tub stand). A structural engineer should check joists, beams, and any cantilevers, and then confirm the actual design live load for your jurisdiction. Keep in mind that deck code requirements can be based on the area served, not just the deck footprint.
What’s the safest way to handle plumbing or electrical penetrations in a rooftop patio system?
Sealants are usually not a substitute for correct flashing at penetrations. For things like drain fittings, conduit penetrations, and railing anchors, you generally need a flashing and waterproofing system designed for rooftop deck membranes. The key is to use a detail that maintains a watertight connection at each penetration, then verify the top layer and the protected deck system do not trap water at terminations.
How should I design pavers and pedestals so drains stay accessible year-round?
For many rooftop pedestal paver systems, the underlayment and pedestals are designed to keep water moving, but you still need access. Plan for lifting individual paver sections or removable panels around every drain, plus a clear inspection path to overflow scuppers. If debris regularly accumulates on your roof, consider designing for periodic maintenance access rather than relying on “set it and forget it” drainage.
Can I add electrical outlets and lighting myself on a roof top patio design?
Yes, but use purpose-built rooftop-compatible fixtures and control wiring. Common failures include using non-wet-rated fixtures, skipping weatherproof conduit, or landing outdoor wiring in boxes not rated for damp or wet locations. Also, if the patio is on a protected membrane, avoid fixture mounts that require fasteners through the membrane unless the system is explicitly designed for that.
Do guard and handrail rules change depending on whether my roof top patio design is called a balcony or a deck?
Check the code for your location’s adopted IRC and IBC versions, and whether local amendments change the guard height and load test requirements. Jurisdictions can differ on whether you follow 36 inch or 42 inch guard heights and what applies to balcony versus deck conditions. If you’re adding privacy screens or mid-height wind barriers, confirm they do not weaken guard performance and that attachments do not create new waterproofing penetration issues.
What are common decor mistakes that lead to membrane damage after a roof top patio design is finished?
You want to avoid “moisture traps” created by non-draining materials. Use rugs that are UV-stabilized and designed to drain, and plan to lift and shake them periodically so air can reach the membrane surface. For furniture placement, choose wide, stable bases and check that straps, feet, or stands are not permanently pressing on small spots that can indent the deck surface.
How do I choose shade for a roof top patio design when wind is a concern?
If you have strong winds or gusty exposure, plan your shade and anchoring strategy carefully. Retractable awnings are often limited by wind speed ratings, so the “retract schedule” should be part of your plan, not an afterthought. For fixed shade sails or pergolas, confirm the wind design and anchorage points, and avoid attaching elements in ways that require extra roof penetrations.
Are misters or fans better for cooling a roof top patio design in my climate?
In hot climates, you’ll usually benefit from shade plus light-colored surfaces and heat-dissipating materials, but misters are climate-specific. In humid regions, mist can increase perceived humidity and not cool effectively. Also, if you consider mosquito misting, be aware that some jurisdictions treat certain outdoor misting devices as pesticide application devices, which can require specific approvals.
How do I place rooftop planters without overloading the structure or blocking drainage?
Planters should be treated like structural loads, not just decorations. A large planter with wet soil can create significant point-load stress, especially near drains or parapet edges. Use lightweight planters and controlled soil mixes, keep them away from drains, and ensure they have drainage holes so water does not pool on the membrane surface.
What permits do I need for a roof top patio design, and how can I confirm the scope before hiring a contractor?
Most projects of a rooftop patio scale and any membrane or electrical changes typically require permits, but the exact list varies. You may need separate approvals for structural changes, electrical circuits, and sometimes roofing permits if you modify membrane details. The practical next step is to call your local building department and ask what permits apply, then request what drawings or calculations they expect before work starts.
Next Articles
The Top Patio Guide: Design, Materials, Upgrades and Next Steps
Plan the top patio with design, durable materials, drainage, weather upgrades, and DIY vs contractor next steps for your

Roof Top Patio Toronto Guide: Best Options and How to Choose
Toronto guide to roof top patio options: features, weatherproofing, feasibility checks, and choosing contractors for roo

High Top Patio Dining: Plan, Build, and Upgrade Guide
Step-by-step high top patio dining guide: plan layout, choose surfaces, ensure comfort and drainage, add shade and upgra