Quality decks and patios come down to five things working together: durable materials matched to your climate, a solid substructure that handles water and load, a layout that fits how you actually live outside, comfort upgrades that make the space usable more than two months a year, and workmanship that holds up over a decade without constant repair bills. Get those five right and you end up with an outdoor space that adds real value to your home and your daily life. Miss one, and you spend weekends fixing problems instead of enjoying the space.
Quality Decks and Patios: Build, Choose Materials, Avoid Failures

Phoebe Foster
13 May 2026
What 'quality' actually means for decks and patios
When most people say they want a quality deck or patio, they mean it should look great on day one. But real quality is about what the space looks and functions like on year five, year ten, and year fifteen. That means thinking about four things from the start: durability (will the materials hold up to your specific weather?), safety (are the surfaces, railings, and structure built to code and beyond?), comfort (can you actually use the space in summer heat or after a rainstorm?), and maintenance burden (how much time and money will you spend keeping it up?).
Safety is worth calling out specifically because it gets skipped in a lot of homeowner planning conversations. Slip resistance on hard surfaces matters enormously, especially around pools or in rainy climates. ANSI/NFSI B101.3-2022 establishes a test method for measuring the wet dynamic coefficient of friction (DCOF) on exterior hard surfaces, which gives you a real, measurable way to compare materials before you buy. ANSI/NFSI B101.3-2022 is the standard that defines this wet DCOF test method for hard-surface walkways so you can make slip-risk comparisons ANSI/NFSI B101. 3-2022 establishes a test method for measuring the wet dynamic coefficient of friction (DCOF). The standard makes clear that higher DCOF values reduce slip risk, though no surface eliminates it entirely on a wet day. When you're picking tile, pavers, or any hard patio surface, ask your supplier for the wet DCOF rating. Anything below 0.42 wet DCOF is worth avoiding for outdoor use where water exposure is expected.
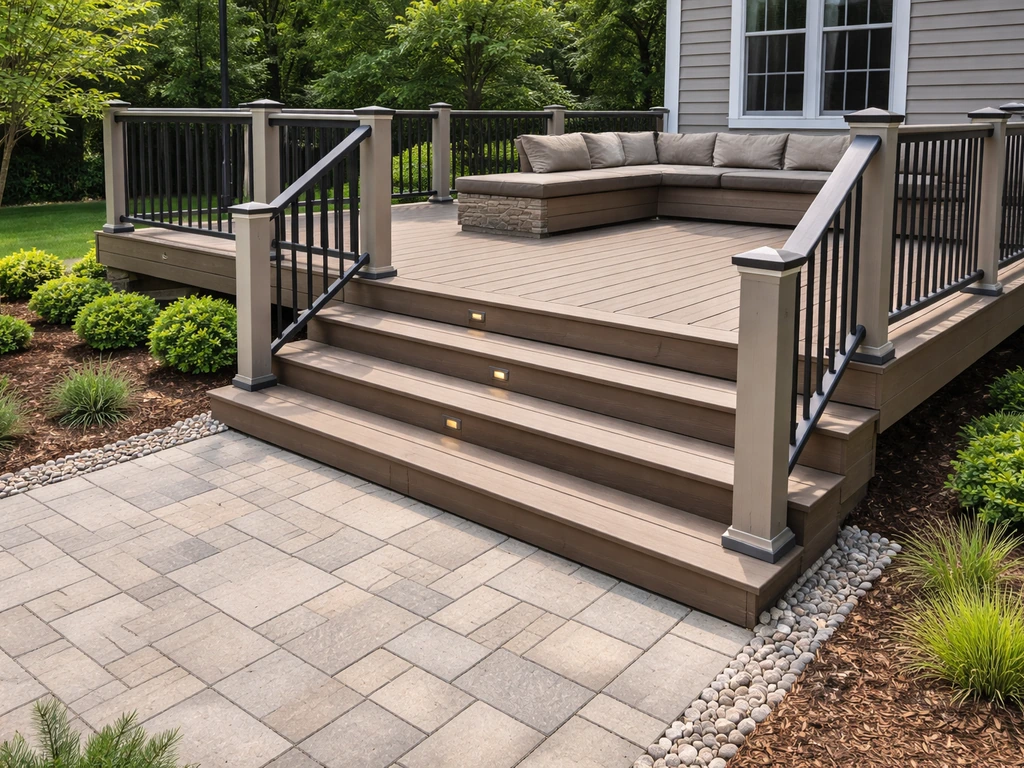
Structural safety is the other big one. Deck railings need to handle a 200-lb concentrated load applied at the top rail per residential building code, which means flimsy post hardware and undersized baluster spacing aren't acceptable on any quality build. A deck that looks beautiful but can't handle a crowd leaning on the railing isn't a quality deck, it's a liability.
Deck material and build choices for durability and low maintenance
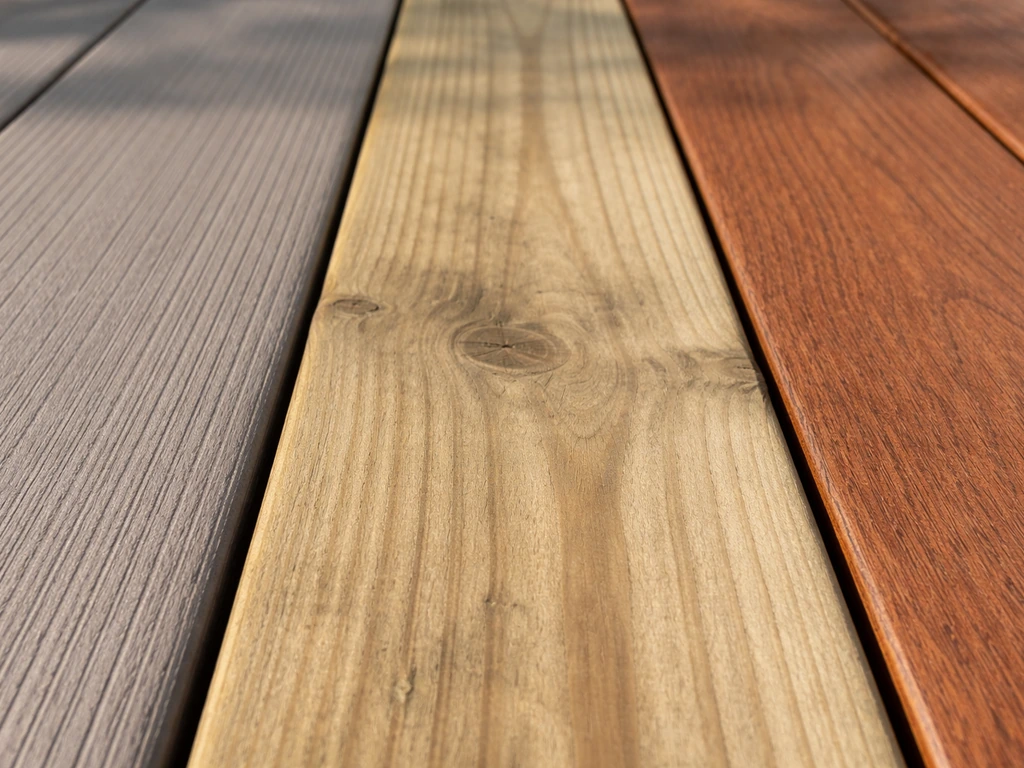
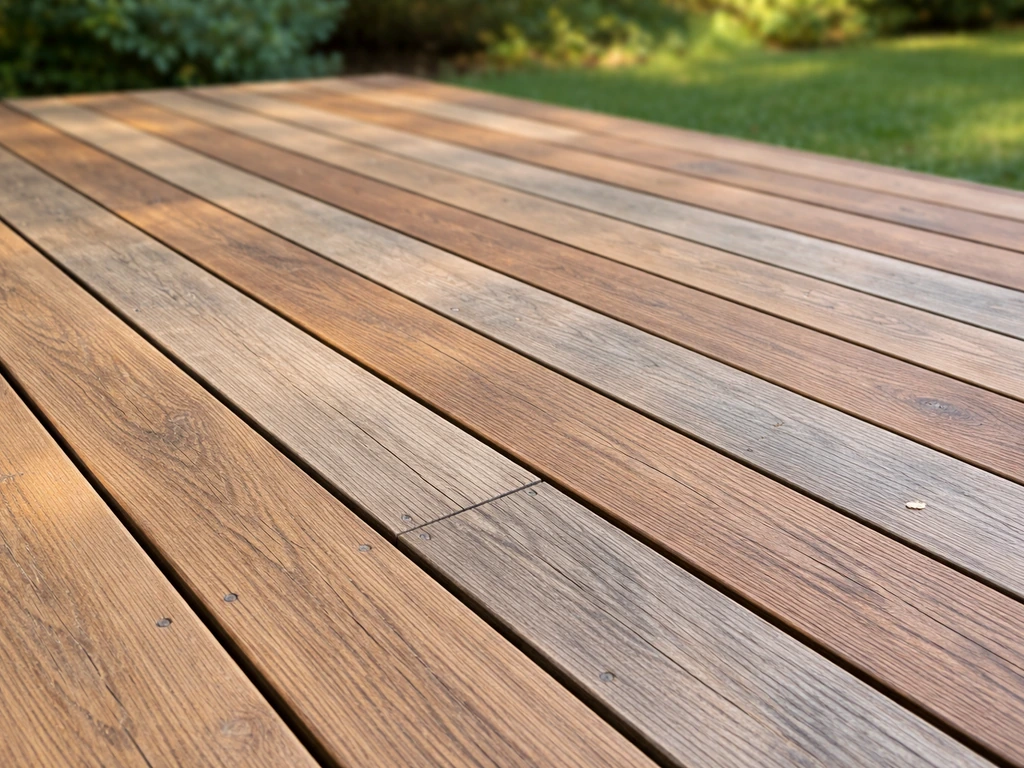
The biggest material decision for a deck is the decking surface itself, and the realistic choice is between pressure-treated wood, hardwood (like ipe or tigerwood), and composite decking. Each has a different cost profile, maintenance demand, and lifespan.
| Material | Upfront Cost | Maintenance | Lifespan | Best For |
|---|---|---|---|---|
| Pressure-Treated Pine | Lowest | Annual sealing/staining required | 15–20 years if maintained | Budget-conscious builds, DIY projects |
| Cedar / Redwood | Moderate | Sealing every 2–3 years | 20–25 years | Natural look, moderate climates |
| Hardwood (Ipe, Tigerwood) | High | Annual oiling to prevent graying | 25–40+ years | Premium natural look, high-traffic areas |
| Composite (Trex, TimberTech, Fiberon) | High upfront | Occasional washing only | 25–30 years (most warranties) | Low maintenance, humid or rainy climates |
| PVC Decking | Highest | Minimal, wipe-clean surface | 30+ years | Wet climates, around pools |
If you're in a hot, humid climate like the Gulf Coast or Southeast, composite or PVC almost always makes more long-term financial sense even though the upfront cost is higher. Pressure-treated wood in those conditions needs aggressive annual maintenance or it will cup, crack, and rot faster than advertised. In drier climates like the Southwest or high-altitude Rockies, wood holds up better and can be a reasonable choice if you're willing to put in the maintenance work. In the Midwest where you get temperature swings of 100+ degrees between summer and winter, composite's dimensional stability is a real advantage over wood.
The substructure is where decks succeed or fail
The framing and ledger connection are the parts of a deck you can't see after construction, and they're where most deck failures begin. The ledger, which is the board that attaches your deck frame to the house, is the single most critical connection on the structure. GuideOne's deck-collapse prevention research identifies blank" rel="noopener noreferrer">ledger attachment and water intrusion at the ledger as the most common source of deck failures. The fix is proper flashing, not just caulk. Flashing needs to extend out past the ledger and ideally to the second deck board, so water gets shed away from the house framing rather than behind it. This is a non-negotiable detail on any quality build. If a contractor skips proper ledger flashing to save time or money, walk away.
For framing lumber, use ground-contact rated pressure-treated lumber (rated for direct soil contact even if it won't be in soil, for added protection) for beams and posts. Joist hangers and post bases should be hot-dipped galvanized or stainless steel, not the cheaper zinc-plated hardware that corrodes within a few years, especially with today's higher-retention pressure-treated wood which is more corrosive to metal than older formulas.
Patio materials, thickness, and the drainage details that prevent failure
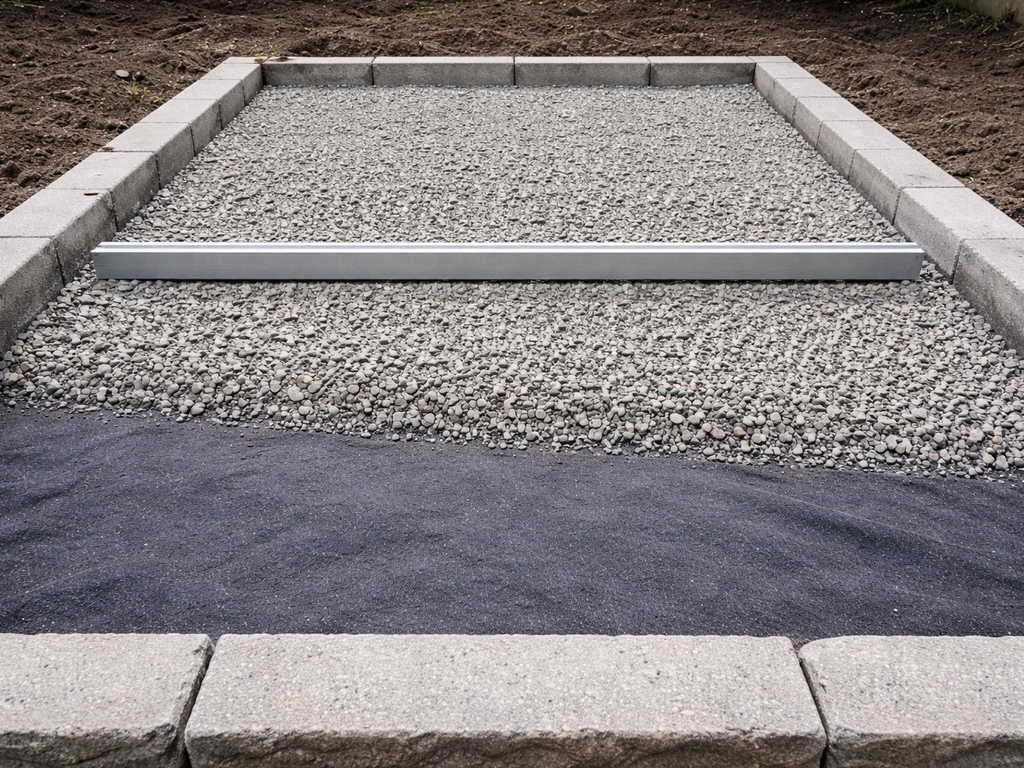
Patios are simpler structures than decks in one sense: they sit on the ground. But that also means drainage and base preparation are everything. A beautiful patio installed on an inadequate base will heave, crack, and settle within a few years regardless of how good the surface material is.
Common patio surface options compared
| Material | Typical Thickness | Cost Range (installed) | Durability | Slip Resistance |
|---|---|---|---|---|
| Concrete (broom finish) | 4 inches | $6–$12/sq ft | 30+ years | Good (broom finish increases texture) |
| Stamped Concrete | 4 inches | $12–$22/sq ft | 20–30 years | Moderate (sealers can reduce grip — recheck DCOF) |
| Concrete Pavers | 2.375–3.125 inches + base | $10–$20/sq ft | 25–50 years | Good to excellent depending on surface texture |
| Natural Stone (flagstone, bluestone) | 1.5–2 inches + base | $15–$30/sq ft | 30–50+ years | Varies by finish — honed is slippery wet |
| Porcelain Tile (outdoor rated) | 3/4–1 inch + base | $15–$25/sq ft | 20–30 years | Check wet DCOF rating carefully before buying |
| Gravel / Decomposed Granite | 3–4 inch depth | $3–$6/sq ft | 5–10 years (replenishment needed) | Good traction, but uneven for furniture |
For poured concrete patios, 4 inches of thickness is the residential standard for most applications, but you want 6 inches in areas with freeze-thaw cycles or where vehicles might drive on it. Always insist on a compacted gravel base of at least 4 inches before the pour. Without it, soil movement from moisture and frost will crack the slab within a few seasons. Control joints placed every 8 to 10 feet help direct where cracking occurs so it happens predictably and neatly rather than randomly across the slab.
For pavers, the traditional base is 6 to 8 inches of compacted gravel with a 1-inch sand setting bed on top. Polymeric sand between joints is worth the extra cost because it locks the pavers together, resists ants and weeds, and reduces washout. Porcelain pavers have become popular and they look stunning, but check the wet DCOF rating before ordering. Many high-gloss or lightly textured porcelain tiles have wet DCOF values below safe thresholds for outdoor use, especially around pools or in rainy climates.
Drainage is the rule that overrides everything else in patio design. Your patio needs to slope away from the house at a minimum of 1/8 inch per foot, ideally 1/4 inch per foot. If your yard grading runs toward the house, you need to address that before you build, either with regrading, a French drain system, or a channel drain at the patio's edge. A patio that pools water against your foundation will cause far more expensive problems than the patio itself cost to build.
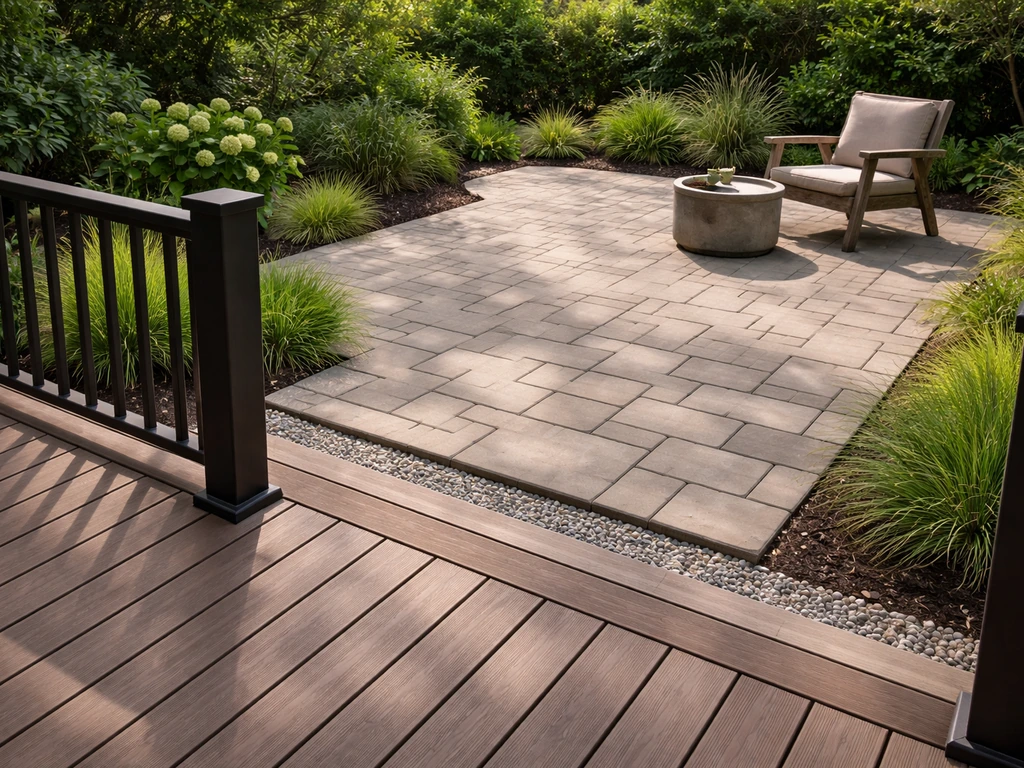
Comfort upgrades that separate a nice patio from a great one
This is where you get the biggest quality-of-life return on investment. A beautiful deck or patio that bakes in the afternoon sun or has no privacy from neighbors gets used maybe 30 days a year. Choosing the right comfort upgrades, materials, and layout is what leads to top notch decks and patios that you will actually use year after year. A better bird deck porch patio layout can also add privacy, shade, and functional comfort so it feels welcoming every day. Add the right comfort features and that number can easily double or triple.
Shade and cover options
Shade is the foundation of an outdoor space you'll actually use in summer. Your options range from a permanent attached patio cover or pergola, to a freestanding structure, to sail shades and retractable awnings. Attached aluminum patio covers are the most durable and lowest maintenance option, particularly in climates with high UV or heavy rain. Wood pergolas look great but need staining every two to three years and will eventually rot at post bases if not properly footed. Polycarbonate roofing panels on pergolas give you rain protection while allowing diffused light, a solid middle ground if you want a covered feel without a solid roof. In areas with high wind (Florida, Texas Gulf Coast, Tornado Alley), make sure any shade structure is rated for local wind speeds and anchored with concrete footings, not just ground stakes.
Cooling: misters, fans, and evaporative options
In hot climates, misting systems and outdoor ceiling fans are not luxuries, they're usability tools. A quality misting system installed under a patio cover can drop ambient temperature by 15 to 20 degrees Fahrenheit in dry-heat climates like Phoenix or Las Vegas. In humid climates, misting adds moisture that's already oppressive, so ceiling fans become the better primary tool there. Outdoor-rated ceiling fans (UL wet or damp listed depending on exposure) move air effectively even in high-humidity environments and use relatively little electricity. Look for fans with blade pitches of 12 to 15 degrees for maximum air movement. For DIYers, a mid-range outdoor ceiling fan installation is very manageable if you have an existing junction box and electrical run to the space.
Lighting, privacy, and finishing details
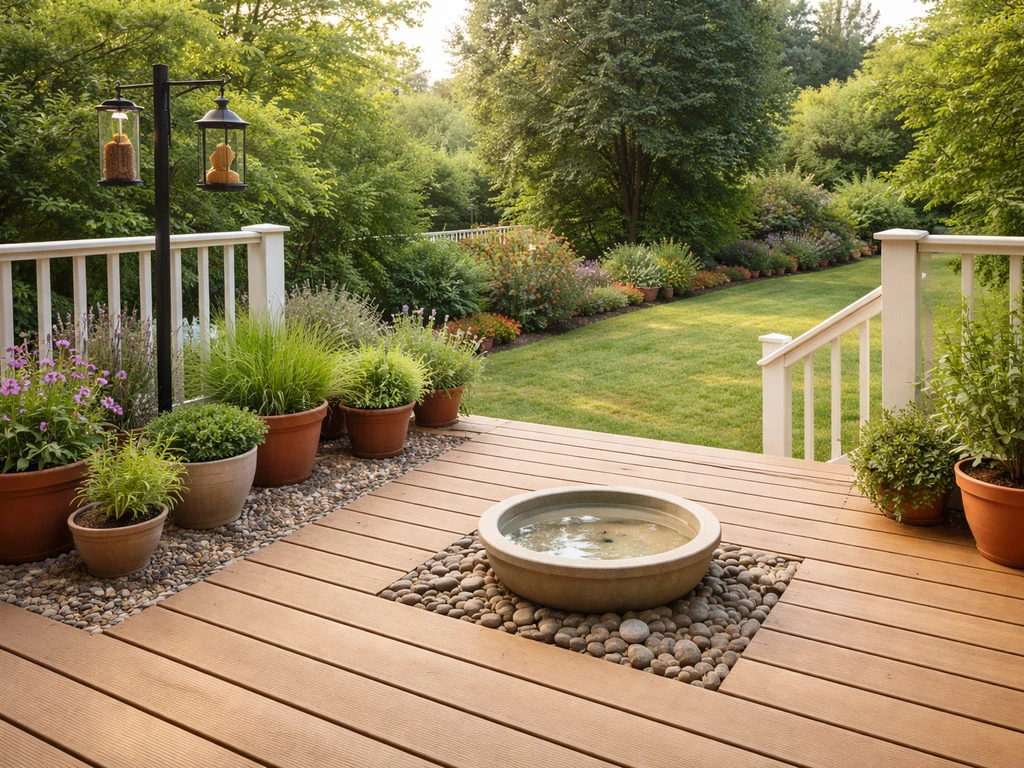
Outdoor lighting dramatically extends usable hours. String lights are affordable and set a relaxed tone, but supplement them with task lighting near cooking areas and path lighting for safety. Recessed LED lights in pergola beams or patio covers are a cleaner, more permanent option. Low-voltage landscape lighting systems are very DIY-friendly and run on timers or dusk-to-dawn sensors without any complicated electrical work. For privacy, options include lattice panels with climbing plants, cedar or composite privacy screens, outdoor curtains on pergola posts, or strategic plantings of fast-growing screening shrubs. Bamboo grows 3 to 5 feet per year in warm climates and can create a living privacy wall relatively quickly. Arborvitae is the go-to in colder climates.
Designing for real life: layout, traffic flow, and safety
The most common design mistake homeowners make is building a deck or patio that's too small for how they actually want to use it. A dining table for six needs roughly a 12x14-foot minimum footprint just for the table and chairs with comfortable pull-out room. Add a grill station, a seating area, and foot traffic paths and you're looking at 400 to 600 square feet for a space that really works. Before you finalize any design, put tape on the ground or your deck boards to simulate furniture arrangements and traffic paths. Walk through it several times with the family.
Traffic flow is about leaving clear pathways of at least 36 inches between furniture groupings, and 48 inches or more near high-traffic areas like doors and grill stations. A patio that requires you to squeeze between a chair and a planter every time you walk from the kitchen to the yard gets annoying fast. Zone your space intentionally: a dining zone, a lounging zone, and a cooking zone should each feel like their own area without being cramped.
Safety details worth building into the design from the start: deck stairs need consistent riser heights (code maximum is 7-3/4 inches per riser) because inconsistent steps are a leading cause of falls. Outdoor step lighting, either recessed tread lights or low-voltage path lights at the base, dramatically reduces nighttime fall risk. Railings on any deck more than 30 inches off the ground are required by code in most jurisdictions and need to withstand that 200-lb top-rail load mentioned earlier. Balusters need to be spaced no more than 4 inches apart to prevent children from getting heads or limbs stuck. These aren't optional details, they're the baseline for a safe, code-compliant build.
Hiring a contractor: the questions that separate good builders from bad ones
Hiring the right contractor is probably the single most important quality decision you'll make. Great materials installed poorly will fail. Mediocre materials installed by an experienced, detail-oriented builder will often outlast a premium-material job done by a sloppy crew.
What to ask every contractor before signing anything

- Are you licensed and insured in this state, and can you show me current certificates? (General liability and workers' comp both matter.)
- Will you pull the permits for this project? (Any reputable contractor should pull permits. If they suggest skipping it to save money, that's a red flag.)
- Who does the actual work — your crew or subcontractors? (Either can be fine, but you want to know who shows up every day.)
- Can you show me a completed project similar to mine that I can visit or at least see photos of?
- How do you handle ledger flashing and water protection at the house connection? (A good builder will have a detailed answer. A vague one is a problem.)
- What's your warranty on labor, and what's the manufacturer warranty on the materials you're using?
- What's the payment schedule? (Never pay more than 10–30% upfront. Full payment before completion is a major warning sign.)
Comparing bids the right way
Get at least three bids and make sure they're all scoped identically: same square footage, same materials (brand and product line), same post sizes, same permit allowance, and same cleanup. A bid that's 30% lower than two others is usually missing something, either a lower grade of material, thinner substructure lumber, skipped permits, or a plan to use day laborers who aren't covered by workers' comp. When you find the lower bid, ask the contractor to explain line by line where the savings come from. Sometimes it's genuine efficiency. Usually it's corners.
The middle bid is very often the right one, but don't choose by price alone. Look at the quality of the proposal itself. A contractor who gives you a detailed written scope of work, a construction timeline, and a material spec sheet is showing you how they operate. A contractor who gives you a single-number quote on a napkin is showing you the same thing.
DIY alternatives worth considering
If budget is a real constraint, some parts of a deck or patio project are genuinely DIY-friendly. Laying concrete pavers on an existing stable base, installing low-voltage lighting, painting or staining an existing deck, adding a pergola kit to a completed patio, and installing outdoor fans and privacy screens are all within reach for a handy homeowner with a weekend and the right tools. The structural framing of a deck, the concrete foundation work, and any electrical or ledger attachment work is where DIY mistakes have serious safety consequences. Know your limits and price out the full professional scope before deciding what to take on yourself.
Maintenance plan and what to expect for long-term cost and value
A quality outdoor space needs a maintenance calendar, not just occasional attention when something looks bad. The specific tasks depend on your materials, but here's a realistic annual plan for most deck and patio combinations.
- Spring: Inspect the deck frame, ledger connection, and post bases for signs of rot, corrosion, or shifting. Clean all surfaces. Check that railings and stairs are solid with no wobble. Refill polymeric sand in paver joints if washout occurred over winter.
- Spring/Early Summer: Re-stain or reseal wood decking if water no longer beads on the surface. Apply hardwood oil to ipe or other tropical hardwoods. Inspect and test outdoor lighting, fans, and misting systems before peak season.
- Summer: Pressure wash composite and concrete surfaces if algae or mildew appears. Check that drainage slopes are performing correctly after heavy rains. Tighten any hardware that has loosened.
- Fall: Clear debris promptly — wet leaves accelerate staining and rot on wood surfaces. Inspect caulking and flashing at the ledger. Drain and winterize misting systems in freeze-prone climates. Cover or store cushions and fabric elements.
- Every 3–5 Years: Deep-clean and reseal concrete patios. Inspect structural connections and replace corroded hardware. Consider refinishing or recoating composite decking if UV fading is significant.
On the ROI side: a well-built deck or patio consistently returns between 60% and 80% of its construction cost in added home resale value according to remodeling cost reports, with the exact figure varying by region and local market. In outdoor-living-focused markets like the Sunbelt or Pacific Northwest, that return can be higher. But the real ROI isn't just resale value: it's the daily quality of life you get from a space you're actually comfortable in. A $30,000 deck and patio that gets used 150 days a year is a better investment than a $15,000 one that sits empty because it's too hot, too exposed, or too cramped.
If you're also thinking through the specific patio surface you want to prioritize, comparing best patio decking options or best patio decks side by side can help you narrow down the surface and structural combination that fits your budget and climate before you go into contractor conversations. When choosing the right setup, looking at the best bird feeders for patios can help you attract birds without creating a mess or safety issues comparing best patio decking options. Going into those conversations with a clear idea of the material you want makes it much easier to compare bids fairly and avoid upsells that don't fit your priorities. If you're also planning around overall design and usability, the best patio decks guides can help you compare deck versus patio options before you commit.
FAQ
What are the most common early signs my deck or patio wasn’t built with quality deck and patio standards?
Look for early cupping or soft spots in decking boards, fast rusting of joist hangers or post bases, gaps opening up around the ledger area (near flashing), settling or rocking when you step on paver patios, and water staining that keeps returning after rains (often a sign of poor drainage slope or base compaction).
How do I choose deck railing spacing and height correctly for safety beyond the basics?
Verify both the required height above walking surfaces and the maximum baluster spacing for your jurisdiction, then confirm the railing can resist the specified top-rail concentrated load. Also ask whether the contractor plans to use post-to-ledger hardware that won’t loosen under load, not just decorative balusters.
Is wet DCOF the only slip-safety metric I should consider when selecting patio materials?
No. Wet DCOF helps you compare surfaces under a standardized wet test, but you should also ask about surface texture suitability for your footwear (bare feet near pools behave differently than shoes). For pavers, confirm the joint system does not wash out, because loose sand can change surface traction over time.
What’s the real difference between “flashing” and “caulking” at the deck ledger, and what should I demand on-site?
Flashing is a physical water-shedding barrier installed so water drains away from the house framing, caulk is a gap-filler that can fail when movement, shrinkage, or freeze-thaw occurs. Ask the contractor to show the flashing layout before covering it, and confirm the material extends past the ledger and is installed in a way that directs water outward.
How can I prevent patio base failure like heaving and cracking without overspending on the top surface?
Focus on base preparation and drainage. Insist on adequate compacted gravel thickness, proper geotextile use where soils demand it, and correct grading before any pour or paver installation. A better surface won’t fix a poorly compacted or waterlogged foundation, it only delays the problem.
For poured concrete patios, what should I verify about reinforcement and joints for a long-lasting result?
Ask whether the design includes reinforcement appropriate to your soil conditions and whether control joints are planned at the spacing the standard recommends for your pour size. Also confirm the contractor won’t skip curing time and finishing steps, because early surface shrinkage can create fine cracks even when thickness is correct.
How do I decide between composite, pressure-treated wood, and hardwood for quality decks and patios in my climate?
If you’re in humid regions, composite or PVC generally tolerates moisture better with less aggressive annual maintenance. In drier climates, wood can be a reasonable value if you accept periodic sealing and cleaning. In areas with big winter swings, prioritize dimensional stability and consistent ventilation under the deck to reduce cupping and joint stress.
What metal hardware should I require for pressure-treated deck framing, and why does it matter?
Require hot-dipped galvanized or stainless steel for joist hangers and post bases, not zinc-plated hardware. The higher-chemistry pressure-treated lumber commonly used today can accelerate corrosion of cheaper metals, causing structural loosening long before visible surface wear.
How do I budget correctly when getting bids, so I’m not comparing apples to oranges?
Make every bid match on the same square footage, material brand and product line (not just “composite decking”), post sizes, flashing details, drainage approach, and permit coverage. Require allowances for disposal and protect-all surfaces cleanup, then ask the lowest bid contractor to itemize each savings source and show where scope was reduced.
If a contractor’s bid is 20 to 30% lower, what are the most likely missing items?
Common gaps include thinner framing, lower-grade substructure lumber, skipping permits or inspections, substituting cheaper hardware, reducing base thickness or sand bed depth under pavers, omitting polymeric sand, or using an insufficient flashing system at the ledger. A serious contractor should be able to explain each line item clearly.
When is DIY reasonable for deck and patio projects, and where should I stop for safety?
DIY is often reasonable for non-structural upgrades like outdoor lighting, installing low-voltage systems, adding pergola kits to an already stable patio, painting or staining existing surfaces, and setting pavers on an existing stable base. Stop for structural framing, ledger attachment, concrete foundation work, and any electrical tie-ins unless you can meet local code and safety requirements.
What should my maintenance calendar include, and what “maintenance neglect” causes the fastest failures?
Plan for seasonal cleaning, checking for standing water, inspecting fasteners and rail connections, re-sealing or staining when required for your surface type, and monitoring drainage components like edge drains or slopes. The fastest failures usually come from water trapped against wood or under surfaces, plus loose or washed-out joint sand for pavers.
How do I prevent nighttime slip hazards and falls beyond just adding lights?
Combine step lighting with consistent stair geometry and proper riser uniformity. Confirm handrail or code-compliant railing details on stair runs, and choose lighting placement that reduces dark tread edges. For patios, ensure any transitions between materials are smooth and not creating ledges that catch feet.
What’s the quickest way to confirm the patio or deck size will work for daily use before construction?
Tape out the footprint on the ground (or use the proposed deck layout) with real measurements for your largest table, seating, and grill footprint, then add walking paths. Walk the layout multiple times while holding typical items (like moving chairs or accessing a door) so you can spot squeeze points early.
What drainage test can I do before building to ensure the patio slope won’t push water toward my foundation?
After rain or by using a controlled hose test, observe where water flows along the proposed area and whether it concentrates near foundation walls. If water runs toward the house, plan regrading, a French drain, or an edge drain before installation, because you typically cannot fix drainage problems once the surface and base are locked in.
How do comfort upgrades change how often a deck or patio gets used, and what should I prioritize first?
Start with shade and airflow because they address the biggest usability bottlenecks in summer heat. Then add privacy and functional lighting where you cook, walk, and relax. If you’re in dry-heat conditions, misting can help temperature, while in humid conditions ceiling fans usually provide better comfort without adding extra moisture.
Next Articles
Top Notch Decks and Patios Checklist for Upgrades Today
Checklist to upgrade top notch decks and patios: materials, safety, drainage, layout planning, DIY vs hire, costs
Better Bird Deck Porch Patio: Step-by-Step Upgrade Guide
Step-by-step upgrade for a better bird-friendly deck porch patio, with safe layout, feeders, plants, drainage, and clean
Best Patio Decking: Compare Materials, Costs, and Lifespan
Best patio decking guide: compare materials by cost, lifespan, maintenance, slip and weather resistance, plus installati