Outdoor patios are built by a surprisingly wide range of people: DIY homeowners, concrete masons, paver/hardscape contractors, landscape companies, general contractors, and deck builders. Which one you actually need depends on your patio material, site conditions, and what add-ons you want. A simple ground-level paver patio on flat ground? A motivated homeowner or a local hardscape crew can handle it.
Who Builds Outdoor Patios: Pros, Roles, and How to Hire

Phoebe Foster
3 Jul 2026
A sloped site with drainage issues, a poured concrete slab, a shade cover, and low-voltage lighting? You're likely coordinating two or three trades. Knowing who does what upfront saves you from hiring the wrong person and paying twice. A reliable patio comes down to getting the base prep and drainage right from the start, so it does not fail after a couple of seasons.
Who builds patios: the roles and who owns what
Patio construction typically gets divided across several distinct roles. Understanding those roles before you start calling contractors will help you ask sharper questions and spot red flags fast. If you are trying to figure out who makes patios for your specific site, start by understanding the key roles described here so you know who to call and what to ask.
| Contractor Type | What They Typically Handle | Best For |
|---|---|---|
| Hardscape/Paver Contractor | Excavation, base prep, paver or slab installation, edging, polymeric sand, sealing | Paver patios, flagstone, natural stone |
| Concrete Mason | Forming, pouring, finishing, jointing, sealing concrete slabs | Poured concrete patios, broom-finish slabs |
| Landscape Contractor | Grading, drainage, base work, sometimes pavers; often subcontracts specialty work | Full yard projects that include a patio |
| General Contractor | Coordinates all trades, pulls permits, manages timeline | Complex projects with covers, electrical, drainage, and structure |
| Deck/Patio Cover Builder | Pergolas, shade structures, patio covers, attached roofed structures | Adding a cover, pergola, or attached structure to an existing or new patio |
| Specialty Trades | Drainage (French drains, catch basins), low-voltage lighting, outdoor electrical, fencing | Add-ons and problem-site solutions |
| DIY Homeowner | Paver installation, base prep, edging, minor grading on manageable sites | Budget-conscious flat-site projects with good access |
The design phase is often handled by whoever you hire to build the project, but on larger or more complex patios it is worth paying a landscape designer or architect for a graded plan before any shovels go in. That plan becomes your bidding document, so every contractor is quoting the same scope.
DIY vs. hiring: what you can realistically tackle yourself
There is real money to be saved doing a paver patio yourself, but the gap between a YouTube tutorial and a patio that holds up for 15 years is mostly in the base work. I have seen plenty of DIY patios where the pavers look fine on day one and are rocking, settling, or pooling water by year two because the compacted base was not done right.
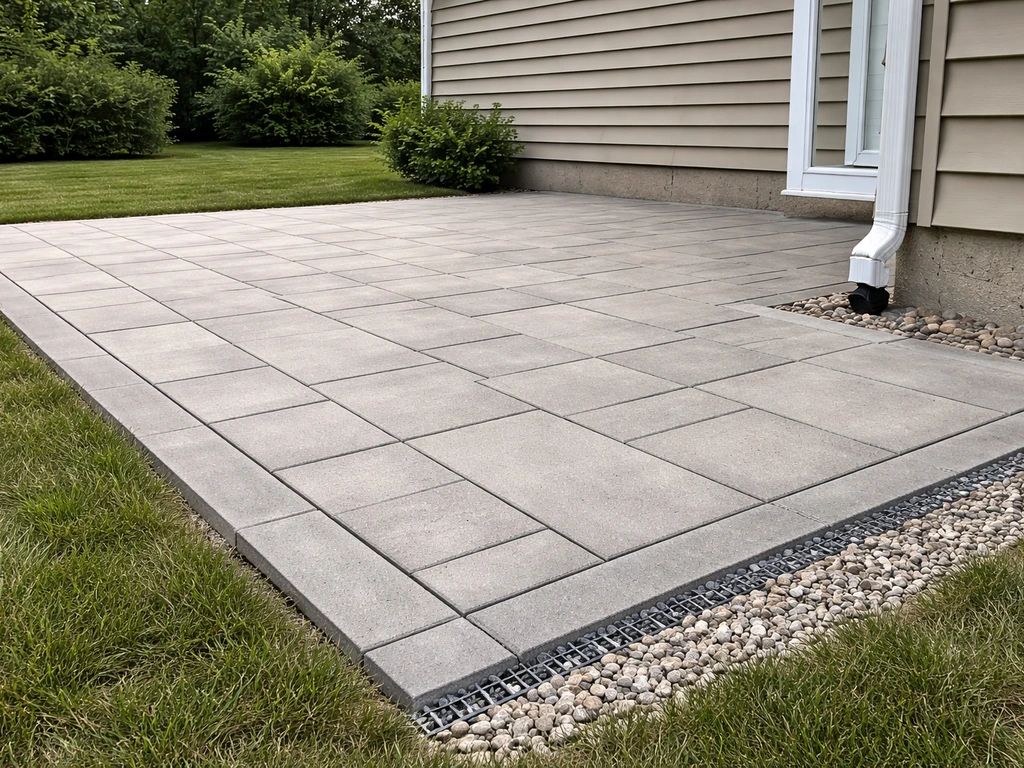
A ground-level paver patio on a relatively flat, well-draining site is genuinely achievable for a careful DIYer. The standard process calls for 4 inches of compacted gravel base, a geotextile fabric layer underneath, a 1-inch sand bedding layer, and a drainage slope of about 1/8 to 1/4 inch per foot away from the house. The slope part is where most DIYers underestimate the work: you need stakes, string lines, and patience to check your grade at every step. Reddit landscaping forums are full of threads where homeowners discovered mid-project that they dug too deep or did not account for existing grade and ended up with a bowl that collects water.
Where DIY tends to break down: clay or problem soils that need deeper excavation or a French drain, sites with meaningful slope changes, concrete slabs (which require forming, proper consolidation, and timed saw cuts for control joints), and anything attached to the house structure. Polymeric sand is also trickier than it looks. You need a plate compactor to vibrate the sand down into the joints properly. Running a compactor without the right technique can shift pavers or crack them. If you are renting equipment you have never used before and the patio is your main outdoor living space, it is worth at least pricing out a paver contractor before committing.
- DIY-friendly: ground-level paver patio on a flat, well-draining site under about 300 square feet
- DIY-possible with research: flagstone in sand, simple gravel patio, basic paver refresh with polymeric sand
- Hire a pro: poured concrete slab of any size, sloped sites, clay soil, drainage problems, anything attached to the house
- Definitely hire a pro: patio covers, pergolas with electrical, gas lines, retaining walls over a few feet tall
Choosing the right contractor for your patio type
The most common mistake homeowners make is hiring whoever answers the phone first or gives the lowest bid without checking whether that person actually specializes in patios. A general landscaper who occasionally lays pavers is a very different animal from a dedicated hardscape crew that does fifty paver patios a year. Same goes for concrete work: a concrete mason who pours driveways all day knows forming, slope, jointing, and finishing at a level a general handyman simply does not.
What credentials to look for

- State contractor's license (check your state licensing board online — takes two minutes)
- General liability insurance and workers' compensation — ask for a certificate naming you as additionally insured
- ICPI certification (Interlocking Concrete Pavement Institute) for paver contractors specifically
- NCMA or similar for segmental retaining wall work if your site involves grade changes
- Verified reviews on Google, Houzz, or Angi — look at photo quality and recency, not just star count
Questions to ask before you hire
- Can you show me three to five completed patios similar to mine, with photos or site visits?
- What base depth and materials do you use, and why?
- How do you handle drainage on this site specifically?
- Who does the work — your own crew or subcontractors?
- What does your warranty cover, and for how long?
- How do you handle permits — do you pull them, or does the homeowner?
- What is the payment schedule, and do you require a large deposit upfront?
- What is your realistic start date and how long will the project take?
Any contractor who cannot clearly explain their base prep process or who dismisses drainage questions is a contractor to skip. The base and drainage are where patios succeed or fail, and a good contractor knows that and talks about it unprompted.
The patio build process, stage by stage
Understanding the sequence of a patio build helps you match the right person to each phase and catch problems before they get buried under pavers or concrete.
Site prep and excavation
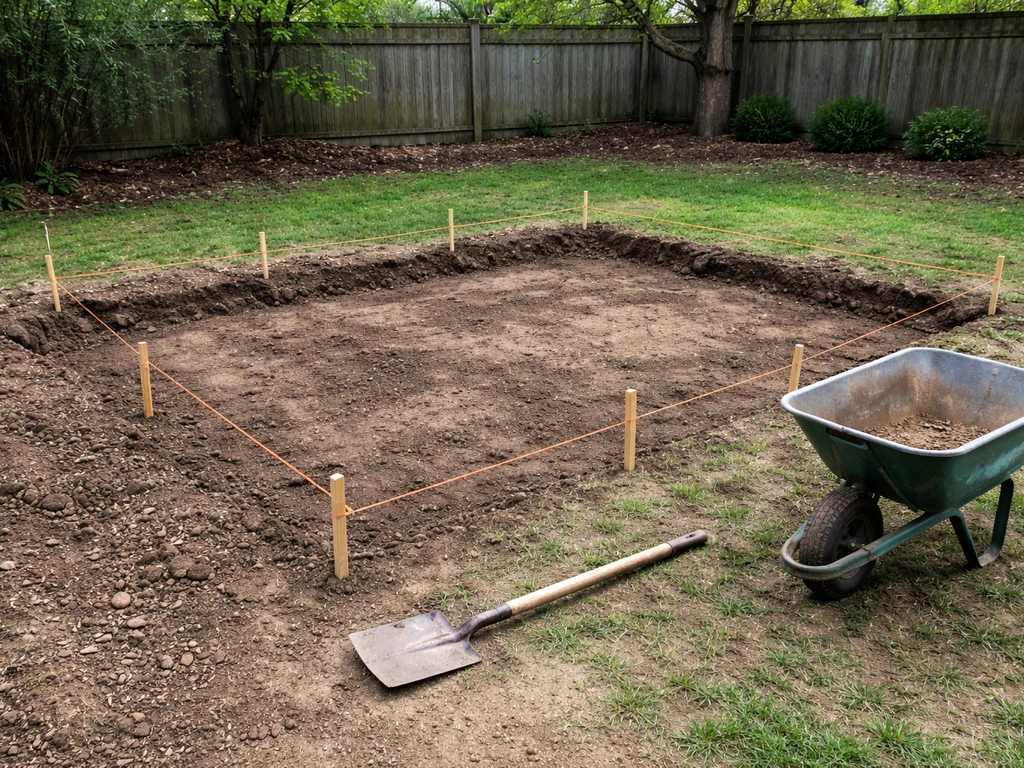
Before anything goes in, the area needs to be staked out, existing vegetation removed, and the soil excavated to the correct depth. For a standard paver patio, that typically means removing 6 to 8 inches of material to leave room for base, bedding, and paver thickness. Utility lines need to be marked before digging: in most areas you call 811 (or your country's equivalent) and it is free. Some jurisdictions explicitly require the permit holder to verify utility and easement locations before breaking ground.
Grading and drainage
This is the most critical and most often skimped step. The finished patio surface needs to slope away from your house at 1/8 to 1/4 inch per foot minimum. On clay soils or sites with poor natural drainage, a geotextile fabric layer under the base prevents fine particles from migrating up and destabilizing everything above it. Serious drainage problems may need a French drain or catch basin added at this stage, which is typically a specialty trade item. Get that sorted before the base goes in, not after.
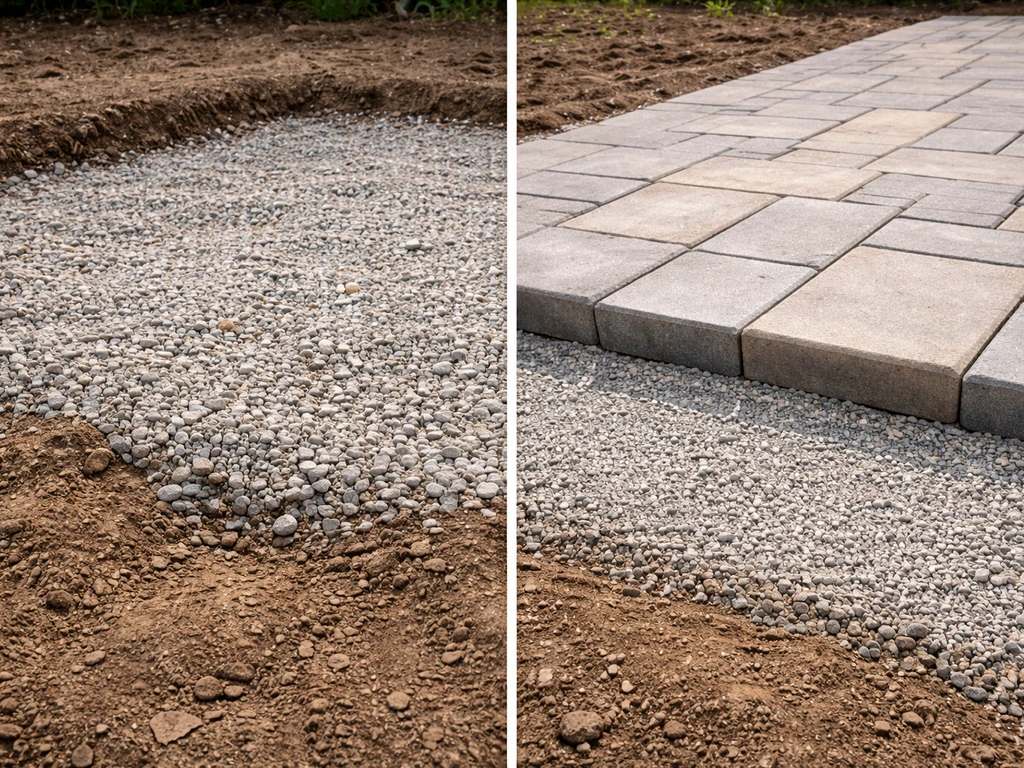
Base installation
Crushed aggregate base (typically 3/4-inch compacted gravel) goes in after fabric and is compacted in lifts, usually no more than 3 to 4 inches per pass. A standard paver patio calls for about 4 inches of compacted base. Skipping the plate compactor or compacting the full depth in one shot leaves voids that cause settling later. This is non-negotiable regardless of whether you are doing it yourself or watching a crew.
Forming and pouring (for concrete slabs)
Poured concrete patios require forms to control the slab's shape, thickness, and slope before the pour. Once the concrete is placed and consolidated, the surface is finished to the desired texture. Control joints need to be cut (typically with a saw) at the right time: too early and the saw tears the concrete, too late and it cracks on its own where you do not want it.
The standard guidance is that control joint depth should be at least one-quarter of the slab thickness, and timing is measured in hours after the pour depending on temperature and mix.
Concrete should cure for a minimum of 28 days before sealing, and sealers should be applied when temperatures will stay between roughly 50 and 90 degrees Fahrenheit for at least 24 hours after application.
Paver or slab placement and jointing
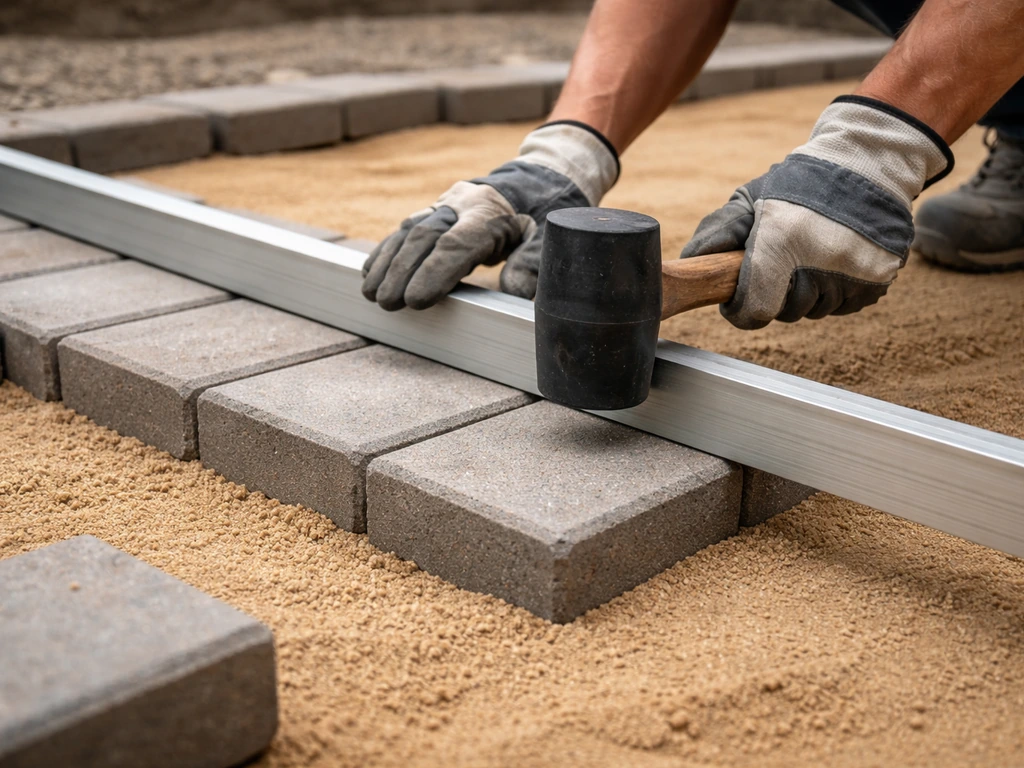
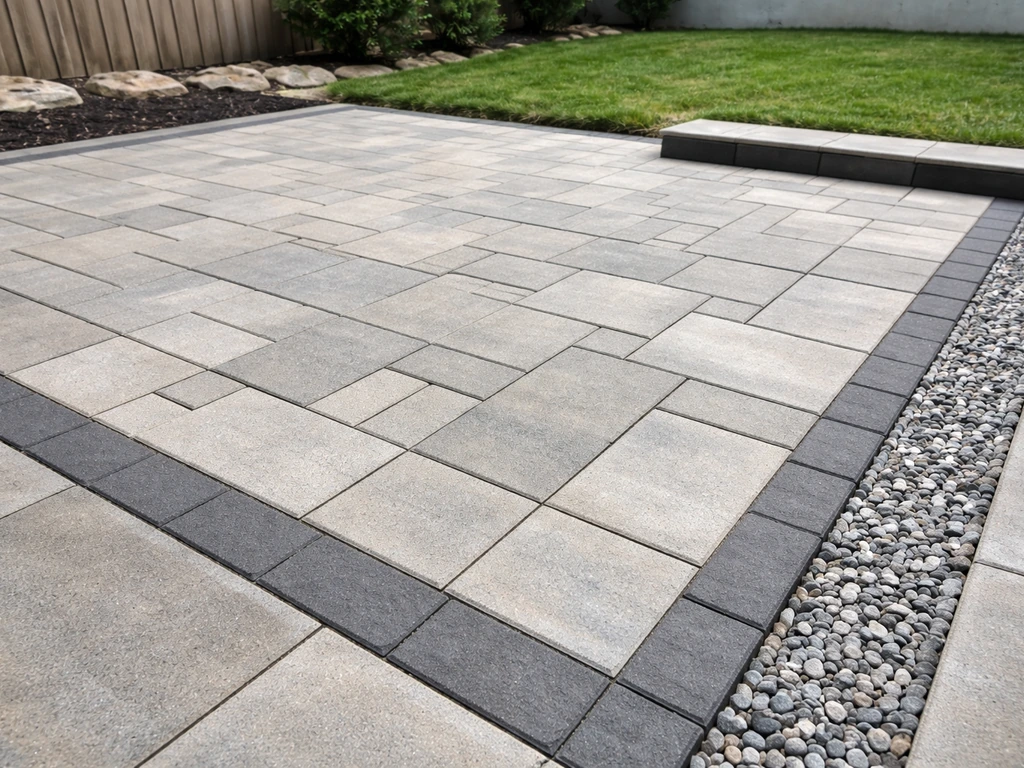
For pavers, a 1-inch layer of coarse sand (not stone dust, which can migrate) goes over the compacted base as a bedding layer. Pavers are set and checked for level and slope continuously as you go. Edge restraints get pinned at the perimeter before the final compaction pass. Polymeric sand is swept in, compacted with a plate compactor (with a protective pad under the plate), and then lightly misted to activate the binding agents. Done right, it hardens in the joints and resists weeds and washout. Done wrong, it hazes the paver surface or stays loose.
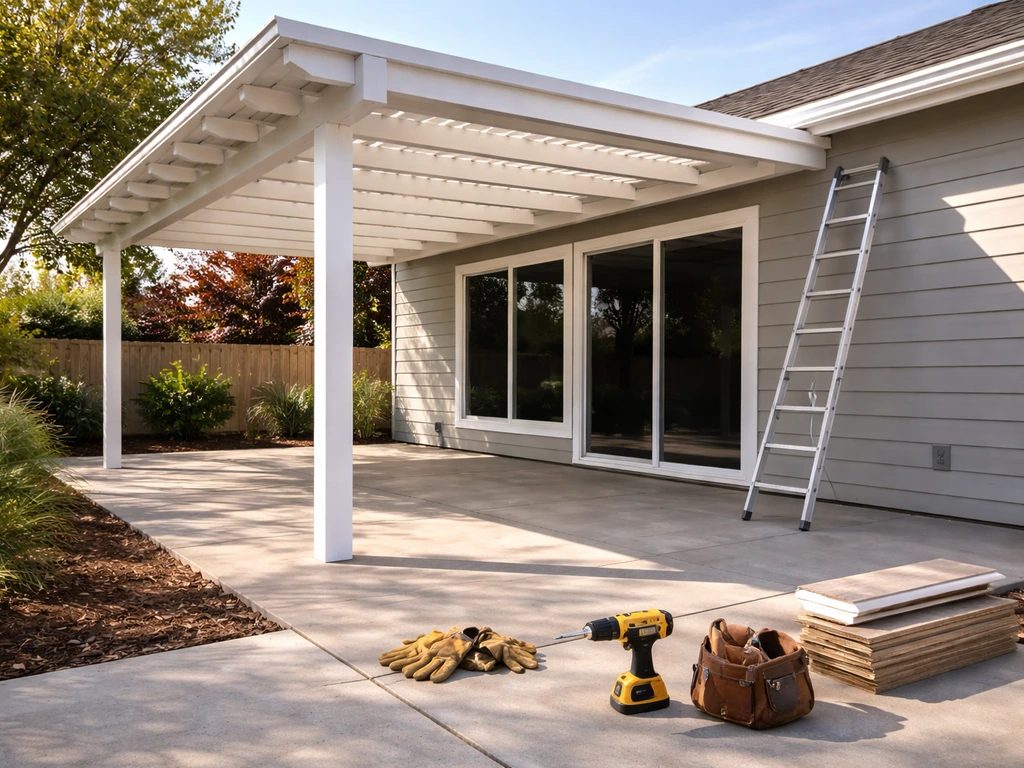
Add-ons: covers, lighting, misters, and privacy features
Once the patio surface is in, add-ons come next. If you want to add comfort upgrades like heaters, shade, or upgraded lighting, it can help to coordinate with solar and patio pros early in the planning stage. Patio covers and pergolas are typically handled by a deck builder or specialty patio cover company.
Low-voltage landscape lighting can often be done by a hardscape contractor with the right experience, but standard-voltage outdoor electrical (outlets, fans, overhead lighting at line voltage) requires a licensed electrician in most states. Misting systems are typically installed by HVAC or specialty outdoor comfort contractors. Privacy features like fencing or screens may involve a separate fencing contractor. If you are adding multiple systems, a general contractor who can coordinate the trades is worth the management fee.
How your patio material affects who should build it
The material choice is probably the single biggest factor in determining which type of contractor you need, how complex the job is, and what the finished product will demand in ongoing maintenance.
| Material | Best Builder Type | Key Considerations |
|---|---|---|
| Concrete pavers | Hardscape/paver contractor or skilled DIY | Base prep and drainage are everything; polymeric sand requires proper compaction technique |
| Poured concrete | Concrete mason | Forming, jointing, and finishing require real skill; not a good DIY project |
| Natural flagstone | Hardscape contractor or careful DIY (dry-laid) | Wet-set mortar flagstone needs a mason; dry-laid in sand is manageable DIY |
| Composite or wood decking | Deck builder | Structural concerns and ledger attachment to house require a licensed deck contractor |
| Gravel/decomposed granite | Landscape contractor or DIY | Simplest base requirements; needs edging and periodic refresh |
| Porcelain/large-format tile outdoors | Experienced tile setter or hardscape contractor | Heavy, requires precise substrate prep; prone to cracking if base shifts even slightly |
Drainage considerations follow the material choice closely. Impervious surfaces like concrete and porcelain tile shed 100 percent of rainfall, which means you need a deliberate plan for where that water goes. Permeable pavers allow water to pass through the joints into the base and soil below, which can actually reduce the drainage design burden on flat sites. If you are in a region with heavy rainfall or clay soils (common in the Southeast, Midwest, and Pacific Northwest), drainage is not optional and should be part of your contractor conversation from the first meeting.
What drives patio costs and how to compare bids fairly
Patio bids can vary by 30 to 50 percent for what looks like the same job, and most of that gap is scope differences, not profit margin. Before you assume the low bid is the deal, figure out what each contractor is actually including.
Main cost drivers
- Material choice: concrete pavers range widely by product line and region; natural stone costs significantly more than manufactured pavers; poured concrete is typically lower material cost but skilled labor-intensive
- Site difficulty: slopes, poor soil, limited equipment access, and tree roots all add excavation time and cost
- Drainage requirements: adding a French drain, catch basin, or regrading adds hundreds to thousands depending on scope
- Base depth: more depth means more excavation, more aggregate, more compaction passes, more disposal
- Add-ons: covers, lighting, electrical, and misting systems are often priced separately and add meaningful cost
- Permits and fees: permit costs vary by jurisdiction but are typically $150 to $500 for a basic patio; more for electrical or structural work
- Disposal: hauling away excavated material and debris is a real line item that some low bids conveniently leave out
How to compare bids without getting fooled
Ask every contractor to bid the same written scope: identical square footage, same base depth and material, same edging type, same paver product (or equivalent), and the same add-ons. Then line the bids up side by side. If one bid is 40 percent lower, the first question is not 'great deal?' but rather 'what did they leave out?' Common omissions include base material, disposal fees, permits, edging restraints, and polymeric sand. A bid that looks cheap on paper but excludes those items will match or exceed the higher bids once you add them back. Also confirm payment terms: a contractor demanding more than 10 to 30 percent upfront as a deposit is a yellow flag.
Permits, code, and HOA: who handles what
This is the area where homeowners most often get surprised, and sometimes not in a good way. Permit requirements for patios vary dramatically by jurisdiction, but the general pattern is consistent: ground-level uncovered patios on well-drained sites often require no building permit, but electrical work, patio covers, larger projects, and impervious surfaces over certain thresholds usually do trigger permits.
For example, Seattle requires a grading permit if you are adding or replacing 750 square feet or more of paving. San Diego allows some patio covers to be permit-exempt based on size and conditions, but separate electrical or mechanical permits may still be required. Bend, Oregon, ties permit requirements to size thresholds and explicitly notes that adding electrical to a pergola or cover triggers an electrical permit. Las Vegas requires an electrical permit any time electrical work is included in a patio cover project. The lesson: always check with your local building department before starting, especially if you are adding a cover, lighting, or anything attached to the house.
Uncovered patios still need to comply with local zoning codes around setbacks and impervious surface limits. If you get a patio installed without checking and your municipality enforces those rules (which does happen, particularly after drainage complaints from neighbors), you can end up having to remove or modify the work. One Reddit thread covers exactly this scenario where a homeowner got a concrete patio installed, skipped the permit research, and was left figuring out the next steps after the fact.
Who pulls the permit?
In most states, the licensed contractor performing the work is the one who should pull the permit. If a contractor asks you to pull your own permit as the homeowner (a common workaround), be aware that doing so in some states means you are taking on legal responsibility for the work meeting code, and it can affect your homeowner's insurance and your ability to claim against the contractor's license if something goes wrong. Confirm your state's rules before agreeing to it.
HOA rules
If you live in an HOA, add a step before you even call contractors: pull out your CC&Rs and architectural guidelines and check whether a patio project requires approval, whether there are restrictions on materials or colors, and what the application timeline looks like. HOA approval and a building permit are separate processes. Some HOAs require permit documentation as part of their approval process, so a delay in one can delay the other. Getting HOA approval in writing before signing a contractor agreement protects you if the project scope changes.
Your next steps today
Here is how to move from 'thinking about a patio' to a real project with the right people involved. Once you have those details, you can compare the best patio solutions for your budget and site conditions. Start by measuring your intended patio area and noting any obvious grade changes, drainage issues, or proximity to the house foundation. Sketch out what you want: size, shape, material preference, and any add-ons like a cover or lighting. That gives every contractor you talk to a starting point.
- Measure your space and note site conditions (slope, soil type, access for equipment, existing drainage patterns)
- Decide on your material preference, even roughly — pavers, concrete, or natural stone each point to different contractor types
- Check your local building department's website for permit thresholds and any impervious surface rules before calling contractors
- If you are in an HOA, submit for architectural approval early and get it in writing
- Get at least three bids from contractors who specialize in your material type — not general handymen
- Ask each contractor for photos of three to five similar completed projects and verify their license and insurance
- Use a written scope to compare bids line by line, not just total price
- Confirm who pulls permits and how that is handled in the contract
If you are still deciding between doing it yourself and hiring out, price both honestly. Factor in equipment rentals (plate compactor, hand tamper, wet saw for cutting pavers), material delivery, and your own time at a realistic hourly value. For many homeowners a paver patio in the 200 to 400 square foot range is genuinely worth attempting as a DIY project on a flat, accessible site.
For anything involving concrete, significant slope, drainage infrastructure, or a patio cover, the pro route tends to pay for itself in outcome quality and headache avoidance. If you are also exploring covered structures or specific contractor companies for your area, researching patio cover builders and reading reviews of local patio contractors alongside this guide will round out your research before you commit.
For a patio cover project, it helps to talk to contractors who regularly build patio covers rather than assuming any patio installer can handle the framing and roofing details patio cover builders.
FAQ
I need to replace part of an existing patio, who should I contact first?
Start with the trade that matches the existing material, then confirm drainage and base condition. For pavers, a hardscape crew can pull up sections and rebuild the base where it has settled. For concrete, a concrete contractor should evaluate slab thickness and jointing, because patching without matching the control joint pattern often leads to new cracking at the patch edges.
How do I decide between a paver contractor, a landscape company, and a general contractor for the same patio?
If the scope is mostly base, pavers, edging, and polymeric sand, pick a dedicated hardscape/paver crew. If you are adding grading, plantings, or drainage beyond the patio footprint, a landscape company (or a contractor who routinely coordinates drainage) is usually the best fit. If you have multiple systems, like a patio cover plus electrical plus fencing, a general contractor can coordinate trades, but still ask who is responsible for base prep and final surface slope.
Who handles drainage when my yard is flat but my patio area floods?
Ask the contractor how they will achieve the required slope, then confirm whether they plan a subsurface fix. For simple issues, the paver base and bedding rebuild with correct grade may solve it. For persistent pooling, look for someone experienced with catch basins, French drains, or underdrains, and ask whether that work is included in their written bid.
Can I hire a handyman to build a patio to save money?
For straightforward ground-level pavers on a well-draining site, some skilled handymen can do it, but the risk is base compaction quality and slope verification. If the project involves concrete, significant slope, any work tied to the house, or polymeric sand, use a contractor who can show a repeatable process for excavation, compacted lifts, and drainage.
Who should install a patio cover, and do I need to involve an electrician?
Framing and roofing are typically handled by a deck builder or specialty patio cover company. If you want wiring for fans, outlets, or overhead lights at standard voltage, confirm that a licensed electrician is included or subcontracted, since most areas require it by code even if the cover company can do the rest.
Is it common to need more than one permit for a patio project?
Yes. Even when a patio itself might be permit-exempt, electrical permits can still be required for lighting or outlets, and some jurisdictions require separate permits for covers or mechanical components. Before signing, ask the contractor what permits they expect to pull and whether they are bundling those costs into the bid.
What contractor should I choose if my patio must be attached to the house or affects a walkway?
Choose a pro who routinely handles tie-ins and transitions, because attachment details and flashing or jointing affect both structure and water management. For concrete tie-ins and control joints, use a concrete contractor. For paver tie-ins that meet existing slabs or steps, use a hardscape contractor and require a written plan for how drainage and surface water will be handled at the interface.
What should I ask to verify the contractor really understands base prep?
Request specifics: how deep they excavate for your patio thickness, what base material and thickness they use, whether they compact in lifts with a plate compactor, and how they will verify the final slope (stakes or laser) before pavers go down. Also ask how they handle utility marking, site disposal, and geotextile placement where needed.
Who is responsible if my patio starts settling or pooling water after installation?
Your contract should spell out workmanship coverage and any warranty timeframe. Many failures trace back to base compaction, drainage slope errors, or inadequate edge restraint, so the responsible party is typically the contractor who built the base and finished surface. Keep your bid and written scope, take photos during construction if possible, and address issues quickly, since some warranties require prompt notice.
How much upfront deposit is normal, and when is it a red flag?
A common concern is contractors requesting very high upfront payments. If someone demands more than roughly 10 to 30 percent as the deposit, treat it as a yellow flag and ask what the payment schedule is tied to (materials ordered, inspection passed, base completed). Also confirm the total contract amount, payment triggers, and that changes require written change orders.
Next Articles
Reliable Patio: Build a Safe, Durable, Low-Maintenance Setup
Reliable patio guidance: choose materials, verify drainage and base, avoid settling and slips, and plan low-maintenance
Who Builds Patio Covers? Find the Right Builder and Get a Bid
Learn who builds patio covers, how to vet builders, compare bids, and ask the right questions for permits and warranties

Solar and Patio Pros Review: Services, Pricing, and Vetting Guide
Solar and Patio Pros review covering solar + patio services, pricing, vetting checklist, and quote steps for homeowners.