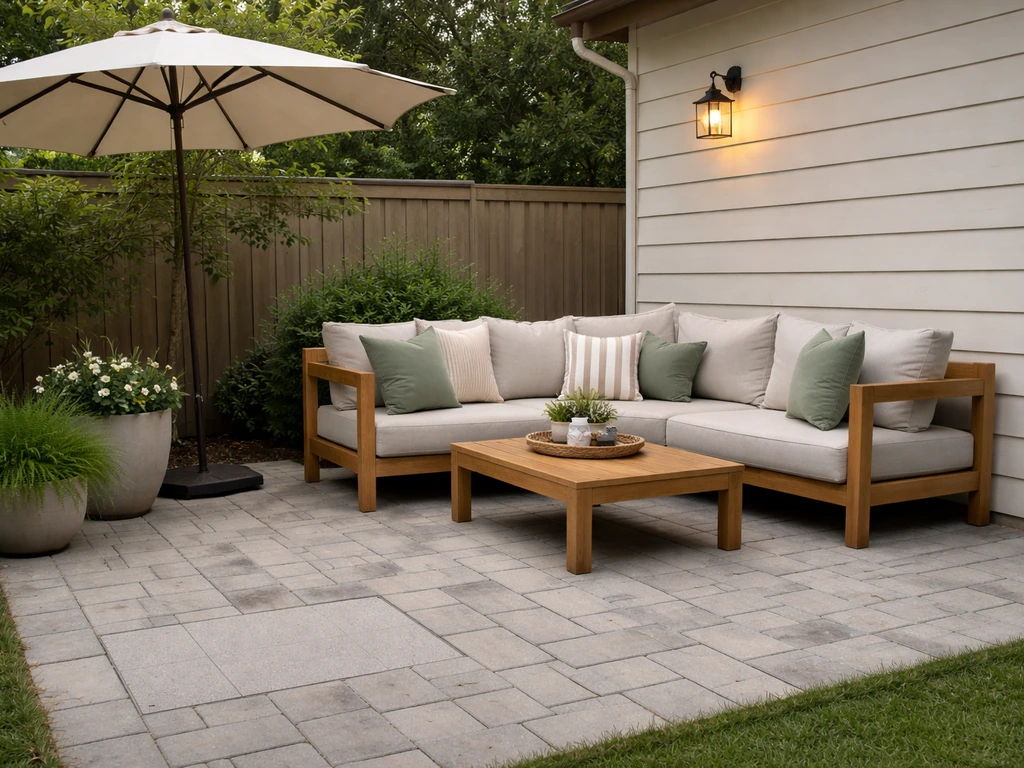
If your patio looks tired, feels uncomfortable, or has a surface you're embarrassed to step onto, you can fix most of that in a weekend, sometimes in an afternoon, without tearing anything out or spending thousands. The right quick fix depends on what's actually wrong: a grimy surface, cracked concrete, wobbly furniture layout, brutal afternoon sun, or gaps that are turning your paver joints into weeds. Nail the diagnosis first, then pick the fix that matches your budget, your climate, and how many hours you realistically have.
Quick Fix Patio Ideas for Instant Comfort and Style

Phoebe Foster
29 Apr 2026
Diagnose What's Wrong Before You Spend a Dollar
Before buying anything, spend 10 minutes walking your patio and honestly categorizing the problems. Most patios have one or two root issues, not ten. Fixing the right thing first gives you the biggest visible return and saves you from wasting money on changes that don't move the needle.
Use this quick mental checklist to find your category:
- Surface problem: Staining, grime, cracked concrete, sinking pavers, eroded joints, or peeling finish. Fix: clean, patch, resurface, or re-sand.
- Comfort problem: Too hot, too exposed to wind, too buggy, or poor airflow. Fix: shade sails, screens, fans, or misters.
- Safety problem: Uneven slabs, trip hazards, slippery surface, poor lighting. Fix: leveling, anti-slip coating, pathway lighting.
- Style/layout problem: Cluttered, outdated look, poor furniture arrangement, no focal point. Fix: layout reset, lighting, new textiles, fast decor.
- Weather and organization problem: No storage, gear left out, no protection for furniture. Fix: covers, bins, hooks, simple weatherproofing.
Most patios fall into two or three of these at once. Pick the one that bothers you most or creates a safety risk, and start there. If you're on a tight budget, the single highest-ROI move almost every time is a thorough deep clean, it's shocking how much better a patio looks before you buy a single thing. If you are searching for the best patio ideas on a budget, starting with a thorough cleaning is often the highest-impact first step before you add anything new deep clean.
Clean, Repair, and Refresh: The Basics That Make the Biggest Impact Fast
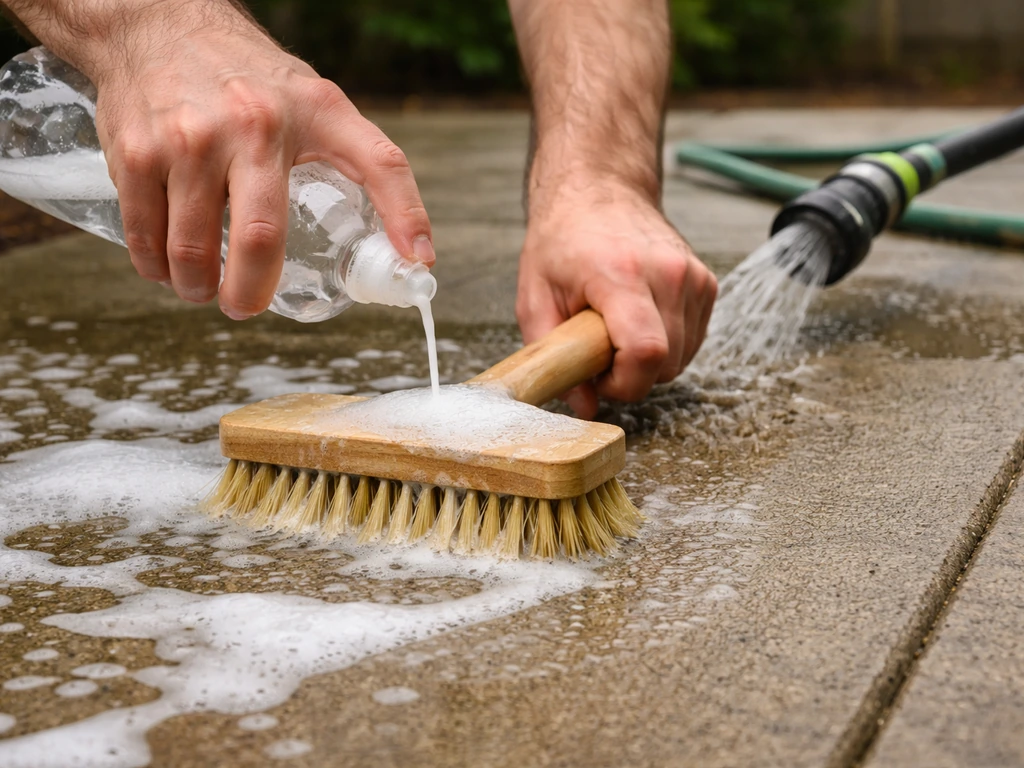
Deep Cleaning First
Seriously, clean the patio before you do anything else. A good scrub with a deck brush, a bucket of soapy water or an oxygen-based cleaner, and a garden hose can transform a patio that looks 10 years older than it is. For concrete or pavers, a pressure washer works well, but keep the pressure under 500 psi on wood surfaces. Pressure washer impact above that threshold damages wood fibers and is genuinely not recommended. On wood decks, stick to a soft-bristle brush and a wood-specific cleaner. Also avoid using bleach or oxidizer-based chemicals on treated wood, they degrade the fibers over time.
Patching Cracked Concrete
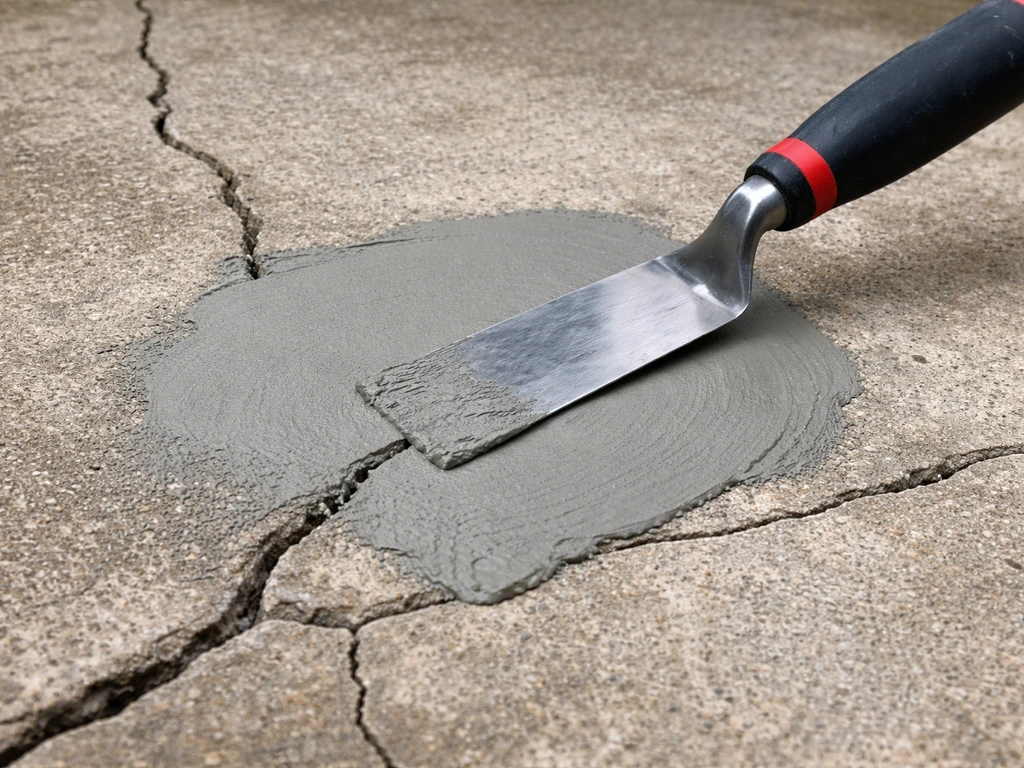
If your concrete slab has surface cracks or worn patches, a product like Quikrete Concrete Resurfacer is one of the best weekend fixes available. It goes on thin, bonds to existing concrete, and can make a badly worn slab look almost new. The key constraint: don't apply it if the temperature is below 50°F, and plan your work window carefully, [at 73°F, you've got about 20 minutes of working time per batch](https://www. quikrete.
com/pdfs/spec_data-concreteresurfacer. pdf) and the coat stiffens in 20 to 30 minutes. Start early in the morning if you're in a warm climate to avoid working in peak heat, which shortens that window further. A related Reddit discussion notes that you should plan QUIKRETE resurfacer timing around temperature windows, not just daytime highs, to stay within the product instructions’ temperature guidance [avoid working in peak heat](https://www.
reddit. com/r/masonry/comments/1sazxlf/temperatureclarificationforquikreteproject/). Follow QUIKRETE® Concrete Resurfacer (#1131-40) installation instructions by [maintaining proper curing temperature conditions](https://www. buildsite.
com/pdf/quikrete/QUIKRETE-Concrete-Resurfacer-1131-40-Installation-Instructions-1838870. pdf), such as not dropping below 50°F for the first 8 hours after placement.
Re-Sanding Paver Joints
If your pavers are intact but the joints have eroded, you're losing stability and inviting weeds. Polymeric jointing sand is the right fix, it hardens when wet and locks the joints without cracking like regular sand. The two steps most DIYers get wrong: not sweeping enough sand into the joints before wetting (leave zero gaps), and not getting the activation right. You need to wet the sand thoroughly so it sets properly, and on textured pavers, blow off any surface water into the joints before it dries to avoid a white residue haze. Use a leaf blower on low, not a pressure washer, for that step.
Quick Leveling for Sunken Pavers
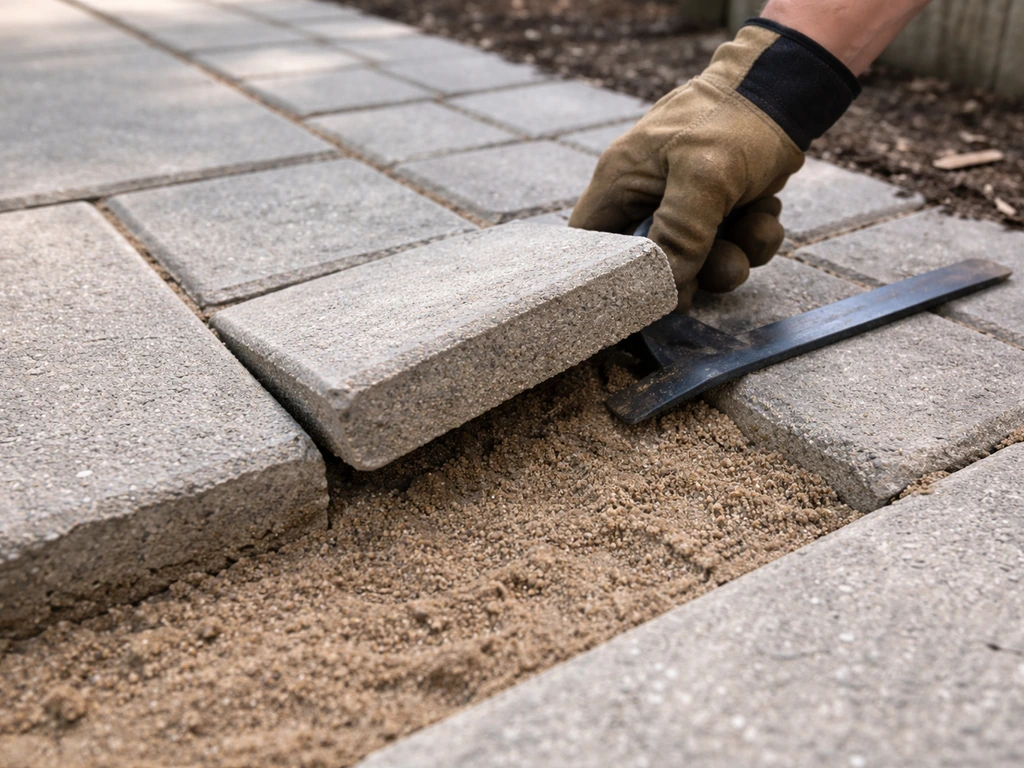
A single sunken or rocking paver is a trip hazard and an easy fix. Pry up the paver with a flat bar, add or redistribute the base sand underneath, tamp it firm, and reset the paver flush. Check it with a straightedge. If multiple pavers in a section are sinking in the same direction, that's a drainage or base failure, more on that in the contractor section below, because that's not a quick fix.
Fast Comfort Upgrades: Shade, Wind, and Temperature
Shade Solutions That Actually Work
If your patio is unlivable from noon to 5pm in summer, shade is the highest-value upgrade you can make. Shade sails are popular because they're cheaper than pergolas and can be installed in a day, but they require real planning to do right. You need anchor points that can handle both the sail's weight and significant lateral loads from wind, this is not a job for deck screws into fence posts.
Proper anchor hardware, deep footings when using new posts, and correct tensioning geometry all matter. If your anchor points are solid (a masonry wall, a structural post, or a heavy beam), a shade sail is a genuinely fast DIY weekend project. If they're not, you'll either need to install proper posts or look at other options.
Faster alternatives if you don't want to deal with load calculations: a freestanding cantilever umbrella (no anchoring needed, moves with the sun), a pergola shade cloth stretched between existing posts, or a retractable awning mounted to your home's fascia. In high-wind regions like the Plains or Gulf Coast, retractable awnings and umbrellas with tilt-and-lock features are smarter choices than fixed sails.
Wind Screens and Privacy Panels
Outdoor privacy screens double as wind breaks and can completely change how a patio feels. Bamboo roll screens zip-tied to an existing fence or railing take about 30 minutes to install. Freestanding wood or metal lattice panels add wind protection without permanent attachment. If you're in a region with cold, gusty springs (think Midwest or mountain states), a well-placed screen on the prevailing wind side can extend your usable season by weeks.
Misting Systems and Outdoor Fans
For hot, dry climates like Texas, Arizona, or Southern California, a misting system is one of the most cost-effective comfort upgrades you can buy. Entry-level kits attach to a garden hose and clip to a pergola or umbrella frame, no plumbing, no tools, under $50. They can drop the perceived temperature by 15 to 20 degrees in low-humidity conditions. In humid climates like Florida or the Gulf Coast, misters don't cool as effectively (the air is already saturated), so a high-velocity outdoor ceiling fan is the better call. Look for a UL-listed wet-rated or damp-rated fan depending on how exposed the space is.
Quick Flooring Fixes and Surface Safety
If the surface itself is the problem, ugly, slippery, or uneven, you have several fast options short of a full replacement.
| Fix | Best For | DIY Difficulty | Approximate Cost |
|---|---|---|---|
| Interlocking deck tiles | Covering ugly concrete or old pavers | Easy (no tools) | $2–$6 per sq ft |
| Concrete resurfacer | Worn or lightly cracked slabs | Moderate (timing matters) | $0.50–$1.50 per sq ft |
| Outdoor area rug | Quick visual refresh, defines zones | Instant | $50–$300 |
| Anti-slip coating or tape | Slippery surfaces near water | Easy | $15–$60 |
| Polymeric sand re-jointing | Eroded paver joints, weed control | Moderate | $30–$80 for most patios |
| Individual paver reset | Sunken or rocking pavers | Easy to moderate | $0–$30 (DIY labor) |
Interlocking wood or composite deck tiles deserve a special mention because they're genuinely fast, you can cover a 200-square-foot patio in a few hours with zero cutting if it's rectangular. They sit directly over existing concrete, drain through the base, and can be taken up if you move. The tradeoff is they add about an inch of height (watch your door thresholds) and trap debris underneath if not lifted occasionally.
For a budget-focused approach to bigger DIY patio flooring overhauls, a full replacement project is a different scope than what we're covering here. If you want more inspiration that stays affordable, cheap do it yourself patio ideas can help you scale up the look without overspending budget-focused approach to bigger DIY patio flooring overhauls.
If you're looking for more do-it-yourself outdoor patio ideas, use the examples in these budget-focused patio inspiration guides to build a clear plan for your space do it yourself patio ideas.
For safety, anti-slip treatment around a pool edge, outdoor shower, or wet kitchen area is a fast, low-cost fix that's easy to skip until someone actually slips. Grip-adding coatings or peel-and-stick anti-slip strips take minutes to apply and are worth doing this week.
Instant Style Changes: Layout, Lighting, and Decor
Rethink the Layout Before Buying Anything
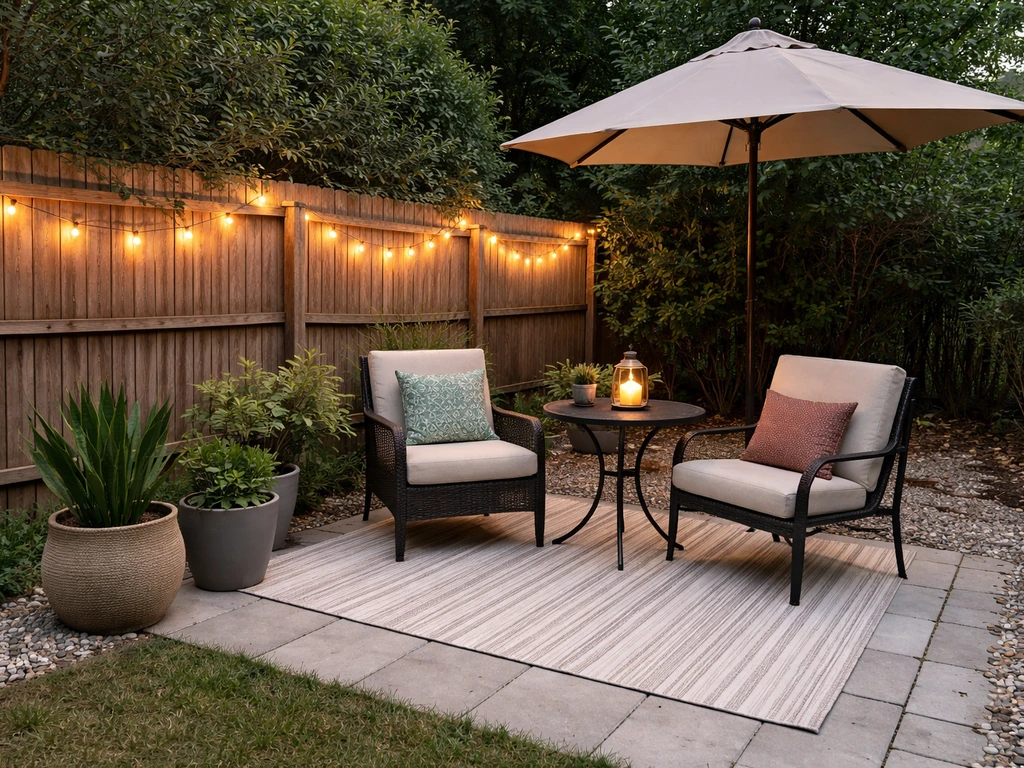
The single fastest free upgrade is moving the furniture. Most patios have everything pushed to the edges or clustered without a clear focal point. Try pulling seating into the center in a conversation-friendly arrangement, angling pieces at 45 degrees, or creating two smaller zones (a lounging area and a dining area) if space allows. Add a rug under each zone to define it. This costs nothing and takes 20 minutes, but it will make your patio feel like someone actually designed it.
String Lights and Low-Voltage Pathway Lighting
Outdoor string lights are probably the fastest style upgrade per dollar in the entire outdoor living category. A $30 set of weatherproof LED string lights hung between two posts, a pergola, or a fence line transforms a flat, daytime-only patio into a space you actually want to be in at night. Use warm white (2700K to 3000K) for ambiance, cool white reads as harsh and clinical outdoors.
For pathway or step lighting, a low-voltage landscape lighting kit is a solid DIY option. These systems use a transformer that steps household current down to 12 volts, making the wiring much safer and simpler to handle than line voltage. The critical safety steps: make sure you're plugging into a GFCI-protected outdoor receptacle, use waterproof wire connectors at every splice, and keep fixtures away from standing water. Burial depth matters for any wire runs, check your kit's instructions for local code requirements, which typically call for at least a few inches of cover for low-voltage cable.
Textiles, Plants, and Quick Decor
New outdoor cushions, throw pillows, and a coordinated rug can change the entire personality of a patio in under an hour. If you're updating an existing set, you don't need to replace the furniture, just replace the fabric. Stick to UV-resistant, solution-dyed fabrics (like Sunbrella or similar) if you're in a high-sun region. Potted plants, especially tall grasses, ferns, or tropical-look plants in oversized pots at corners, add scale and greenery without any landscaping work. A single large pot with height is more impactful than six small ones scattered around.
Low-Effort Weatherproofing and Outdoor Storage
Weatherproofing doesn't require a contractor. A few targeted products can protect your investment and keep the patio functional through weather changes.
- Furniture covers: Invest in fitted, UV-resistant covers for cushions and frames. They take 2 minutes to put on and add years to patio furniture life.
- Concrete or paver sealer: A penetrating sealer applied after cleaning and any repairs protects against water intrusion, freeze-thaw damage, and staining. Most are brush- or roll-on and dry in a few hours.
- Gutter diverters or drip-edge extensions: If rain from your roofline dumps directly onto the patio, a $10 gutter extender redirects it away—prevents erosion at patio edges and keeps surfaces dryer.
- Outdoor storage bench or deck box: A weatherproof storage bench near the patio door keeps cushions, toys, and tools out of the weather without a separate shed. They assemble in under an hour and start around $80.
- Hooks and wall-mounted organizers: Stainless or powder-coated wall hooks for tools, hose reels, and gear take 15 minutes to install and dramatically reduce visual clutter.
One thing worth doing right now if you're in a freeze-thaw climate (Midwest, Northeast, mountain states): drain and store any water features, irrigation hoses, and mister lines before the first freeze. Burst lines and cracked hose bibs are expensive and avoidable.
Your DIY Roadmap, Materials Checklist, and When to Call a Pro
The Weekend Quick-Start Sequence
If you want to tackle everything in priority order, here's the sequence that makes the most logical sense for most patios:
- Clean the entire surface thoroughly (Day 1 morning)
- Make any safety repairs—reset sunken pavers, apply anti-slip treatment, fix trip hazards (Day 1 afternoon)
- Do any patching or resurfacing while temperatures are in range (Day 1 afternoon, if weather cooperates)
- Install shade, screens, or comfort accessories (Day 2 morning)
- Reset the furniture layout, add rugs and textiles (Day 2 afternoon)
- Hang string lights or install pathway lighting (Day 2 evening)
- Add covers, storage, and organization last
High-Level Materials List
You don't need to buy everything, use this as a filter based on your diagnosis from the first section.
- Cleaning: deck brush, oxygen-based cleaner or concrete cleaner, garden hose or low-pressure washer
- Concrete repair: Quikrete Concrete Resurfacer or similar, margin trowel, mixing bucket
- Paver joints: polymeric jointing sand, leaf blower, broom
- Flooring: interlocking deck tiles, outdoor rug, anti-slip strips or coating
- Shade: shade sail with hardware, cantilever umbrella, or shade cloth
- Comfort: misting kit (hose-connect), outdoor fan (wet-rated), wind screen panels
- Lighting: outdoor LED string lights, low-voltage landscape lighting kit, GFCI adapter if needed
- Decor: UV-resistant cushions and pillows, large planters and plants
- Weatherproofing: penetrating concrete or paver sealer, furniture covers, deck box or storage bench
When to Stop and Call a Contractor
Some problems look like quick fixes but aren't. Here's where to draw the line and bring in a pro:
- Multiple pavers sinking in a section, or a concrete slab that's heaving or cracking in a pattern: this usually means a drainage or base failure that needs excavation and proper re-grading.
- Water pooling on the patio surface after rain and not clearing: a drainage or slope issue that requires regrading or a French drain install.
- Shade sail installation when you don't have solid, structural anchor points: installing new footings for posts is a job that benefits from professional help to get the depth and concrete work right.
- Any outdoor electrical work beyond plug-in connections: hardwired outdoor lighting, ceiling fans requiring new circuits, or outlet installation should be done by a licensed electrician and needs to meet NEC code for outdoor GFCI protection.
- Structural repairs to an attached pergola, covered patio, or any overhead structure: load-bearing connections to your home require a permit and professional assessment in most jurisdictions.
The DIY sweet spot for quick fixes is everything that's cosmetic, furniture-related, plug-in electrical, or involves surface-level repairs on an otherwise sound structure. Once you're dealing with water management, structural integrity, or line-voltage electrical work, the cost of getting it wrong is much higher than the cost of a professional consult. For deeper budget planning and more ambitious project ideas, topics like budget-focused patio ideas and broader DIY patio design approaches are worth exploring once your immediate fixes are done. If you're looking for the best diy patio approach for your space, these budget-focused patio ideas can help you choose upgrades with the biggest impact.
FAQ
Can I use the same quick fix product for both cracked concrete and paver weeds?
Yes, but only if the product matches your surface. Concrete resurfacers are made for bonding to existing concrete, while paver joint sand is for gaps between units. If you apply cement-based resurfacer over loose or weedy joints, you can lock in the problem and create uneven patches. Start by confirming the failure is on the surface (worn top) versus at joints (erosion and weeds).
What if I fix one rocking paver and the rest of the section keeps sinking?
Not always. If you’re seeing multiple pavers sinking in the same direction, it often signals base or drainage failure, not just a single loose unit. Resetting one paver can feel like it works briefly, but the area can keep moving if water is pooling under that section. If you notice directional settling, plan for improved base drainage or a contractor assessment before doing more resets.
Do anti-slip treatments work better than cleaning for a slippery patio?
It depends on what you’re trying to fix. Many patio “slips” come from algae, mildew, or contamination, in which case cleaning and proper drying first can solve it. If the surface is inherently smooth (certain stone, glazed pavers) or it’s frequently wet (pool edges, shower areas), anti-slip coatings or peel-and-stick strips can work quickly. Test in a small hidden spot first, then choose between coating for larger coverage or strips for targeted high-risk zones.
How do I schedule quick fixes if the weather swings during the day?
For best results, you should plan around temperature and moisture. Resurfacer batches have a short working time once mixed, and it cannot be applied below 50°F. For joint sand, timing matters too, because the sand needs proper wetting to set and you should avoid letting surface water dry on textured pavers. If you can only work in late afternoon, expect faster stiffening and a higher chance of residue or incomplete joint lock.
Why does polymeric sand sometimes leave a white haze on textured pavers?
Yes, but you must prevent haze and ensure the sand actually sets. After wetting the polymeric sand, you still need to manage surface water, especially on textured pavers. Blow off any surface water into the joints before it dries, and use low-speed airflow (leaf blower on low) rather than pressure washing, which can disturb the joint material.
If my patio furniture is fine, what’s the quickest way to update it without replacing everything?
Replacing only the cushions and rug is usually the fastest route, but check frame compatibility and sizing first. Measure seat widths and depth, then match the cushion thickness so doors and steps clear without scraping. If your patio furniture sits in intense sun, choose UV-resistant, solution-dyed fabrics for longevity. Store cushions briefly during heavy storms if your local weather is frequent and humid.
In humid climates, should I skip misters and go straight to a fan?
If the goal is “instant comfort” from heat, a ceiling fan is often more reliable than misters in humid regions. Fans create airflow that improves comfort even when evaporation cooling is limited. In low-humidity climates, misters can drop perceived temperature by roughly 15 to 20 degrees, but only if you use a wet-rated outdoor system and route the setup safely from puddling areas.
What lighting upgrade is easiest to DIY safely, string lights or pathway lighting?
Usually, yes. String lights and step/path lighting are typically the fastest upgrades, but the critical difference is safety and placement. String lights still need weatherproofing and secure mounting, while low-voltage path lighting requires a GFCI-protected outdoor receptacle and waterproof connectors at every splice. If you’re unsure about where water will pool, position fixtures away from standing water and verify burial depth per the kit instructions.
I have a wood patio, can I pressure wash it like pavers?
For wood decks, the main mistake is over-pressure or using the wrong chemical. Pressure above 500 psi on wood surfaces can damage fibers, and harsh cleaners can accelerate wear. Stick with a soft-bristle brush, use a wood-specific cleaner, and avoid bleach or oxidizer-based products on treated wood because they can degrade the material over time.
How do I know if a shade sail is a bad idea for my yard?
Consider the anchor condition and wind exposure before choosing the shade solution. Shade sails need anchor points rated for both weight and lateral wind loads, and deck-screw anchors into fence posts are a common failure point. If you cannot use solid structural anchors, a freestanding cantilever umbrella or an awning that mounts to the house can avoid load calculations and give you quicker, safer installation.
What’s the biggest mistake people make with misters before winter?
If you have a freeze-thaw climate, freezing water in lines and fixtures can cause cracks and expensive leaks, even if you only used the system in summer. Drain and store water features, irrigation hoses, and mister lines before the first freeze. For misters, also verify any connected frames and fittings are fully drained so residual water does not expand inside small tubing.
Next Articles
Cheap Do It Yourself Patio Ideas: Budget Build Guide
Budget DIY patio ideas with step-by-step flooring, prep tips, cost ranges, upgrades, and safety mistakes to avoid.
Best DIY Patio Ideas and Step-by-Step Build Guide
Best DIY patio ideas plus a step-by-step build guide: materials, subbase, drainage, costs, tools, and maintenance tips.
Best Patio Ideas on a Budget: Plan, Build, and Upgrade
Best patio ideas on a budget with layouts, DIY-friendly upgrades, flooring, shade, lighting, cost tips, and a build chec