You can build a solid, good-looking DIY patio for $3 to $10 per square foot depending on your material choice, and the most important thing separating a patio that lasts a decade from one that sinks in two seasons isn't the pavers or the tile, it's the base work underneath. Start with your budget and your ground conditions, pick a layout that fits your space, prep the base correctly, then choose the cheapest flooring option that makes sense for your climate. Everything else, shade, lighting, privacy, is just finishing touches you can add over time.
Cheap Do It Yourself Patio Ideas: Budget Build Guide

Phoebe Foster
29 Apr 2026
Start with your budget, space, and what your yard is actually like
Before you buy a single paver or bag of gravel, spend 20 minutes answering three questions: How much are you actually willing to spend? What does your ground look like? And what's your climate doing to outdoor surfaces year-round? These three things determine almost every choice that follows.
For budget, a realistic range for a DIY patio runs roughly $3 to $7 per square foot for a gravel or stepping-stone patio, $5 to $12 for a concrete paver patio you install yourself, and $8 to $15 for tile over an existing slab. A 200-square-foot patio, about 10x20 feet, which is a comfortable starter size, could cost you $600 to $2,400 all-in depending on your approach. Compare that to professionally installed pavers, which run $8 to $25 per square foot installed, and the DIY savings are real.
Ground conditions matter more than most beginners expect. Soft or clay-heavy soil compacts differently than sandy or loamy soil, and if you skip proper base prep on clay, you will get sinking. If your yard has poor drainage and holds standing water, you need to grade the area before anything else. A patio should slope away from your house at about 1/4 inch per foot (roughly a 2% grade), that's about a 1-inch drop every 4 feet. Get that wrong and you're directing water toward your foundation.
Climate is the other big filter. If you're in a freeze-thaw zone, think the Midwest, Northeast, or mountain states, certain materials crack, heave, or fail within a few seasons if not installed correctly. Porcelain tile on a sand base in Minnesota is a disaster waiting to happen. Gravel, pavers, and properly prepped concrete all handle freeze-thaw cycles much better. In the South or desert Southwest, your main enemies are heat, UV, and heavy rain events rather than frost, so you have more flexibility with materials.
Pick a layout that fits your space
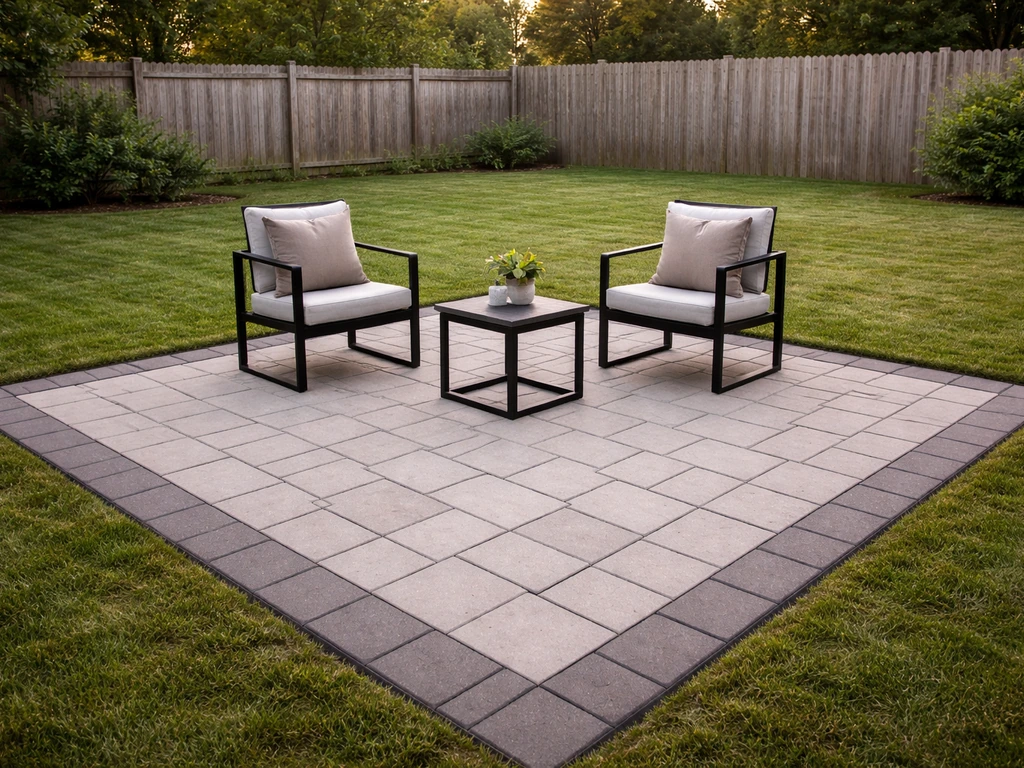
Don't just pour whatever fits in a rectangle. Think about how you actually use the space. A small backyard might work better with a 10x12 defined sitting area plus a stepping-stone path to the grill than one big flat surface. Zones, a seating zone, a dining zone, a grill zone, make even a modest patio feel intentional.
Small spaces (under 150 sq ft)
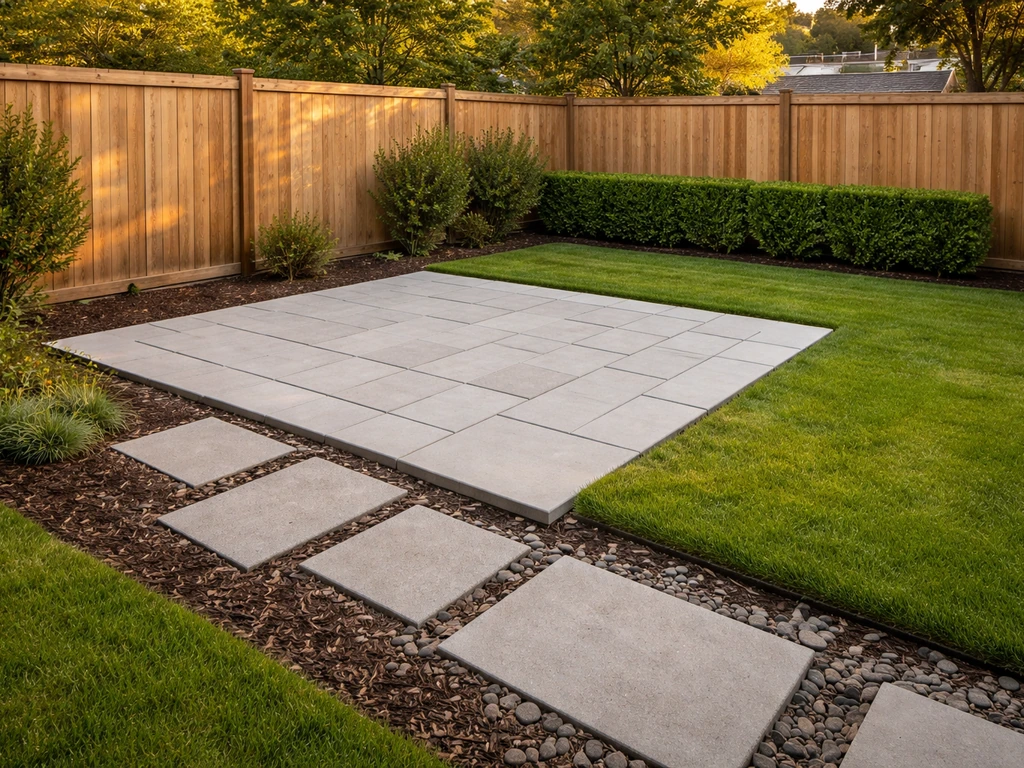
For tight spaces, a simple rectangle or L-shape works best because it's easier to square up and requires less cutting. A 10x10 or 10x12 paver patio with a defined edge is achievable in a weekend by one person. Stepping-stone layouts, individual stones or pavers set into gravel or ground cover, are even simpler and can cost as little as $1 to $3 per square foot in materials.
Medium spaces (150–400 sq ft)

A two-zone layout starts to make sense here, one area for seating, one for dining or a fire pit. You can define zones with different materials (pavers for the seating area, pea gravel or decomposed granite for a fire pit surround) or just with furniture arrangement and lighting. Curved or irregular edges look great and are totally achievable with flexible plastic edge restraints, but they do require more cutting if you're using pavers.
Larger spaces (400+ sq ft)
At this scale, DIY is still very doable but the base prep becomes more physically demanding. Renting a plate compactor (around $70 to $100 per day) pays for itself at this size because hand-tamping 400 square feet of base is brutal and less effective. Consider breaking a large area into phased sections, build the main seating area this season, extend later.
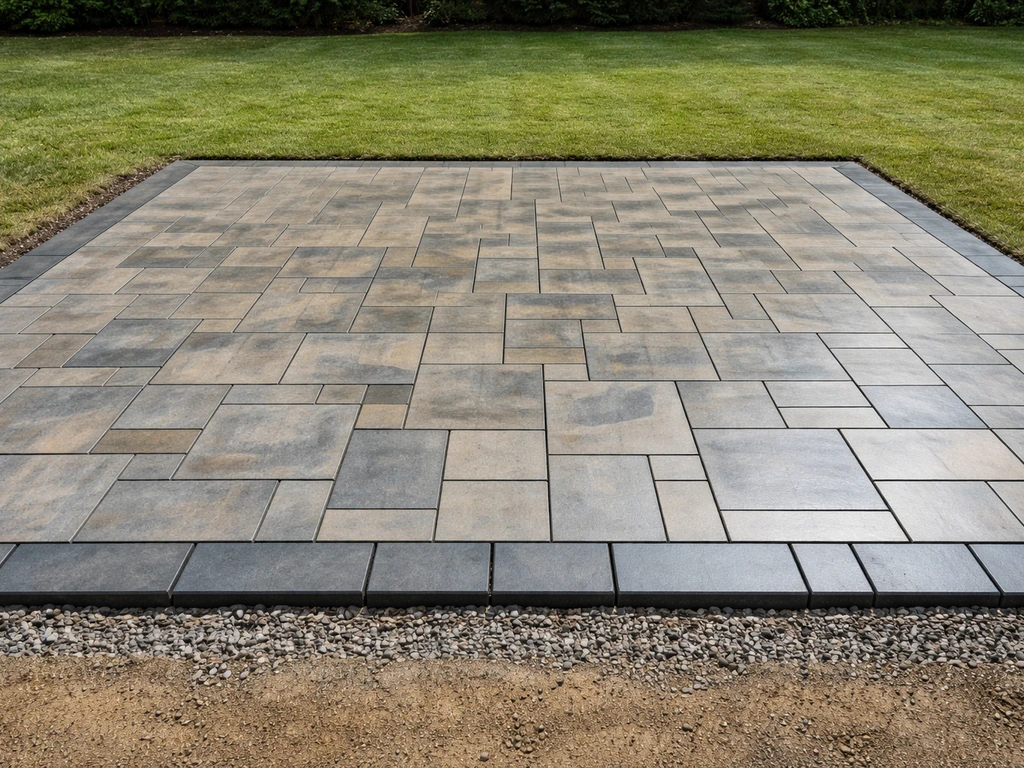
Base prep: the step most people skip and regret

Getting the base right is what separates a patio that looks good five years later from one that looks like a mess after the first winter. It's not glamorous work but it's where your money is actually well spent.
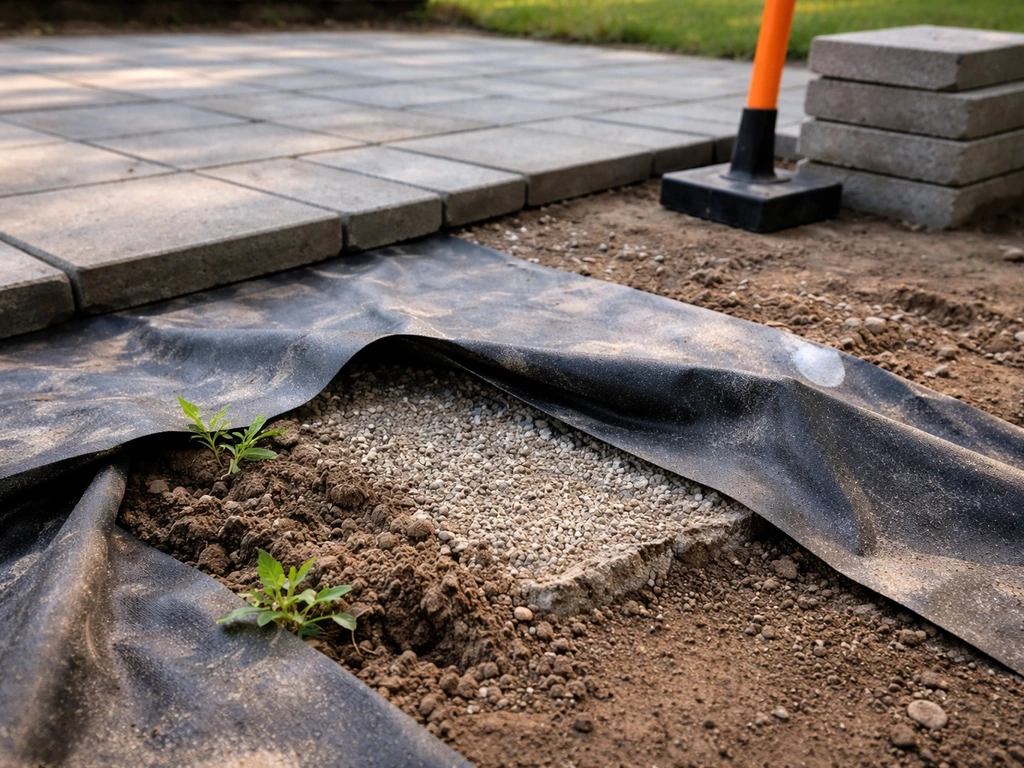
- Mark out your patio area with stakes and string, adding about 6 inches on each side for edge restraints.
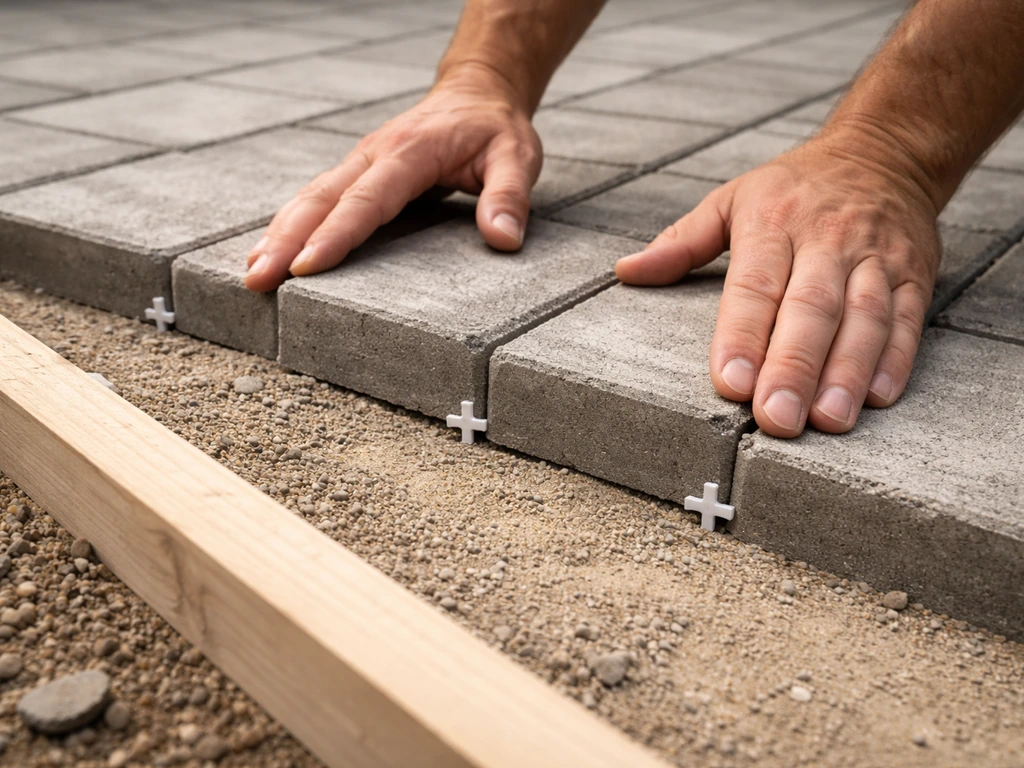
- Excavate to the right depth. For pavers, that's typically 7 to 9 inches total: 4 to 6 inches of compacted crushed aggregate base, 1 inch of bedding sand, plus the paver thickness. For a gravel patio, 4 to 6 inches of compacted base material is usually enough.
- Lay a weed barrier fabric over the excavated area before adding base material. This suppresses weeds without blocking drainage.
- Fill with crushed aggregate base — use angular crushed stone (Class II 3/4-inch minus road base is the industry-standard term), not smooth river rock or pea gravel. Smooth aggregate doesn't lock together the same way and gives you an unstable base.
- Compact the base in 2 to 3 inch lifts using a plate compactor or hand tamper. Check compaction by stepping across it — you should leave no more than about 1/8 inch of impression.
- Add 1 inch of coarse bedding sand (for pavers) and screed it level, maintaining your 1/4-inch-per-foot slope away from the house.
- Install plastic edge restraints before laying any pavers. The restraint needs to be tall enough to contain both the base and sand layers so nothing escapes at the edges.
Once your pavers are down, sweep polymeric sand into the joints, compact across the surface with the plate compactor (with a rubber pad to protect the pavers), then carefully wet the joints with a gentle shower-spray nozzle, not a blasting stream. Techniseal’s technical datasheet for SMARTSAND polymeric sand notes that surface and joints must be dry and advises limiting wetting to a small area at a time, rather than wetting too large a section at once. Polymeric sand uses polymer binders that harden when wet, which resists erosion, deters weeds, and keeps joints locked. This step alone dramatically extends the life of a paver patio.
Your cheapest flooring options compared
Here's where you make the biggest cost decision. Each option has a sweet spot in terms of budget, skill level, and durability. This table covers the main DIY-friendly options.
| Flooring Option | Approx. DIY Cost (per sq ft) | Skill Level | Best Climate | Lifespan (with good base) |
|---|---|---|---|---|
| Gravel or decomposed granite | $1–$3 | Beginner | Any | Ongoing (top off every 2–3 years) |
| Stepping stones in gravel/mulch | $2–$5 | Beginner | Any | 10–20+ years |
| Concrete pavers (DIY installed) | $5–$10 | Intermediate | Any (use angular base) | 20–30+ years |
| Poured concrete slab (DIY or hired mix) | $4–$8 | Advanced | Any | 20–40+ years |
| Tile over existing slab | $6–$15 | Intermediate–Advanced | No freeze-thaw, or use frost-rated tile + membrane | 10–20 years |
| Peel-and-stick/snap-together deck tiles | $3–$8 | Beginner | Mild climates; avoid hard freeze zones | 3–8 years |
| Outdoor rugs over existing hard surface | $1–$4 | Beginner | Any | 2–5 years |
Gravel and decomposed granite
This is the fastest and cheapest option. Excavate 4 to 6 inches, lay weed barrier, fill with 3 to 4 inches of pea gravel or decomposed granite, compact, and you're done. The downside is that gravel migrates underfoot and needs occasional top-offs. It works great for fire pit surrounds, side yards, and informal seating areas. In rainy climates, use coarser stone so it doesn't turn muddy.
Concrete pavers
This is the most popular cheap DIY patio choice for good reason, it looks polished, holds up in almost any climate with proper base prep, and you can pull up individual pavers to make repairs. Basic concrete pavers run $1 to $3 per square foot in materials; nicer tumbled or textured options go up from there. Home improvement stores like Home Depot and Lowe's stock a solid range, or you can often find overstock pavers on local Facebook Marketplace and Craigslist for a fraction of retail.
Tile over concrete
If you already have a concrete slab, tiling over it is tempting and can look fantastic. The catch is that outdoor tiling in freeze-thaw climates requires frost-rated tile, the right exterior-rated mortar adhesive, and ideally an uncoupling membrane to absorb movement. Skip those steps in a cold climate and the tile cracks within two winters. In warm climates like the Southeast, Texas, or California, it's more forgiving. You'll also want to check whether grout lines or soft joints align with any existing expansion joints in the concrete underneath.
Snap-together and peel-and-stick deck tiles
These are the weekend-warrior solution for an existing hard surface, clean the surface, snap or stick the tiles down, done. They work well on existing concrete or wood decks and cost $2 to $5 per square foot for wood composite options and similar for stone-look porcelain snap tiles. Don't count on them lasting long in hard freeze zones; the interlocking plastic bases crack in extreme cold. These are a great quick-win option and align well with quick-fix ideas if you just want the space functional now. These types of snap-together and peel-and-stick options are especially useful when you're brainstorming quick fix patio ideas for an existing surface quick-fix ideas. If you want the most budget-friendly patio plan, these best patio ideas on a budget can help you choose materials and layouts that fit your space quick-fix patio ideas.
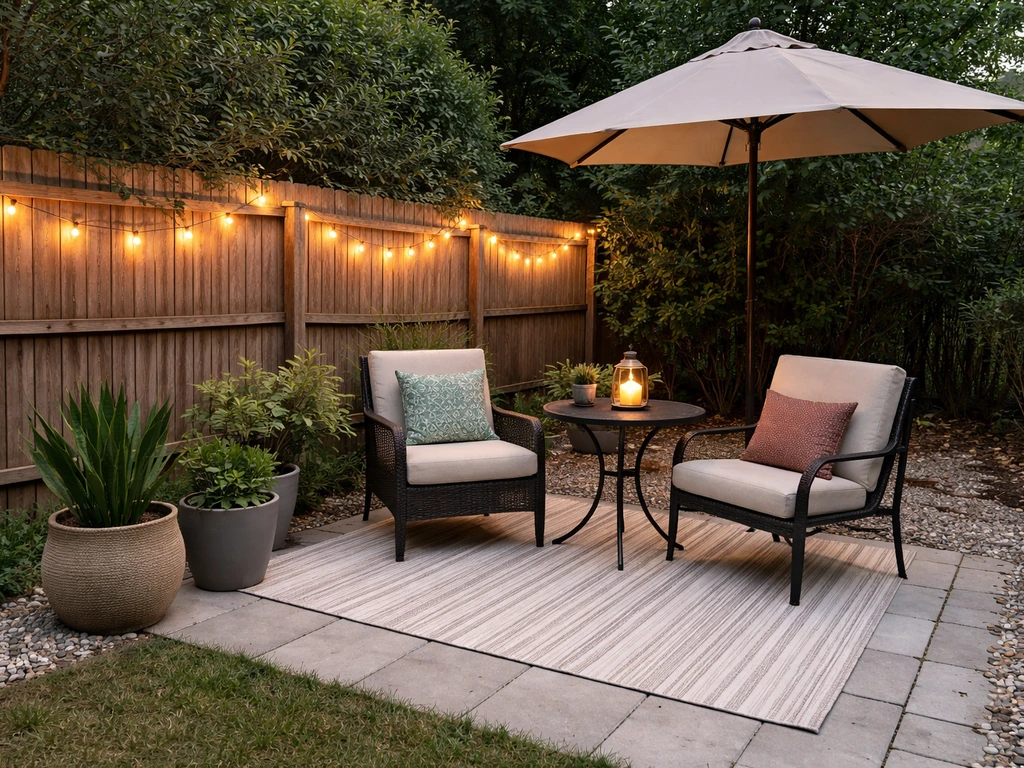
Make it comfortable and good-looking without spending much
Once the floor is down, upgrades that make a patio actually enjoyable don't have to be expensive. These are the ones that give you the most impact per dollar.
Shade
A decent freestanding offset umbrella runs $80 to $200 and can shade a full dining table. For more permanent coverage, a shade sail attached to the house and a fence post or freestanding pole costs $40 to $150 in materials. For a more structural look on a budget, a pergola kit from a home improvement store starts around $400 to $600 and can be installed in a day. One safety note: always anchor umbrellas properly in a weighted base or post bracket, the CPSC has documented serious injuries from umbrellas becoming projectiles in wind gusts. Check the manufacturer's anchoring instructions and never leave one open unattended in windy weather.
Lighting
String lights are the biggest bang-for-buck upgrade in outdoor living. A 48-foot strand of outdoor-rated LED string lights runs $20 to $40 and transforms a patio at night. Run them along a fence, over a pergola, or across guide wires attached to 4x4 posts. Solar-powered path lights are free to run and can define the border of a patio for $20 to $50 for a multipack.
Privacy
Bamboo roll fencing ($20 to $50 per 8-foot section) attached to an existing fence or mounted on posts gives instant privacy and looks intentional. Outdoor curtain panels on a tension rod or conduit pipe create a softer look for $30 to $80. Fast-growing screening plants like arborvitae or tall ornamental grasses are inexpensive and permanent, a 3-gallon arborvitae runs about $15 to $25 per plant at a garden center.
Planters, rugs, and other easy upgrades
A large outdoor rug ($40 to $100) immediately defines the seating area and adds warmth. Raised planter boxes built from 2x6 cedar boards cost about $20 to $40 in materials per box, you can build three in an afternoon. Herb beds placed near a grill area are both functional and decorative. Wall-mounted planters, DIY painted concrete block shelves, and outdoor-rated art from thrift stores all add character for under $30 each.
Tools, materials, cost ranges, and where to source cheaply
Here's what you realistically need for a basic paver patio build and where to find it for less.
| Item | What It's For | Approx. Cost | Sourcing Tip |
|---|---|---|---|
| Plate compactor rental | Compacting base and locking pavers | $70–$100/day | Rent from Home Depot, Sunbelt, or local rental yards |
| Crushed aggregate base (angular) | 4–6 inch base layer | $30–$60 per ton (covers ~80 sq ft at 4 in deep) | Landscape supply yard is cheaper than bagged; ask for Class II 3/4-inch minus |
| Coarse bedding sand | 1-inch layer under pavers | $20–$40 per ton | Landscape supply yard; avoid play sand |
| Weed barrier fabric | Weed suppression under base | $20–$40 per 100 sq ft roll | Home Depot, Lowe's, or Amazon |
| Concrete pavers | Surface layer | $1–$3 per sq ft basic; $3–$6 for textured/tumbled | Home Depot/Lowe's for standard; Facebook Marketplace for discounts |
| Plastic edge restraints | Hold edges and prevent base loss | $1–$2 per linear foot | Home improvement stores; buy full rolls for savings |
| Polymeric sand | Joint filler that locks and resists weeds | $25–$40 per 50 lb bag | Home Depot, Lowe's; one bag covers roughly 25–40 sq ft |
| String line and stakes | Grading and layout | $5–$15 | Dollar store or hardware store |
| Hand tamper (optional) | Compacting corners and edges | $25–$40 to buy | Rent or buy; useful even if you rent a compactor |
| Rubber mallet | Setting pavers without cracking | $10–$20 | Any hardware store |
| Bubble level and tape measure | Checking slope and layout | $10–$30 | Already have it, or hardware store |
For sourcing, landscape supply yards almost always beat home improvement store pricing on bulk materials like crushed stone, sand, and gravel. Call ahead, ask for delivery minimums, and see if a neighbor wants to split a load. Facebook Marketplace and Craigslist are genuinely excellent for pavers, people frequently sell leftovers from completed projects at 25 to 75 percent off retail. Just make sure they're the same thickness so your surface stays level.
Mistakes that kill cheap DIY patios early
Most patio failures come down to the same handful of shortcuts. Avoid these and you'll dramatically improve your odds of a patio that still looks good in five years.
- Skipping or cheaping out on base depth: This is the single biggest mistake. Four to six inches of compacted angular crushed stone is non-negotiable for pavers. Two inches of sand directly on soil will shift, sink, and heave.
- Using the wrong base material: Smooth rounded gravel (river rock, pea gravel) doesn't lock together under compaction the way angular crushed stone does. Use the right aggregate from the start.
- Skipping the slope: Build with at least 1/4 inch per foot of slope away from the house. Water pooling on your patio will destroy joints, promote weeds, and eventually undermine the base.
- Skipping edge restraints: Without edge restraints, pavers spread outward over time. The edges crumble and the whole surface loses integrity within a few years.
- Tiling outdoors without checking freeze-thaw compatibility: In any climate that goes below freezing, you need frost-rated tile and exterior-rated mortar. Standard indoor tile and thinset will fail.
- Underestimating material quantities: Calculate your area, add 10 percent for cuts and waste, and order accordingly. Running short mid-project and waiting for a second delivery is a real problem.
- Rushing the compaction: Base material needs to be compacted in layers of 2 to 3 inches at a time for proper density. Dumping 6 inches and compacting once doesn't achieve the same result.
Basic safety to keep in mind
Call 811 (in the US) before you dig to have underground utilities marked, this is free and legally required in most states. Wear gloves and eye protection when cutting pavers with an angle grinder or chisel. Wear ear protection with a plate compactor. When using shade structures, follow the anchoring instructions: an improperly secured umbrella or shade sail in a wind gust is a genuine hazard.
When to hire out instead
DIY makes great sense for most paver, gravel, and stepping-stone patios under 400 square feet on relatively flat ground. If you want more do it yourself outdoor patio ideas, start by picking a simple layout and a flooring option that fits your climate and ground conditions. Consider hiring help when: the ground has significant slope that requires retaining walls or major regrading, you're pouring a new concrete slab from scratch (this is technically doable DIY but leaves very little margin for error), you're in a freeze-thaw climate doing tile over concrete (the material science and installation sequence get complicated fast), or you have drainage problems that require underground piping. Getting the base wrong on a 300-square-foot patio and having to redo it in two years costs more than hiring a contractor would have. When in doubt, at least get one professional quote, the number will either confirm your DIY plan is worth it or tell you something you need to know.
Your weekend action plan
Here's the concrete sequence to go from planning to a finished patio in one or two weekends.
- Measure your space and sketch a layout. Note any drainage slopes, shaded areas, or obstructions.
- Set a firm budget. Add 15 percent as a buffer for delivery fees, extra material, or tool rentals you didn't plan for.
- Call 811 to mark utilities before digging.
- Choose your flooring method based on your budget, climate, and whether you have an existing slab.
- Order base materials (crushed aggregate, sand, weed barrier) from a landscape supply yard. Schedule delivery for Day 1.
- Rent a plate compactor for the weekend — Saturday base work, Sunday paver or surface installation.
- Excavate, install weed barrier, lay and compact base material in lifts, install edge restraints.
- Set your surface material, maintain drainage slope, and check level frequently.
- Sweep in polymeric sand (for pavers), compact, and wet according to manufacturer instructions.
- Let everything cure for 24 to 48 hours before furniture goes on.
- Add string lights, an outdoor rug, and one or two planters the following weekend to finish the space off.
The gap between a cheap patio that fails and a cheap patio that looks great for years is almost entirely in the base prep and material choices, not in how much you spend on the surface. Get those fundamentals right, and even a $600 DIY patio can look like it cost three times that.
FAQ
How do I estimate my patio’s total cost beyond just the pavers or tile?
Add base and edge costs before you budget the top surface. For a typical DIY paver build, plan for excavation depth, bulk crushed stone and/or sand, bedding layer, polymeric sand for joints, compacting rental if needed, and perimeter edging (plastic, metal, or lumber). Also budget for extra material because cutting waste often adds 5 to 15%, especially with curves or tight layouts.
Do I need to remove all the existing grass or topsoil, even for a small DIY patio?
Yes, to a depth that reaches stable soil. Topsoil is usually too organic and compresses over time. Common practice is to excavate to the full designed base thickness plus enough to reach firm ground, then verify stability by walking the area and checking for soft spots after removing loose material.
What base thickness should I use for gravel or stepping-stone patios?
Aim for enough depth to prevent movement. A gravel patio typically uses roughly 3 to 4 inches of compacted pea gravel or decomposed granite after excavation, but footing stiffness matters more when you expect frequent foot traffic. For stepping stones, you still need a solid compacted leveling layer so stones don’t wobble, then set them slightly above finished grade so water sheds correctly.
How can I tell if my soil is “bad enough” that DIY base prep won’t be enough?
If you get persistent dampness, standing water, or visible clay behavior (sticky when wet, rock-hard when dry), treat it as a risk condition. In that case, plan on improved drainage and more robust grading, and consider whether you need French drains, a thicker base, or even a contractor for subsurface work. If you’re unsure, do a quick infiltration check by filling a small hole with water and timing how long it takes to drain.
Why does my paver patio stay uneven after I compact, even when I followed the steps?
Unevenness usually comes from inconsistent bedding depth or not re-checking grade after compaction. Re-screed the bedding layer to a consistent thickness, then compact in small lifts or passes. Also avoid overloading one spot with your body while you work, because it can create localized dips before the base locks in.
Can I skip the plate compactor and just hand-tamp to save money?
You can, but it’s often the reason patios fail early. Hand-tamping rarely matches the density you get from mechanical compaction, particularly on larger areas or clay-heavy soils. If you must do it without a rental, reduce the size and expect longer compaction and multiple re-checks of flatness and slope, but for anything near 300 to 400 square feet, renting is usually cheaper than redoing the base.
What’s the right slope for proper drainage, and how do I measure it easily?
Use about a 1/4 inch drop per foot away from the house (around a 2% slope). Measure with a string line or a laser level, and set temporary stakes at both ends of the run. Then confirm the slope again after bedding and before laying pavers, because moving materials can subtly change grade.
Should I use weed barrier under pavers or gravel?
Weed barrier can help with germination, but it should not replace proper base compaction or drainage grading. For paver patios, many failures come from trapped water or a compromised base rather than weeds. If you use barrier fabric, make sure it lies flat, overlaps correctly, and does not create wrinkles that become low spots where pavers settle.
When should I choose polymeric sand versus regular sand for joints?
Polymeric sand is best for paver joints where you want reduced weed growth and tighter locking, especially on patios you intend to keep for years. Use it only when joint gaps are within the manufacturer’s recommended range, and follow wetting instructions carefully with a gentle spray. If you over-saturate, you can wash out binders and weaken the joint.
How do I avoid polymeric sand washing out during rain soon after installation?
Plan your install for dry weather and keep foot traffic off the patio until the sand fully cures. If a rain event is forecast right after you apply it, cover the joints with a breathable tarp or postpone the jointing step until you can control exposure. Also avoid blasting the joints, use a low-flow spray so water activates the binder without dislodging it.
Is it safe to install patio tile directly on an existing concrete slab?
It can be, but only if you’re in a climate-compatible system. In freeze-thaw regions, you need frost-rated tile and exterior-rated thinset, plus ideally an uncoupling membrane to manage slab movement. Also check the slab for cracks and moisture, because tile over a failing or moving slab can still crack even with the right materials.
What’s the risk with peel-and-stick or snap-together patio tiles in cold weather?
Their base systems can become brittle, and interlocking or adhesive layers may lose flexibility when temperatures plunge. If you live in extreme freeze-thaw conditions, treat these as short-term or upgrade-later solutions, and expect reduced lifespan compared with pavers. For any snap or peel product, confirm the cold-temperature rating before buying.
How do I keep gravel from migrating if I build a gravel patio?
Use real edging plus a well-compacted base. Flexible plastic edging sometimes bows under pressure, so choose edging that’s pinned or bedded, and ensure the gravel depth is sufficient so stones interlock. For muddy rainy climates, use a coarser, angular aggregate that compacts and drains better than finer gravel.
Where should I place my patio lights and outlets for code-safe results?
Plan the electrical route before the final base and paving. If you need power, use outdoor-rated wiring and proper weatherproof connections, and avoid running extension cords permanently across walkways. If you aren’t experienced with exterior electrical work, have an electrician handle outlet placement, GFCI protection, and any hardwired fixtures.
Do I need to anchor umbrellas and shade sails even on small DIY patios?
Yes, anchor them to their rated base or mounting points. Wind can turn an unanchored umbrella into a safety hazard, even on a small patio. For shade sails, use the manufacturer’s taught tension and attachment points, and confirm that the posts or hardware are rated for wind load in your area.
When is hiring a pro better than DIY for a “budget” patio?
Hire help when the work depends on subsurface or structural accuracy. Examples include major regrading, installing underground drainage piping, building retaining walls, or pouring and finishing a new concrete slab from scratch. Also get a professional quote if you have significant slope or water issues, because base fixes after failure are often more expensive than the original surface cost.
Next Articles
Best DIY Patio Ideas and Step-by-Step Build Guide
Best DIY patio ideas plus a step-by-step build guide: materials, subbase, drainage, costs, tools, and maintenance tips.
Best Patio Ideas on a Budget: Plan, Build, and Upgrade
Best patio ideas on a budget with layouts, DIY-friendly upgrades, flooring, shade, lighting, cost tips, and a build chec
Best Patio Wood: Choose Decking That Lasts
Compare the best patio wood options for rot, mold, warping, and splinters by climate, maintenance, and slip resistance.