The best DIY patio for most homeowners is a concrete paver patio on a properly compacted gravel base. It's forgiving enough for a first-time builder, durable enough to last 20-plus years, repairable if something shifts, and available in enough styles to look genuinely polished. That said, the right answer depends on your yard's conditions, your budget, and how much work you're willing to do up front. Get the base right and almost any surface material will hold up. Skip the base work and it doesn't matter how nice your pavers or concrete looks on day one.
Best DIY Patio Ideas and Step-by-Step Build Guide

Phoebe Foster
29 Apr 2026
Start here: Define your goals and constraints
Before you pick a material or a style, walk your yard and answer a few honest questions. The answers will narrow your options fast and save you from expensive mistakes.
- How much usable space do you have, and what shape is it? A tight rectangular corner calls for a different approach than a wide open backyard.
- What's the ground like? Flat, compactable soil is ideal. Sloped yards, clay-heavy soil, or low spots that pool water all add complexity and may require grading help.
- Where does the sun hit, and when? A patio baking in afternoon sun in Texas or Arizona needs shade planning built in from day one.
- Do you need privacy from neighbors or a screened feel? That affects whether you plan for a pergola, fence line, or planted border alongside the patio.
- Who's using it? A mobility-conscious household needs a smooth, level surface. Families with young kids do well with pavers over gravel. Pet owners may want to skip light-colored materials that show stains.
- Do you need a permit? Some jurisdictions require one for patios over a certain square footage or within setback distances. Check before you dig.
- What's your honest skill level and tool access? Concrete pours and grading work benefit from experience or a helper. Paver or gravel projects are genuinely beginner-friendly with the right prep.
Once you've answered those, you have a real constraint list to work with instead of just scrolling through inspiration photos. Most DIY failures start with ignoring one of these questions, usually the drainage or ground condition one.
Best DIY patio ideas by style and layout
Here are the styles that actually work well for DIYers, organized by how complex they are to build and what kind of yard they suit best.
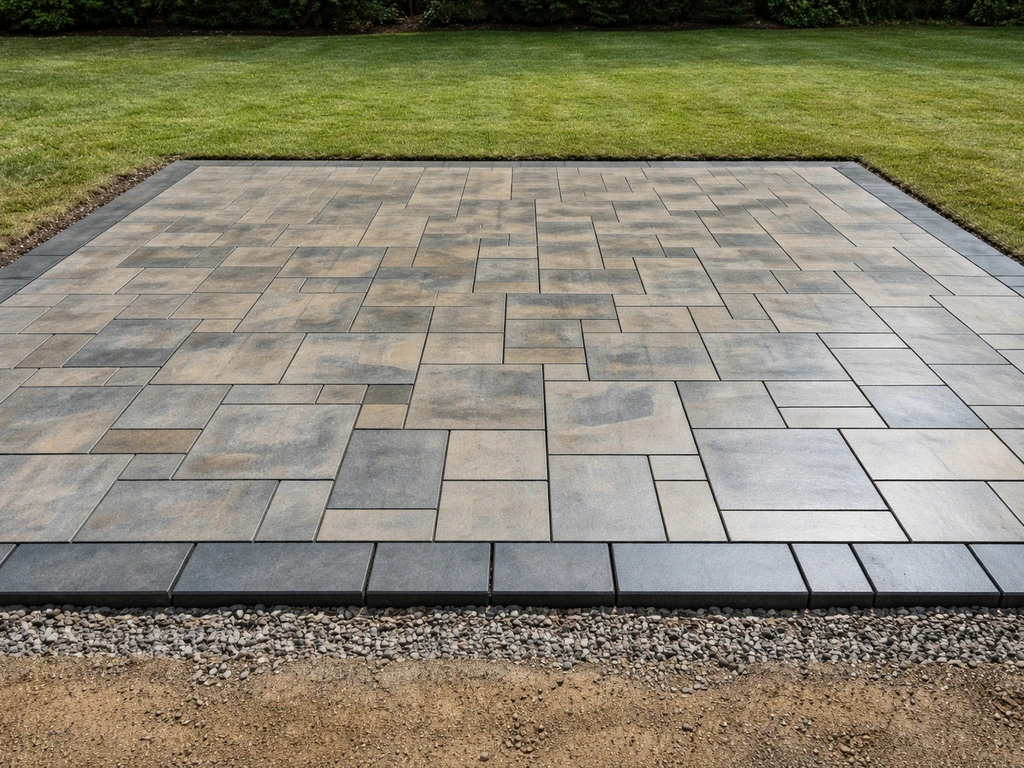
Concrete paver patio (the all-around best)

This is the most popular DIY hardscape for good reason. You excavate, compact a gravel base, add a 1-inch bedding layer of coarse sand or chip stone, lay the pavers in your chosen pattern, and lock everything together with polymeric sand in the joints. It's modular, so if a paver sinks or cracks later, you can lift and reset it. Rectangular running-bond layouts are the easiest to cut and plan. Herringbone and fan patterns look more formal but require more cuts at the edges.
Concrete slab
A poured concrete slab is extremely durable and low-maintenance, but it's the least forgiving DIY project. Mixing, forming, pouring, finishing, and curing concrete is physical, time-sensitive work. You also need proper control joints to manage cracking. That said, if you're comfortable renting a mixer and have a helper, a small slab under 200 square feet is doable. For anything larger or on uneven ground, strongly consider hiring the pour and handling the prep work yourself to save money.
Gravel or pea gravel patio
This is the easiest and cheapest entry point. You excavate a few inches, lay landscape fabric or geotextile, add edging to contain the stone, and fill it with 3 to 4 inches of gravel. It drains beautifully, which makes it great for wet climates or low-lying spots. If you still feel unsure after this, browse do it yourself outdoor patio ideas as a related starting point for choosing the best surface and layout for your yard. The trade-off is that it's not great for furniture stability and needs occasional top-offs as stone shifts or settles. Pea gravel runs roughly $2 to $5 per square foot installed, making it one of the most budget-friendly surfaces out there.
Stepping stone or mixed-material path patio
Large flagstone or concrete stepping stones set in gravel, mulch, or ground cover plants create a casual, garden-style patio feel. This works especially well in side yards, cottage gardens, or smaller spaces where a full hardscape would feel heavy. It's very beginner-friendly and low-cost, though not great if you want a defined seating area with furniture.
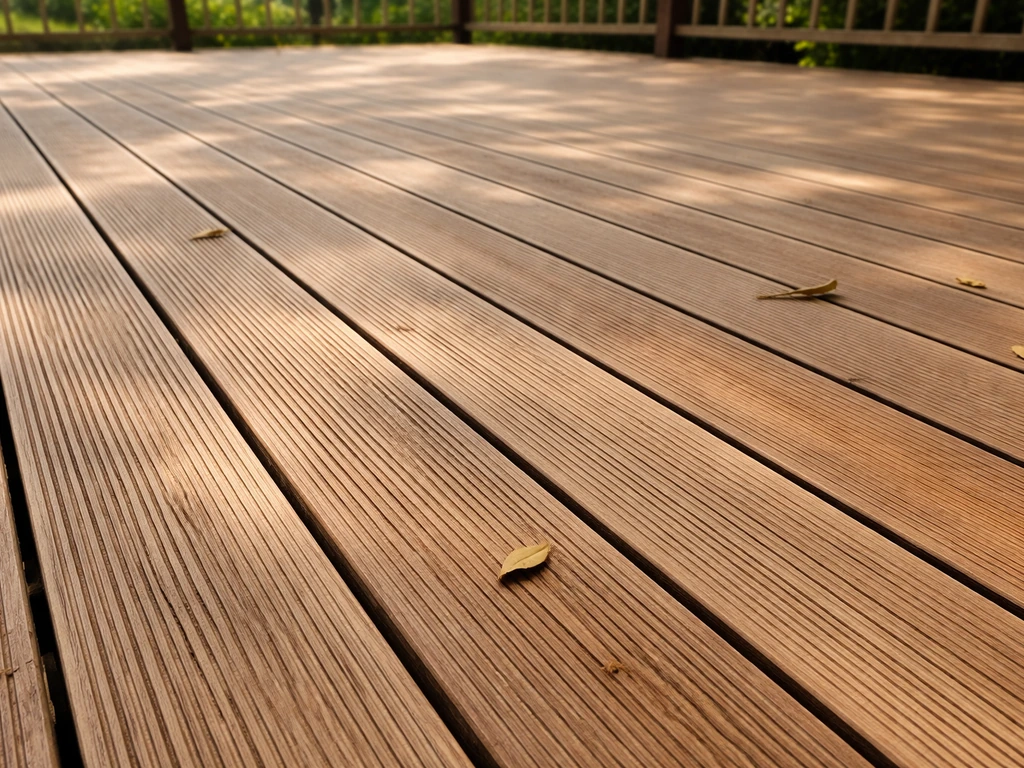
Deck-patio hybrid
If your yard has a significant slope, a low elevated deck using composite decking can be easier to build level than trying to grade and harden the ground. You can also build a hardscape patio at ground level below an elevated deck and use an under-deck drainage system (like Trex RainEscape) to keep that lower space dry and usable. The hybrid approach is more expensive than a straight paver job but solves real problems that grading can't.
Edging-defined zone patio
Sometimes the best DIY move is using strong metal or concrete edging to carve out a patio zone from an existing lawn, then filling it with pavers, gravel, or decomposed granite. The edging does the structural definition work and keeps everything contained. This is a great approach for budget-conscious projects and pairs naturally with cheap DIY patio ideas if you want to phase the project over time.
Material comparison: What to actually build with
Every material has a real trade-off. Here's how the most common DIY patio materials stack up across the factors that actually matter when you're building and living with the result.
| Material | DIY Difficulty | Cost (per sq ft) | Durability | Best Climate Fit | Repairability |
|---|---|---|---|---|---|
| Concrete pavers | Easy-Moderate | $8–$20+ | Excellent (20+ years) | All climates | Excellent (lift and reset) |
| Poured concrete | Moderate-Hard | $5–$11 DIY; $11–$15+ pro | Excellent if done right | All climates | Poor (cracks are permanent) |
| Pea gravel / crushed stone | Easy | $2–$5 installed | Good (needs top-offs) | Wet climates, warm zones | Easy (just add more) |
| Natural flagstone | Moderate | $15–$30+ | Very good | Dry/moderate climates | Moderate (re-set individual stones) |
| Composite decking | Moderate | $20–$40+ | Very good (25-year warranties common) | All climates | Good (replace boards) |
| Decomposed granite | Easy | $1–$4 | Moderate | Dry climates (Southwest, CA) | Easy |
For most people building their first real patio, concrete pavers are the right call. They're more forgiving than poured concrete, more stable than gravel, and much more durable than wood in wet climates. If your budget is tight, gravel or decomposed granite gets you a functional, attractive space for very little money. If you want to go deeper on cheap DIY patio options, there are a lot of creative ways to stretch your budget without sacrificing the look.
The details that make or break a DIY patio: base, leveling, and drainage
This is where most DIY patios either succeed long-term or start showing problems within a couple of years. It's not glamorous, but getting the base right is the single most important thing you can do. If you are looking for quick fix patio ideas, the fastest wins are usually improving drainage, leveling low spots, and tightening up edging before you upgrade the surface.
Excavation and subgrade
For a paver patio, you typically need to excavate 6 to 8 inches below your finished surface height: 4 to 6 inches for the compacted gravel base, 1 inch for the bedding course, and the thickness of your paver (usually 2 to 3 inches). For a concrete slab, you're typically excavating to allow for 4 inches of concrete plus a gravel base underneath. Once you're down to subgrade, compact it. A plate compactor rental is worth every penny. Loose subgrade is the number-one reason pavers sink and slabs crack.
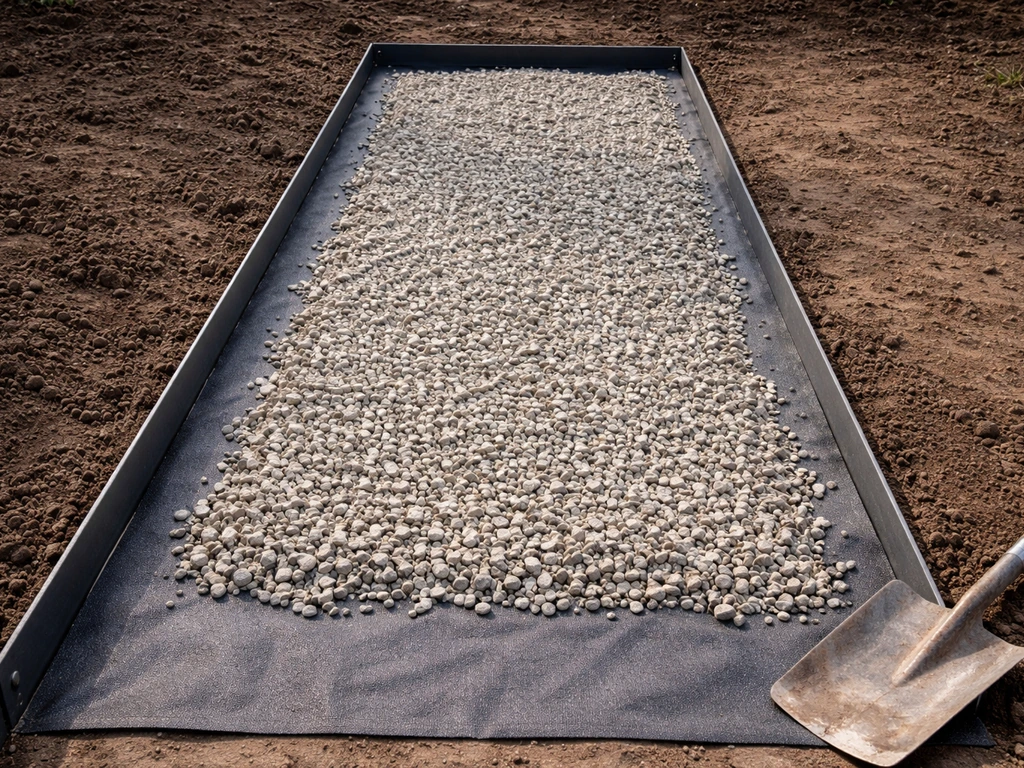
The base layer
Use crushed stone or road-base gravel (also called Class II base or crusher run depending on your region) for the main base layer. This material compacts into a dense, stable mass that drains and doesn't shift. Lay it in 2 to 3 inch lifts, compacting each one. Skip the cheap river gravel or rounded stone for the base: it doesn't compact well and will cause movement later.
Bedding course
For pavers, the bedding course goes on top of the compacted base. Use coarse concrete sand or a chip stone material (ASTM No. 8 gradation, sometimes called HPB). Spread it to exactly 1 inch thick and screed it flat. Do not compact the bedding sand before laying pavers: you want it loose so pavers can settle into it evenly. Once all pavers are laid, the final compaction sets everything together.
Drainage slope

Every patio surface needs to slope away from your house. The standard is at least 1/8 inch per foot (roughly 1% grade), though 1/4 inch per foot is better. Set your grade correctly at the base layer stage. Once the bedding sand and pavers are in, correcting slope is very difficult. For concrete slabs, the ACI guidelines are clear: grade the site for positive drainage before the pour, and make sure the compacted subbase reflects that slope.
Weed control and edging
Landscape fabric under a gravel patio is a must. For paver patios, polymeric sand in the joints does most of the weed-suppression work. It uses a binder that hardens when wet, keeping joints stable and inhibiting weed germination. Standard ASTM C144-grade sand with a polymer binder (products from Techniseal, Sakrete, and others all work well) outperforms plain sand significantly for long-term weed control and joint stability. Use rigid plastic or metal paver edging around the perimeter to keep everything from spreading outward over time.
Common mistakes to avoid
- Skipping compaction at any layer (the single biggest cause of paver settlement and concrete cracking)
- Using the wrong base material (rounded gravel instead of angular crushed stone)
- Making the bedding sand layer too thick, which causes uneven settling
- Not sloping away from the foundation, leading to water pooling against the house
- Skipping edging restraints so pavers spread and joints open up over time
- For concrete: missing control joints or curing too fast in hot/dry weather, which causes uncontrolled cracking
Realistic budget planning and cost-saving moves
A 200 to 300 square foot DIY paver patio typically runs $1,500 to $4,000 in materials depending on paver style and regional prices. Concrete patio costs professionally poured run $1,916 to $5,242 on average, but a DIY pour on a small slab can cut that number significantly. Gravel patios are the clear budget winner at $2 to $5 per square foot all-in.
Where to save money
- Do your own excavation by hand or with a rented mini-excavator for larger areas. This is where contractor quotes add the most markup.
- Buy pavers from big-box stores rather than specialty hardscape suppliers. The selection is narrower but prices are meaningfully lower.
- Use basic rectangular concrete pavers in a running-bond pattern. They're the cheapest option and still look clean and intentional.
- Rent a plate compactor instead of buying one. A day rental runs $60 to $100 and is much more effective than a hand tamper.
- Go with gravel or decomposed granite for phase one, then add pavers over it later. This spreads the cost without abandoning the project.
- Mix materials intentionally: a paver border with a gravel fill looks designed, not cheap.
- Do your own finish work like edging, lighting, and planting after the hardscape is done.
If your main constraint is budget, there are a lot of genuinely good-looking DIY patio ideas on a budget that don't require compromising on the base work. The surface material is where you can flex on cost. The base is not.
Step-by-step build process and tools checklist
This workflow applies to a standard on-grade paver patio. Adjust excavation depth and base thickness for other materials.
- Mark the area with spray paint or stakes and string. Define the exact perimeter and double-check measurements.
- Call 811 (or your country's equivalent) to have utilities marked before any digging.
- Excavate to depth: typically 7 to 9 inches below finished surface height. Remove all organic material and soft soil.
- Compact the subgrade with a plate compactor. Make at least two passes in perpendicular directions.
- Add crushed stone base in 2 to 3 inch lifts, compacting each lift. Total compacted base depth should be 4 to 6 inches.
- Install paver edging restraints around the perimeter, pinned with spikes into the base.
- Spread 1 inch of coarse sand or ASTM No. 8 chip stone for the bedding course. Screed flat using rails and a straight board.
- Lay pavers in your chosen pattern, working from one corner outward. Use a rubber mallet to seat each paver. Check level frequently.
- Cut pavers at borders using a diamond-blade wet saw or angle grinder with a masonry blade.
- Run a plate compactor over the entire paved surface (put a rubber pad on the compactor plate to protect the paver surface).
- Spread polymeric sand over the surface, sweep it into joints until full, then compact again lightly. Mist with water to activate the binder.
- Clean off any excess polymeric sand and let cure per product instructions (usually 24 hours before foot traffic).
Tools and materials checklist
- Plate compactor (rent)
- Flat spade and round-point shovel
- Wheelbarrow (2 if you have a helper)
- String line, stakes, and line level
- Screed rails (conduit pipes work great) and screed board
- Rubber mallet
- 4-foot level and torpedo level
- Measuring tape
- Diamond-blade wet saw or angle grinder with masonry blade (rent or borrow)
- Push broom and stiff brush for polymeric sand
- Garden hose with mist nozzle
- Safety glasses, gloves, knee pads
- Crushed stone base (calculate cubic yards based on area and depth)
- Coarse concrete sand or ASTM No. 8 chip stone for bedding
- Pavers (add 10% to your calculated square footage for cuts and breakage)
- Paver edge restraints and spikes
- Polymeric sand (one bag per roughly 15 to 25 sq ft depending on joint width)
Finishing touches that pull the whole space together
A freshly laid patio looks raw until you add the elements that make it feel like an outdoor room. This part is where you get to have fun after all the base work.
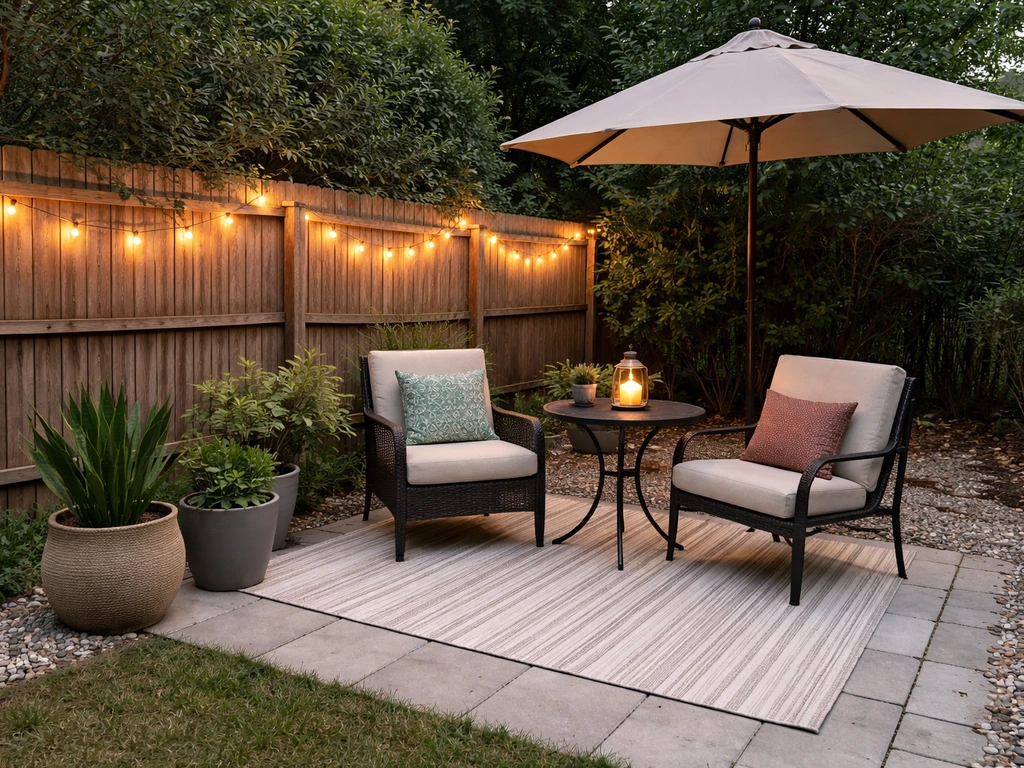
Seating and zones
Define your seating zone first. An outdoor rug anchors the furniture grouping and visually separates it from the rest of the patio. For a 200 to 300 square foot space, an 8x10 or 9x12 rug under a table-and-chairs set works well. If you have a larger patio, create two zones: one for dining, one for lounging. The transition can be as simple as a change in furniture height or a planter row dividing the areas.
Lighting
Solar-powered path lights along the patio edge are cheap and easy to install. String lights hung from a pergola, fence, or post system are the most effective way to create ambiance at low cost. For a more permanent look, low-voltage LED path lighting wired to a transformer gives you reliable light without the inconsistency of solar in shaded yards. Paver manufacturers also make LED paver inserts that sit flush with the surface and look incredibly clean.
Shade, misters, and fans
This is especially important in hot climates. A freestanding pergola or sail shade over the patio makes it usable in summer heat instead of just decorative. If you're in a humid region like the Gulf Coast or Southeast, a high-velocity outdoor fan (either ceiling-mounted on a pergola or a freestanding tower fan) makes a big difference in comfort. In dry heat climates like Arizona or New Mexico, a misting system attached to a pergola beam can drop the perceived temperature by 15 to 25 degrees and transforms an unusable afternoon patio into a genuinely comfortable outdoor space. The site covers covers, misters, and fans in depth if you want to go deeper on those upgrades.
Decor and planting
Large planters at the corners of the patio anchor the space visually and add greenery without digging new beds. Raised planting borders along one or two edges soften the hard line between patio and lawn. Keep the palette simple: two or three plant types repeated beats a mix of everything from the garden center.
Maintenance, weatherproofing, and when to call a contractor
Paver maintenance
Paver patios need very little routine maintenance. Sweep off debris, rinse seasonally, and inspect the joints every year or two. If polymeric sand erodes in high-traffic joints, sweep in a fresh application and mist it. If a paver settles or cracks, lift it, add or remove bedding sand to correct the level, and reset it. Sealing pavers is optional but extends color vibrancy and makes cleanup easier. Reapply sealant every 3 to 5 years in high-use areas.
Concrete maintenance
Seal a concrete slab within 28 days of the pour once it's fully cured. Reapply every 2 to 3 years. Fill hairline cracks with a flexible concrete caulk before they widen. In freeze-thaw climates, avoid using rock salt on concrete. It accelerates surface spalling. Use sand or kitty litter for traction instead.
Gravel maintenance
Top off gravel every year or two as it compacts and displaces. Check edging for any sections that have worked loose. If weeds push through the fabric, a pre-emergent herbicide applied in spring keeps them manageable.
When to hire a contractor instead
DIY is the right call for most standard on-grade patios in flat or gently sloping yards. But there are situations where hiring out is genuinely the smarter move, not just a convenience.
- Significant grading work: If your yard slopes more than 6 to 8 inches across the patio area, proper grading requires equipment and expertise to get drainage right. Poor grading leads to water pooling at your foundation.
- Drainage complexity: If water already collects in the area or near your foundation, you likely need a French drain or catch basin installed before any hardscape goes in. This is not a beginner DIY task.
- Permits and inspections: Some jurisdictions require permits for patios over a certain size or near structures. A contractor who pulls permits is legally responsible if something fails inspection.
- Concrete pours over 200 square feet: The timing, finishing, and curing of a large slab is very difficult to execute perfectly without experience. Mistakes are permanent.
- Structural work: Any patio that connects to or supports a structure (pergola footings, covered patio roof, second-story deck) needs proper structural engineering.
- High-value outdoor spaces: If you're planning an outdoor kitchen, fire pit with gas hookup, or full entertaining area, the ROI on professional installation usually justifies the cost.
The best DIY patio is one that matches your real skill level and site conditions honestly. Overreaching leads to a patio you'll be unhappy with, or worse, one that damages your yard or foundation over time. For most flat-to-gently-sloped yards with stable soil, a paver or gravel patio is genuinely within reach of a motivated first-timer willing to rent the right tools and not cut corners on the base.
FAQ
How do I make sure the patio height won’t interfere with my doors or steps?
Before buying pavers, confirm your finished height relative to doors and thresholds. If you end up higher than the bottom of exterior doors, you may need to adjust door swing clearance or add step-down transitions, which can turn a small build into a major rework.
What should I do where the patio meets my house, deck, or other fixed structures?
Plan for expansion gaps at every hard boundary (house, fence posts, raised planters, and any fixed structures). Fill these joints with a compressible foam backer and sealant (for concrete) so movement doesn’t crack a slab or push pavers out of alignment.
When is the best time to install polymeric sand, and what mistakes cause it to fail?
For pavers, use the poly sand only after final slope and compaction are correct, and only when conditions are dry enough for the joint binder to activate. If you hose down too soon or lay poly sand during humid drizzle, joints can wash out or fail to lock.
Why do my patio edges keep spreading or opening up, even when I added edging?
Edge restraints are only as good as their installation depth. Set metal or plastic edging into compacted base material (not just on top of sand) and extend it far enough that it can resist lateral pressure as the patio experiences wetting and freeze-thaw.
What if my yard stays wet after heavy rain, can I still DIY a patio?
If the ground is poorly draining clay, a paver patio can still work, but you may need an improved subbase design (for example, a thicker compacted base and better perimeter drainage). If water stays in place after rain, fix drainage first, because a surface upgrade will not solve a saturated subgrade.
Can I build a patio where mature tree roots are likely to be a problem?
If tree roots are present, you need to account for future growth by either re-routing the patio zone or using a foundation approach that tolerates minor movement. Otherwise roots can lift pavers or heave gravel and create persistent trip hazards.
What’s the best way to cut and fit pavers at the patio perimeter without gaps?
When cutting pavers, dry-cutting can create chips and an uneven edge unless you use the right blade and support the tile so it doesn’t bind. For straight cuts at edges, use a straightedge and test-fit a spare paver to confirm the final reveal matches your layout.
How can I tell if my base is really compacted and correctly leveled?
For a compacted base, you can’t rely on “looks level” anymore. Use a string line and check thickness and slope at multiple points, then compact in lifts (and verify with a hand tamper test for stability). Uneven compaction often looks fine at first, then settles within a season.
Can I build a patio in phases, starting with the base now and the surface later?
Yes, but avoid stacking too many changes in one phase. If you plan to phase, keep the base capped and protected, install rigid edging at the boundaries of the current section, and avoid leaving subgrade exposed for long periods because moisture cycles loosen it.
What are the traction and winter safety considerations for different patio materials?
Do a simple traction check. In freeze-thaw areas, choose a surface and joint setup that won’t become slippery with ice. On concrete slabs, avoid salt, and consider broom finish or an approved texture so the surface holds traction when wet or freezing.
How do I prevent weeds if I already have grass and weeds in the patio footprint?
Over-seeding or existing weeds are different than weeds migrating through joints. If weeds already exist in the area, remove the root mass and plan for longer-term suppression at the base stage, then use joint maintenance (poly sand touch-up) so gaps don’t become weed entry points.
My pavers are rocking or sinking, what’s the correct fix?
If you’re seeing paver rocking, it’s usually a localized base void or bedding sand loss, not just a top-surface issue. Lift the affected stones, add and re-level the base where needed, replace bedding sand to the correct thickness, and compact properly before resetting.
How should I plan low-voltage or solar lighting so I don’t tear up the patio later?
For lighting, place conduits and transformer locations before you close the base and pour or set pavers. If you add electrical later through established paver joints, it often requires cutting multiple stones and compromises drainage paths and edge restraints.
Next Articles
Best Patio Ideas on a Budget: Plan, Build, and Upgrade
Best patio ideas on a budget with layouts, DIY-friendly upgrades, flooring, shade, lighting, cost tips, and a build chec
Best Patio Wood: Choose Decking That Lasts
Compare the best patio wood options for rot, mold, warping, and splinters by climate, maintenance, and slip resistance.
Best Wood for Patio Cover: Choices, Grades, and Tips
Compare cedar, redwood, and pressure-treated wood grades for patio covers, plus what to buy, finish, and maintain outdoo