Every patio needs four things to actually be usable: a solid, well-drained surface, some form of shade or weather protection, lighting for evening hours, and furniture or structure that fits how you actually use the space. Everything else is a upgrade. Get those four basics right and you have a functional outdoor room. Skip any one of them and the patio collects leaves instead of people.
What Every Patio Needs: Essentials, Upgrades, and Checklist

Phoebe Foster
25 Jun 2026
The non-negotiables: what makes a patio actually work
Before you think about string lights or a pizza oven, make sure the fundamentals are in place. A lot of patios fail because the basics were rushed or skipped entirely, and they end up with puddles after every rain, cracked pavers after the first winter, or wobbly furniture on an uneven surface.
Here is what every patio genuinely needs, regardless of budget or style:
- A stable, level surface: whether that is poured concrete, sand-set pavers, porcelain tile, or composite decking, it needs to be even enough to be safe and comfortable
- Proper drainage slope: the surface must slope away from your house at 1/8 to 1/4 inch per foot so water runs off instead of pooling against your foundation
- Edge restraints or a defined border: this keeps your surface from shifting or spreading over time
- Basic lighting: even a single overhead light or a few pathway lights makes the space usable after dark
- At least one shade option: an umbrella, pergola, sail shade, or roof overhang keeps the space tolerable in summer heat
- Seating sized for how many people use it: this sounds obvious, but undersized furniture for the space is one of the most common mistakes
If your patio is attached to the house, also make sure the surface sits at least an inch or two below any door threshold and weep holes in the siding. This keeps water from migrating into your home. Contractors sometimes get this wrong, so it is worth checking before installation is complete.
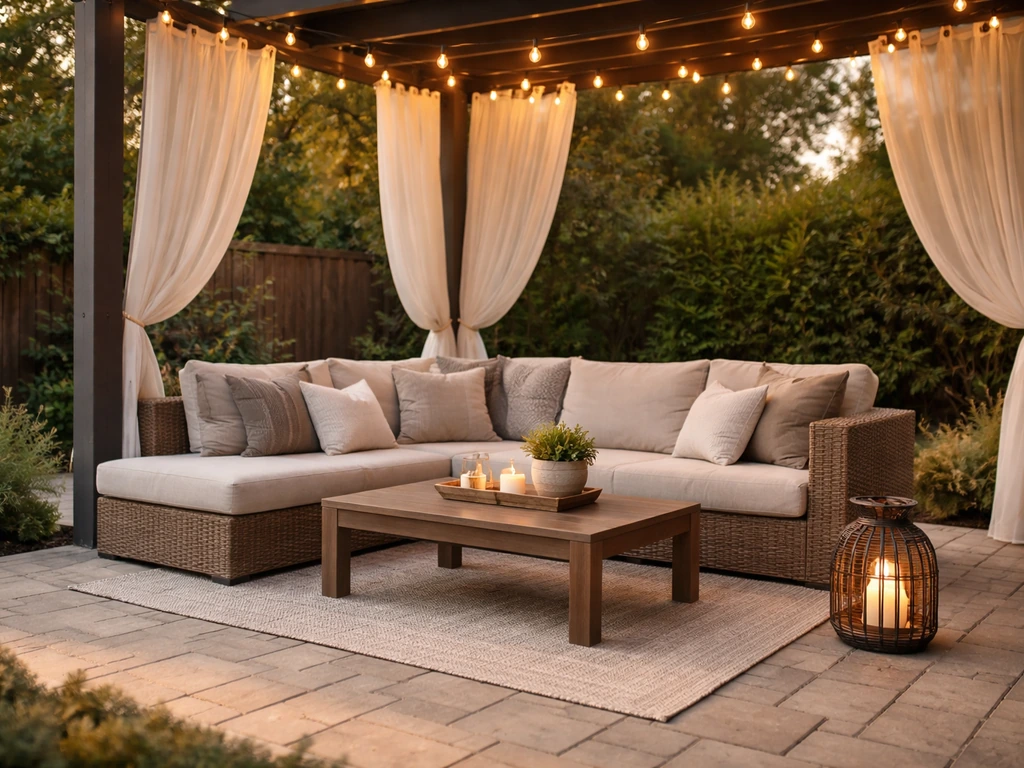
Shade, heat, lighting, and privacy: the comfort upgrades worth prioritizing
Shade and sun control
In most of the US, a patio without shade is barely usable from May through September during peak afternoon hours. Your best options depend on your budget, how permanent you want it to feel, and how much wind you get.
| Option | Best for | Wind/Durability notes | Approximate cost range |
|---|---|---|---|
| Patio umbrella | Small to mid-size seating areas, renters | Needs a properly sized weighted base (undersized base is a wind hazard) | $50–$400+ |
| Shade sail | Wide, open coverage on a budget | Must be mounted at 15–30° angle to shed rain; engineered mounts needed for wind areas | $100–$600 DIY installed |
| Pergola with shade cloth | Semi-permanent, versatile look | Very durable frame; add louvered roof or retractable canopy for more coverage | $1,500–$10,000+ |
| Retractable awning | Attached-house patios, flexible coverage | Motorized versions retract in wind automatically; good for variable climates | $1,000–$5,000 installed |
| Solid roof cover or patio cover | Maximum protection, rain coverage | Requires permits in most areas; most durable long-term option | $5,000–$20,000+ installed |
If you are in a high-wind area (coastal Texas, the Plains, or mountain zones), shade sails and freestanding umbrellas need serious attention. Shade sail structures often reference wind design speeds of 110+ MPH in engineered builds, but a standard DIY sail with basic post mounts will not get close to that. Use heavy-duty ground anchors or wall mounts, and take the sail down before major storms. For umbrellas, the base weight needs to match the canopy size, and most people underestimate how heavy that should be.
Lighting that actually works
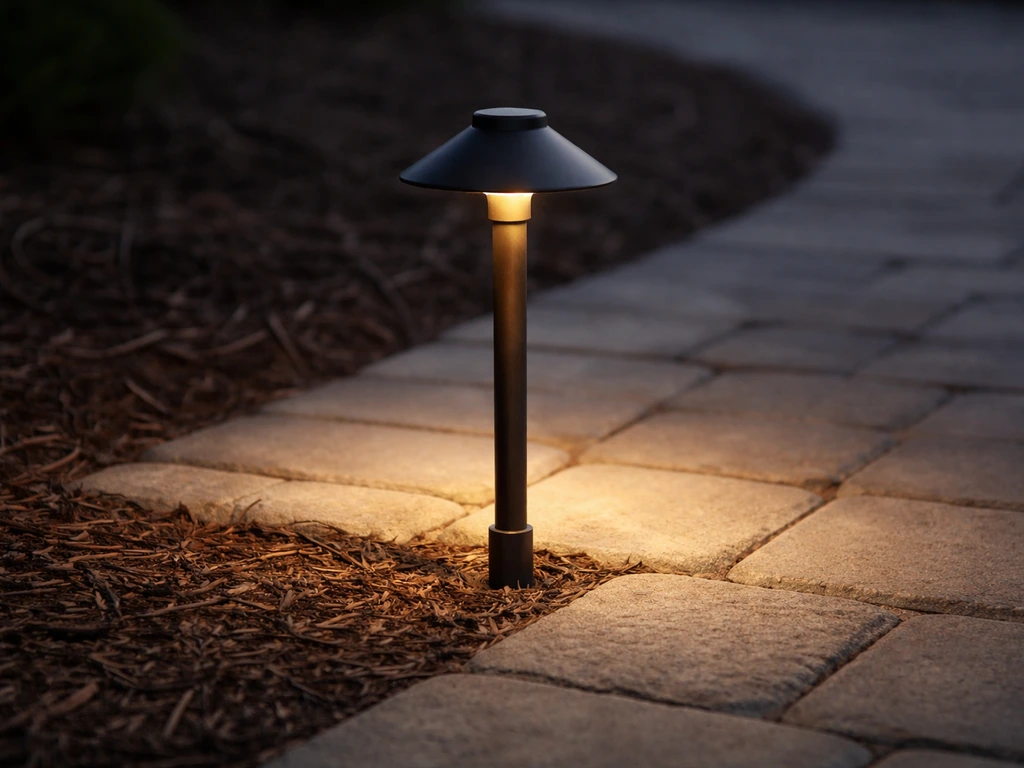
The goal with patio lighting is task visibility without glare. Fixtures that throw light upward are the main culprit for that uncomfortable, washed-out brightness that makes people squint and retreat inside. Downward-directed fixtures, step lights, and string lights strung below eye level all work better. For pathway and step areas, you are targeting about 2–10 lux on the surface, which is enough to see clearly without being blinding.
blank" rel="noopener noreferrer">Low-voltage landscape lighting (12V systems with a plug-in or hardwired transformer) is the most practical choice for most DIYers. It is safer to install, easy to expand, and widely available. If you want line-voltage fixtures (120V), those need to be rated for wet locations under UL 1598 and typically need a licensed electrician. For most patios, a low-voltage system with a quality transformer will do everything you need.
Heating and cooling
In the South and Southwest, cooling matters more than heating. A ceiling fan mounted to a pergola or patio cover makes a bigger difference than most people expect, especially when combined with shade. Misting systems are popular in dry climates like Arizona and can drop the perceived temperature significantly, though they can feel muggy in already-humid areas like Houston or Florida. For heating, propane or natural gas patio heaters extend the season in cooler climates. Electric infrared heaters are another option that mount overhead and heat people rather than the air, which is more efficient on breezy nights.
Privacy screening
Privacy is often an afterthought and it should not be. If you can see your neighbors clearly from your seating area, you are less likely to actually use the space. The most practical options are lattice panels with climbing vines, privacy fence extensions, outdoor curtains hung from pergola posts, or a row of evergreen shrubs or tall ornamental grasses. Evergreens are the best year-round solution for screening since deciduous plants leave you exposed in winter. Curtains work well and add a soft, finished look, but in consistently windy spots they flap around and get annoying fast. A layered approach works best: start with a structural element (fence or trellis) and soften it with plants.
Weather-proofing and surface durability: choosing the right flooring for where you live
The surface material is probably the most consequential decision you will make for a patio. It affects how the space looks, how safe it is when wet, how much maintenance you will do, and how long it lasts before something needs repair. The right choice depends heavily on your climate.
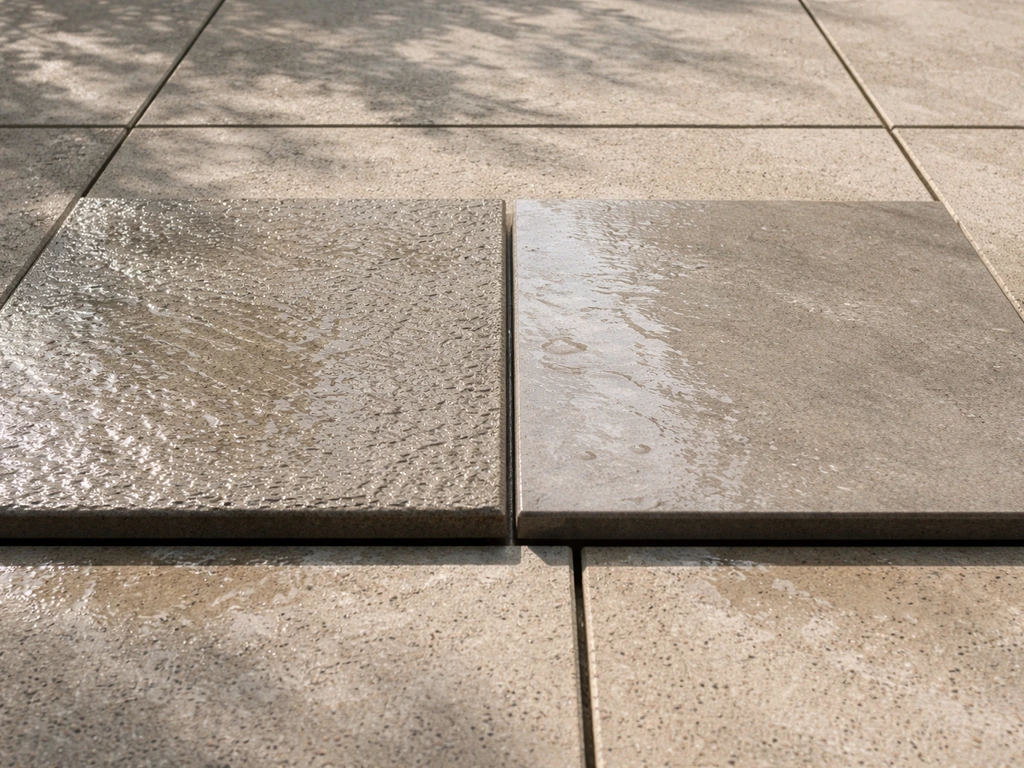
Slip resistance: the spec that matters for wet surfaces
Any outdoor hard surface gets wet, and slippery tile or smooth concrete causes real falls. Look for a Dynamic Coefficient of Friction (DCOF) of at least 0.42 for any wet outdoor area. For pool surrounds or areas that stay consistently wet, aim higher. If you are building a pool patio, prioritize slip resistance and materials designed for consistently wet surfaces so the space stays safe year-round. Many porcelain pavers carry an R11 slip rating, which corresponds to good grip on wet inclines. When shopping for tile or pavers, ask specifically for the DCOF value and do not just assume any outdoor-rated tile meets it.
Cold-climate surfaces: freeze-thaw is the enemy
If you live somewhere that freezes, water absorption in your paver or tile is the key number. Materials with high water absorption will crack when that absorbed water expands during freezing. Porcelain pavers with water absorption under 0.5% (many quality products are under 0.1% per ISO 10545-3 testing) hold up well in freeze-thaw cycles. Standard ceramic tile, natural stone, or concrete pavers with higher absorption rates can fail within a few winters. In cold climates, 20mm (about 3/4 inch) thick porcelain pavers are a particularly good choice: low absorption, good slip ratings, and durable enough for outdoor use.
Hot-climate surfaces
In Texas, Arizona, or Florida, freeze-thaw is not your problem. Heat retention is. Dark-colored concrete and dark stone can get uncomfortably hot on bare feet. Light-colored concrete, travertine, and light tan pavers stay cooler. Composite decking with a heat-reflective coating is another option if you want a wood-look surface without the barefoot burn factor.
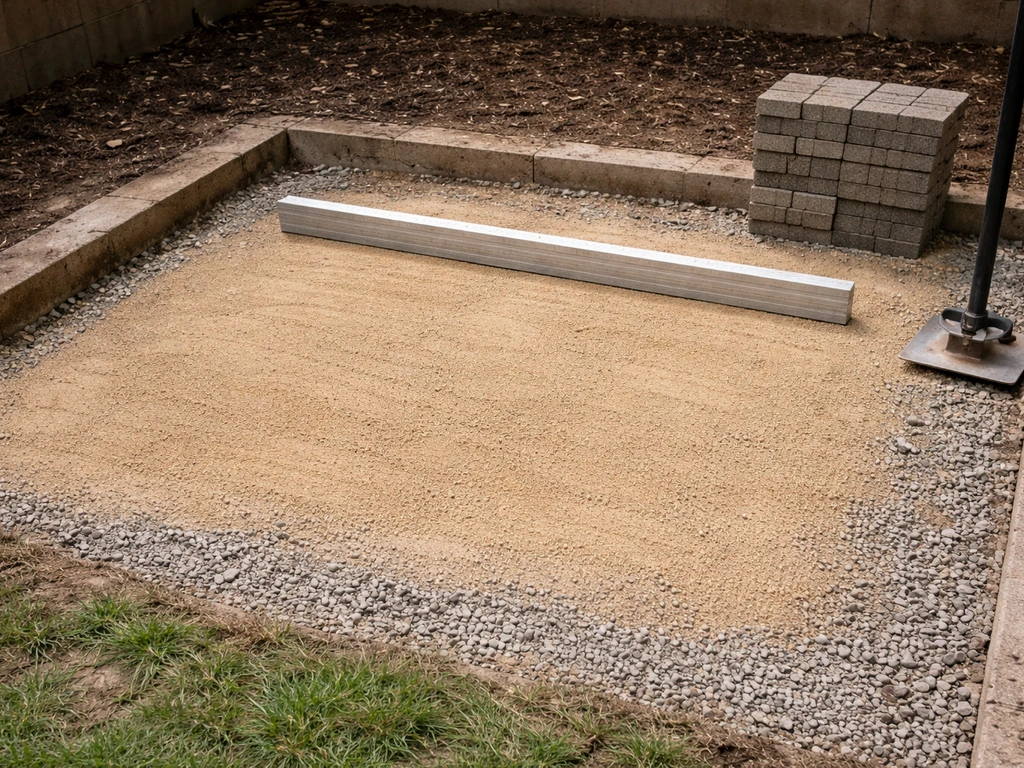
Drainage slope and what it means for your build
Every patio surface needs to slope away from the house. The standard is 1/4 inch drop per foot of distance, though 1/8 inch per foot is the minimum that still drains reliably. Over a 12-foot patio, that means a 3-inch drop from the house side to the outer edge. This needs to be built into the base, not just shimmed or hoped for. For large patios or spaces surrounded by structures, you may also need channel drains or a French drain along the outer edge to handle runoff from heavy rain events.
If you want to reduce runoff entirely, permeable paver systems let rain seep through the joints and into a gravel base below. The EPA recognizes these as legitimate stormwater management tools that can also filter pollutants before water reaches groundwater. They require a properly prepared base with adequate void space and work best in areas without clay-heavy soil directly below.
Joints, weeds, and low-maintenance finishing
If you have sand-set pavers, polymeric sand in the joints is not optional, it is essential for longevity. Regular sand washes out, lets weeds take hold, and allows pavers to shift. Polymeric sand cures after you activate it with water and creates a flexible, weather-resistant joint that resists washout and discourages weed growth. Different products are specified for different joint widths, so match the product to your joint size. After installation, seal the surface if you want to protect color and simplify cleaning.
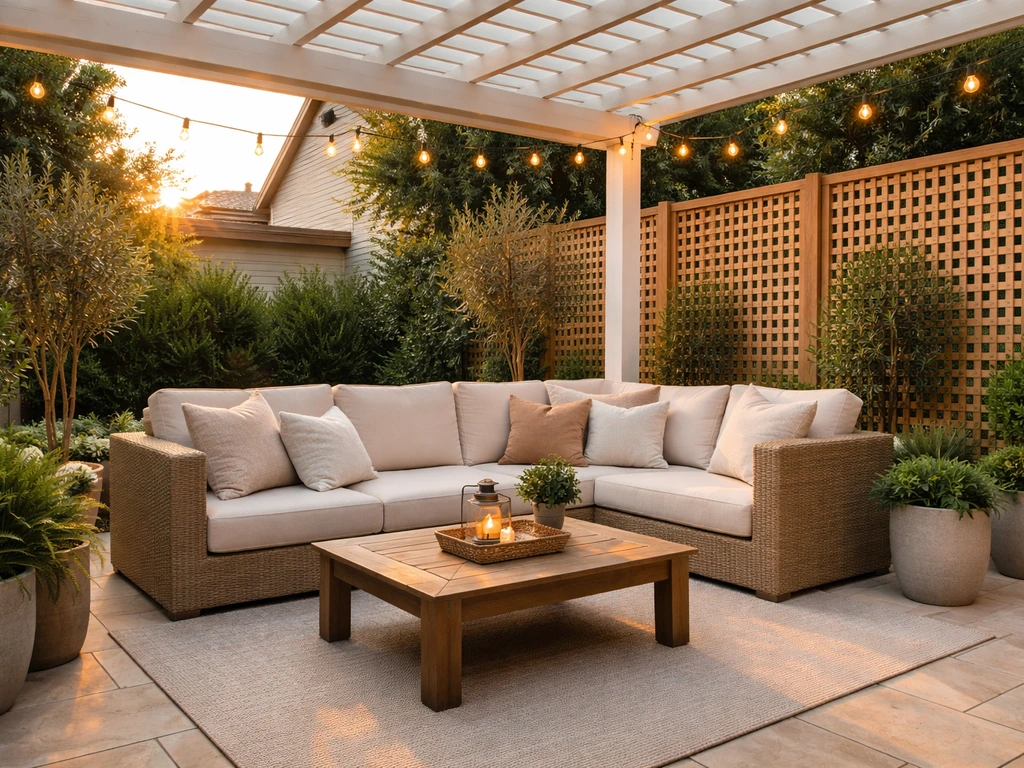
Designing for how you actually use your patio
One patio can serve multiple purposes, but only if you plan zones intentionally. A patio that tries to do everything in one undivided space usually ends up doing nothing well. Think about your primary uses and lay them out so they do not fight each other.
Dining zone
A dining setup needs a flat, level surface (even small wobbles make tables annoying), enough space for chairs to pull out without falling off the edge of the patio, overhead shade for daytime meals, and lighting for evenings. A general rule of thumb: allow at least 3 feet of clear space around the table on all sides for comfortable chair movement. A 6-person table typically needs a minimum 12x12 foot dining zone.
Lounging zone
Lounge areas benefit from softer surfaces underfoot (outdoor rugs help), lower lighting, and maximum shade. A sectional or deep-seat arrangement anchored with an outdoor rug feels like an outdoor living room rather than a furniture showroom. Keep the lounging zone somewhat separated from the grill or cooking zone so smoke does not drift over sitting guests.
Cooking and grilling zone
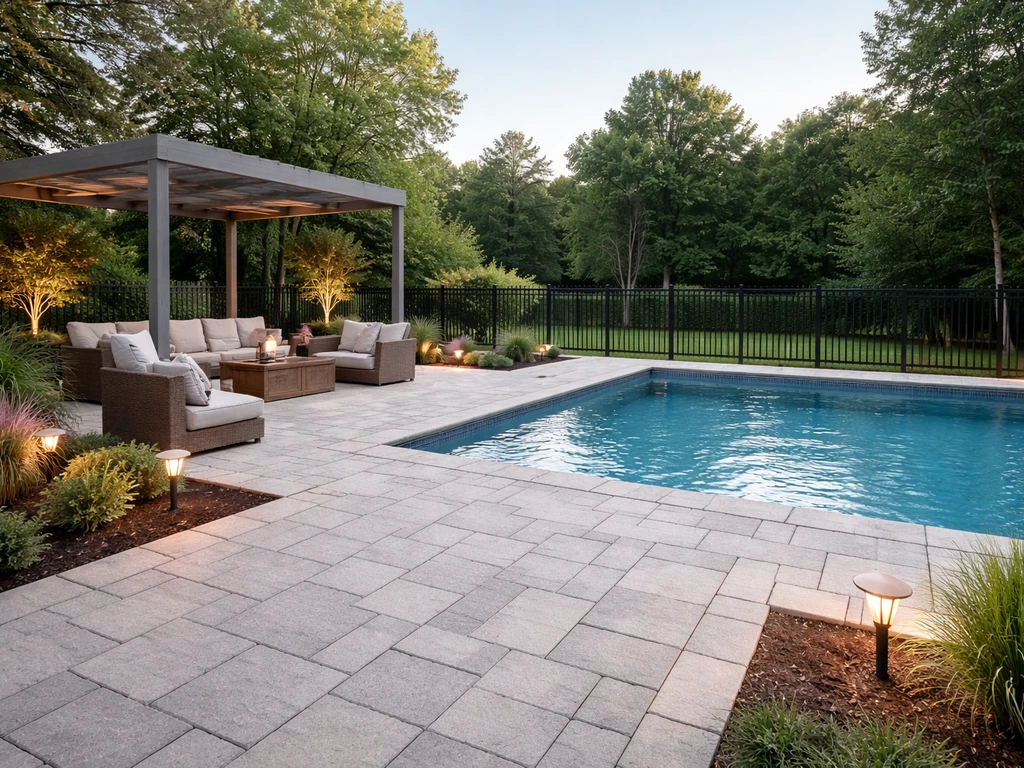
The grill area has real safety requirements, not just aesthetic ones. Gas grills need at least 10 feet of clearance from the house structure and a minimum of 18 inches from any combustibles like fence boards, railings, or overhead pergola framing. That 10-foot recommendation applies to 1-2 family homes and is echoed by fire safety guidelines from multiple municipalities. Make sure your grill zone has a non-combustible surface (concrete or stone, not composite decking or wood), a prep surface nearby, and good airflow. Never put a grill directly under a low pergola without checking clearance. Home Depot’s pellet grill assembly instructions repeat the same clearance concept, emphasizing manufacturer-specified minimum distances to nearby combustibles when planning the grill area Never put a grill directly under a low pergola without checking clearance..
Kids and pets
If kids or dogs use the patio regularly, slip resistance becomes even more important. Textured surfaces, outdoor rugs with non-slip backing, and avoiding glossy tile near any water features or pool edges are all practical choices. Keep grills behind a physical barrier or gate when the patio is being used as a play space.
Materials and products: what to actually look for
Shopping for patio materials is overwhelming because there are dozens of options in every category. Here is a simplified decision framework that cuts through the noise.
| Material | Best climate fit | Key spec to check | Maintenance level |
|---|---|---|---|
| Concrete pavers | Most climates | Water absorption rate; freeze-thaw rating in cold zones | Low; re-sand joints every few years |
| Porcelain pavers (20mm) | All climates, especially cold | DCOF ≥0.42 (wet), water absorption <0.5%, R11 slip rating | Very low; easy to clean |
| Natural stone (travertine, slate) | Mild to warm climates | Sealed properly; not ideal for hard freeze zones | Moderate; needs sealing annually |
| Poured concrete | All climates | Stamped or brushed finish for slip resistance; control joints for crack prevention | Low-moderate; seal every 2-3 years |
| Composite decking | Mild to warm climates | Heat reflectivity rating; fade warranty; slip rating when wet | Low; periodic cleaning |
| Permeable pavers/grid systems | Any climate with stormwater concerns | Infiltration rate; void percentage; compatible base depth | Low; occasional joint replenishment |
For furniture, focus on frame material and fabric ratings. Powder-coated aluminum frames do not rust, do not need painting, and stay light enough to move around. Resin wicker (not natural wicker) holds up outdoors without fading quickly. Fabrics rated for outdoor use (like solution-dyed acrylic) resist UV fading and mildew far better than standard polyester. Cheap outdoor cushions will look bad within one summer in a sunny climate.
For shade structures, the key is the mounting system, not just the canopy material. A beautiful shade sail with flimsy hardware is a liability in any wind. Use galvanized or stainless steel hardware, mount into structural posts or masonry anchors, and make sure the sail can be removed or retracted before storms.
Budgeting it out: DIY vs hiring a pro, and what to ask contractors
Realistic cost ranges
Patio costs vary enormously by region, material, and complexity. A basic concrete patio runs roughly $6–$15 per square foot installed. Pavers typically run $15–$30 per square foot installed. A pergola can range from $1,500 for a basic kit you assemble yourself to $15,000 or more for a custom built structure. Outdoor kitchens and built-in grills add another $5,000–$20,000+ depending on appliances. Budget at least 10–15% more than your estimate for site prep surprises: tree roots, grading issues, and buried irrigation lines are common.
What makes sense as DIY
Laying pavers or concrete stepping stones on a well-prepped base is genuinely achievable for a motivated DIYer, especially on smaller patios under 200 square feet. Installing low-voltage landscape lighting, hanging shade sails, building simple pergola kits, planting privacy screens, and adding outdoor furniture and accessories are all realistic DIY projects. The tasks that are harder to DIY well are anything involving significant grading changes, drainage systems (especially if tying into storm drains), poured concrete larger than a small pad, electrical work for line-voltage lighting or outdoor outlets, and permitted structures like covered roofs.
Questions to ask any patio contractor
- What is the base prep method and depth? (For pavers, you want to hear about compacted gravel base, typically 4–8 inches for concrete or 4–6 inches of compacted aggregate for sand-set pavers)
- What slope are you building in, and in which direction does water flow off the patio?
- What joint material are you using between pavers, and is polymeric sand included?
- Will drainage be handled by surface slope alone, or will you install channel drains or underdrains?
- Do you pull permits for this work, and what is required in my jurisdiction?
- What is the warranty on labor and what happens if pavers settle or shift in the first year?
- Are you licensed and insured? Can I see your current certificate of insurance?
- Can you provide references from similar projects in my area completed in the last 12 months?
Get at least three bids for any project over $3,000. When comparing bids, make sure you are comparing the same scope: base depth, material grade, drainage approach, and cleanup are all things that vary between low and high bids and explain price differences that look confusing on paper.
Finishing touches and keeping everything in good shape long-term
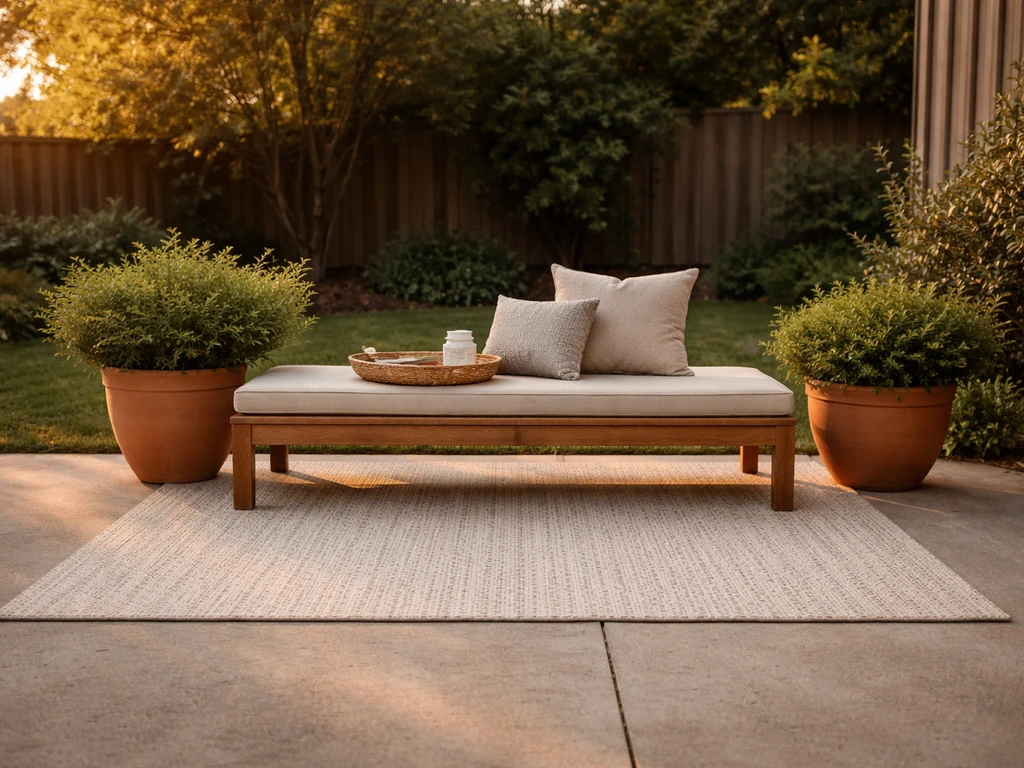
The finishing layer is what makes a patio feel like a real outdoor room versus a bare slab. An outdoor rug defines a seating zone and makes the space feel warmer. Potted plants add life without the commitment of a full garden bed. A side table at every chair eliminates the need to reach across the space for a drink. These are small additions that dramatically change how people use and feel about the space.
For long-term care, the main tasks are predictable and not time-consuming if you stay on top of them. Sweep or blow off debris regularly so it does not stain or trap moisture against the surface. Reapply polymeric sand to paver joints if you notice gaps forming, typically every 3–5 years depending on weather exposure. Seal concrete and natural stone surfaces every 2–3 years. Check the slope and drainage after the first major rain of the season and after any hard freeze cycle to catch any shifting before it becomes a bigger problem. Store or cover cushions and fabric items during extended off-season periods or during major storms.
Shade structures need seasonal attention too. Remove shade sail canopies before winter in freeze zones. Inspect all hardware annually for rust or loosening, especially after wind events. For pergolas with wood frames, check for rot and re-seal or re-stain every two to three years. Aluminum and vinyl pergola frames are essentially maintenance-free beyond an occasional rinse.
If your patio design feels like it is missing something, it is usually one of three things: more defined zones (which can be solved with a rug, a change in surface material, or a low planter divider), better lighting after dark (a few well-placed low-voltage fixtures fix this for under $200 DIY), or some form of privacy or enclosure that makes the space feel intentional rather than exposed. For more inspiration, explore the best patio garden ideas that pair greenery with shade, lighting, and durable, weather-ready surfaces. Patios that feel right to be in do not happen by accident, but they also do not require a massive budget. They require decisions made in the right order, starting with the surface, drainage, and shade, then layering comfort and personality on top.
If you are planning around a pool, the priorities shift slightly toward slip resistance, water drainage, and heat-tolerant surfaces. And if you are thinking bigger, the best patio additions tend to build on a solid base rather than compensate for a poor one. Get the foundation right first and every upgrade after that becomes easier and more satisfying to use.
FAQ
What every patio needs if I only have time for one “fix” before guests come over?
Start with drainage and trip safety. Even if you add furniture later, check that the surface slopes away from the house and that there are no ponding spots after a rain. If water pools anywhere in your walkway or seating area, address the base or add a properly routed drain before spending money on decor.
How do I tell whether my patio slope is actually working?
After a heavy rain, walk the edges and watch where runoff goes. Water should move toward the outer perimeter, not toward the house foundation or into the middle of the patio. If you see standing water spots that last more than 30 to 60 minutes, the slope or base thickness may be off.
Is it okay to add shade later, or should I plan it from the beginning?
Plan it early. Shade changes how you place seating zones, where people will congregate, and it can affect drainage if you mount structures into the base or near weep paths. If you are installing a pergola or shade sail, decide the posts and anchor points before final surfacing.
What every patio needs for lighting if I do not want to see fixtures or get glare?
Use downward-directed lighting and keep the beam low. Aim fixtures so they illuminate steps, pathways, and tabletops rather than washing walls or reflecting off shiny surfaces. If you have glossy tile, add more low-level path lights and reduce brightness near the seating area.
For 12V landscape lighting, how do I avoid common power and voltage drop issues?
Do not run long cable distances on the thinnest wire available. Use the correct wire gauge for the total run length, and follow the transformer capacity so multiple fixtures do not exceed the system’s output. If you plan expansion, oversize the transformer slightly and leave room for adding fixtures on the same circuit.
What every patio needs if I live in a freeze-thaw climate, but I want low maintenance?
Choose low water-absorption materials and plan correct thickness and joints. Porcelain pavers under about 0.5% absorption reduce freeze cracking risk, and polymeric sand joints help prevent washout that destabilizes units. Also re-check slope after the first hard freeze, since small shifts can show up quickly in cold weather.
How should I handle snow or ice on a patio with pavers or tile?
Avoid aggressive scraping on joints and use de-icing methods that do not damage surfaces. Keep salt and harsh chemicals off porous grout lines when possible, and focus on preventing refreezing on the surface by improving traction and drainage. If you expect frequent ice, prioritize higher DCOF and textured, wet-rated materials.
What every patio needs for kids or pets around water features?
Traction matters more than appearance. Use textured or higher DCOF surfaces near pool edges and water lines, consider outdoor rugs with non-slip backing only where water exposure is limited, and keep any glossy tile away from wet transition zones. If the patio doubles as a play area, add a physical barrier near the grill and any pool access points.
Do I need a permit for a covered patio, pergola, or patio extension?
Often, yes, especially for roofed structures, attached components, and anything that changes the exterior footprint. Check local zoning and permitting rules before buying materials, because requirements can include setbacks, engineering, and inspection. Building permits can also affect how you anchor posts and handle electrical hookups for lighting or outlets.
What every patio needs if my patio is attached to the house but I am worried about water intrusion?
Confirm the surface elevation and the water path. Your patio should sit below door thresholds, and you need weep holes in the siding where appropriate, plus a clear drainage route away from the home. During installation, inspect how the base meets the foundation and verify that flashing or weep details are not blocked by new materials.
What should I do if my patio feels “unfinished” even though I have furniture and decor?
Rebuild the zones and address contrast in lighting and layout. A single seating area may still feel exposed if it lacks a defined boundary, so add a rug, a low planter divider, or adjust the furniture arrangement to create a clear center. Then refine nighttime comfort with a few low-voltage fixtures placed to reduce shadows and glare.
How much clearance do I truly need around a gas grill on a patio?
Follow clearance rules for both heat and combustibles, not just the grill itself. Ensure the area around the grill uses non-combustible material, keep distance from fence boards, railings, and pergola framing, and verify overhead clearance even if the pergola is open. If you have a narrow patio, plan a dedicated grill zone early rather than relocating the grill later.
When should I reapply polymeric sand, and what is a sign it is failing?
Reapply when joints start to show gaps, when weeds begin to appear, or when fine particles wash out after rain. The timing depends on weather and foot traffic, commonly every few years, but the real trigger is joint loss rather than the calendar. If you are getting washout, also investigate drainage and base settling, since sand alone cannot fix an underlying slope issue.
What every patio needs for long-term comfort, beyond the basics?
Plan for seasonal usability. Add shade or airflow (fans on pergolas, ventilated covers) for hot months, and prioritize safe heating options in cooler seasons. If you live in windy areas, build choices that can be stowed or removed, since unsecured coverings and furniture covers can turn into storm problems.
Next Articles
Pool Patio Must Haves Checklist: Safe, Comfortable, Durable
Pool patio must haves checklist for safe, comfortable, durable outdoor living, with DIY tips, budgeting, and material ch
Best Patio Additions: Comfort, Shade, Privacy, and More
Best patio additions ranked by comfort, shade, privacy, cooling, lighting, and weatherproofing with DIY, costs, and trad

Do It Yourself Outdoor Patio Ideas: Build, Upgrade, Maintain
DIY outdoor patio ideas for planning, building, upgrading, and maintaining floors, shade, privacy, lighting, and decor.