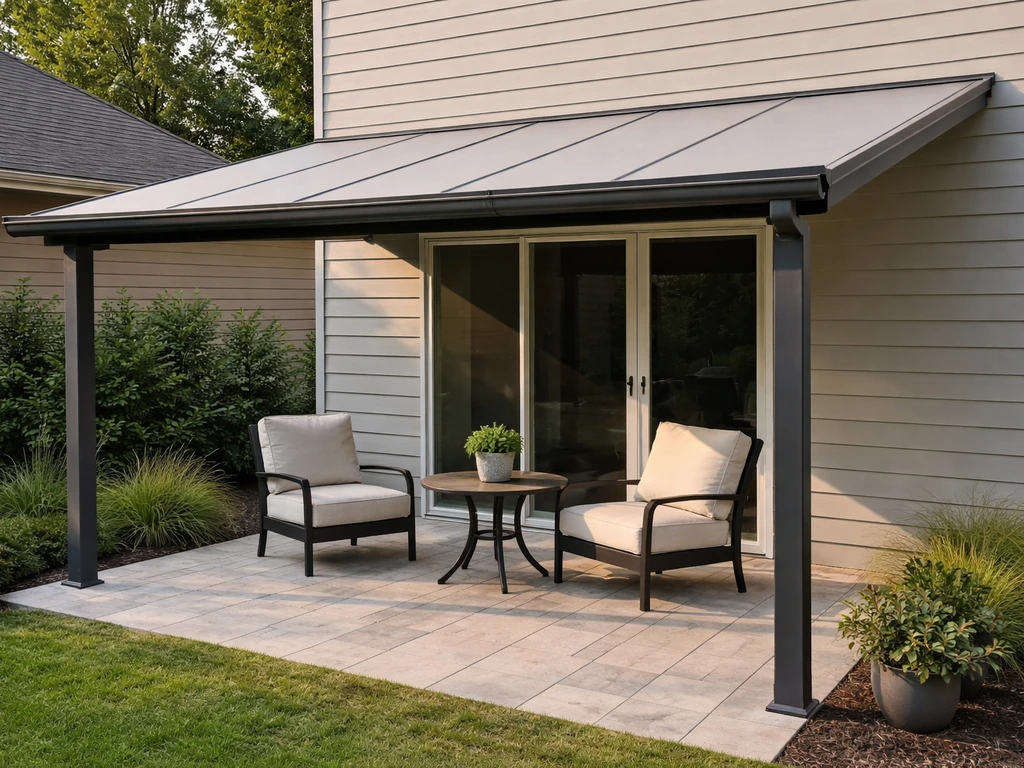
A hard top canopy for a patio is a permanently or semi-permanently installed overhead structure with a rigid roof panel, not a fabric sail or retractable awning. If you want real, weather-proof coverage that holds up to rain, hail, and years of sun without sagging, fading, or needing to be rolled up every storm season, a hard top is the right direction. The key decisions are which material fits your climate, what size and pitch you actually need, and whether you hire out or build it yourself.
Hard Top Canopy for Patio: Selection, Fit, and Install Guide

Phoebe Foster
22 May 2026
What a hard-top patio canopy actually is (and where it makes sense)

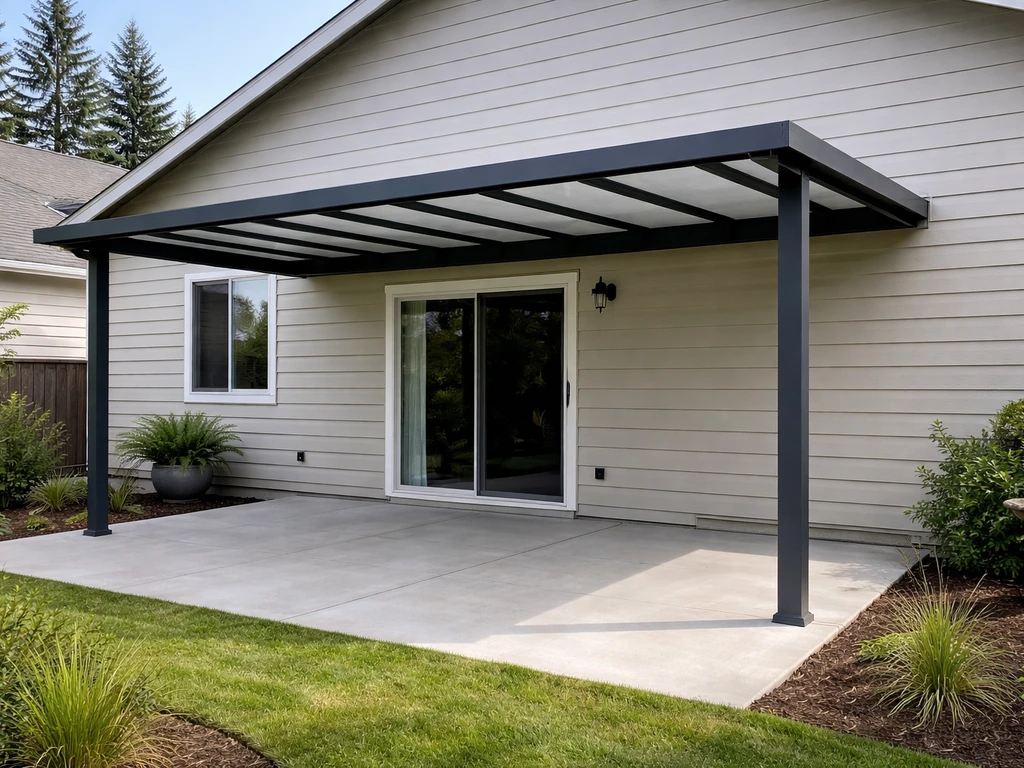
A hard top patio canopy is a fixed overhead roof structure attached to the house or supported by posts, covered with rigid panels like polycarbonate, aluminum, or glass instead of fabric. It sits in a different category than a soft canopy, pergola shade sail, or retractable awning. Those solutions are lighter and cheaper upfront, but they don't block rain, they wear out faster, and most need to be stowed or replaced every few years.
Hard top canopies work especially well when you want to extend your usable outdoor season, protect patio furniture from UV damage and rain, or create a covered outdoor dining or living space that genuinely feels like an extension of the house. They're also the right call when you're tired of fighting with fabric covers that rip, sag, or mildew. If you've been researching patio top cover ideas and keep coming back to wanting something more permanent, a hard top is what you're circling toward. If you want to brainstorm patio top cover ideas, focus on the material, the roof pitch, and how well the design sheds rain and snow.
Where they don't fit as well: very small patios where the structure would feel heavy and overwhelming, rental properties where you can't modify the building, or tight budgets where a simpler shade solution would do the job. But for most homeowners with a dedicated patio space, a hard top canopy is genuinely the most durable and lowest-maintenance overhead option available.
Getting the size, pitch, and layout right
Start by measuring your actual patio footprint, then add 12 to 24 inches of overhang on the open sides if the design allows it. That extra overhang matters a lot for rain coverage, especially on windy days when rain comes in at an angle. A canopy that barely covers the furniture underneath isn't giving you full protection.
Roof pitch is one of the most underrated decisions. You need enough slope for water to run off reliably without pooling. For polycarbonate panel systems, the minimum workable slope is around 1:20 (about 3 degrees), but that only holds up when overlaps, flashing, and support spacing are all done correctly. In practice, I'd aim for at least a 1:12 pitch, which gives you a noticeably steeper angle and much better drainage with less risk of leaks at the panel seams. In snow-prone regions, a steeper pitch also helps snow slide off before it accumulates.
For layout, most patios use one of three configurations: a lean-to attached to the house wall (most common and usually the most affordable), a freestanding structure on four posts, or an L-shaped or wraparound design for larger homes. Attached lean-tos are the most practical for most homeowners because they share a wall with the house, which reduces the number of posts and the overall cost. Freestanding canopies give you more placement flexibility but cost more and require footings on all corners.
Materials and build quality: what actually matters
The frame and the panel material are the two biggest quality factors, and getting either one wrong will cost you more in replacements and repairs than you saved upfront.
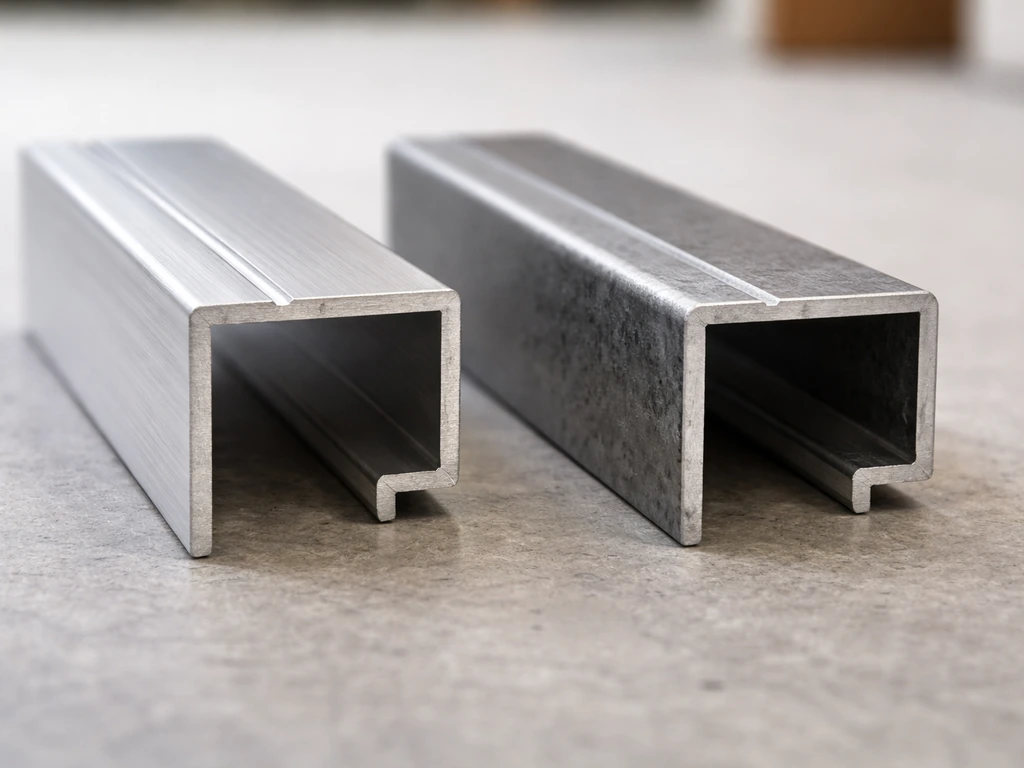
Frame options
Aluminum is the most practical frame material for most homeowners. It's lightweight, naturally corrosion-resistant, and available in powder-coated finishes that hold up for 15 to 20 years without repainting. Steel frames are stronger but need to be galvanized or powder-coated to resist rust, especially in humid or coastal climates. Wood looks great but requires ongoing sealing and staining and will eventually rot or warp without consistent maintenance. For a canopy you want to install once and largely forget, aluminum is the smart default.
Panel and roofing material options
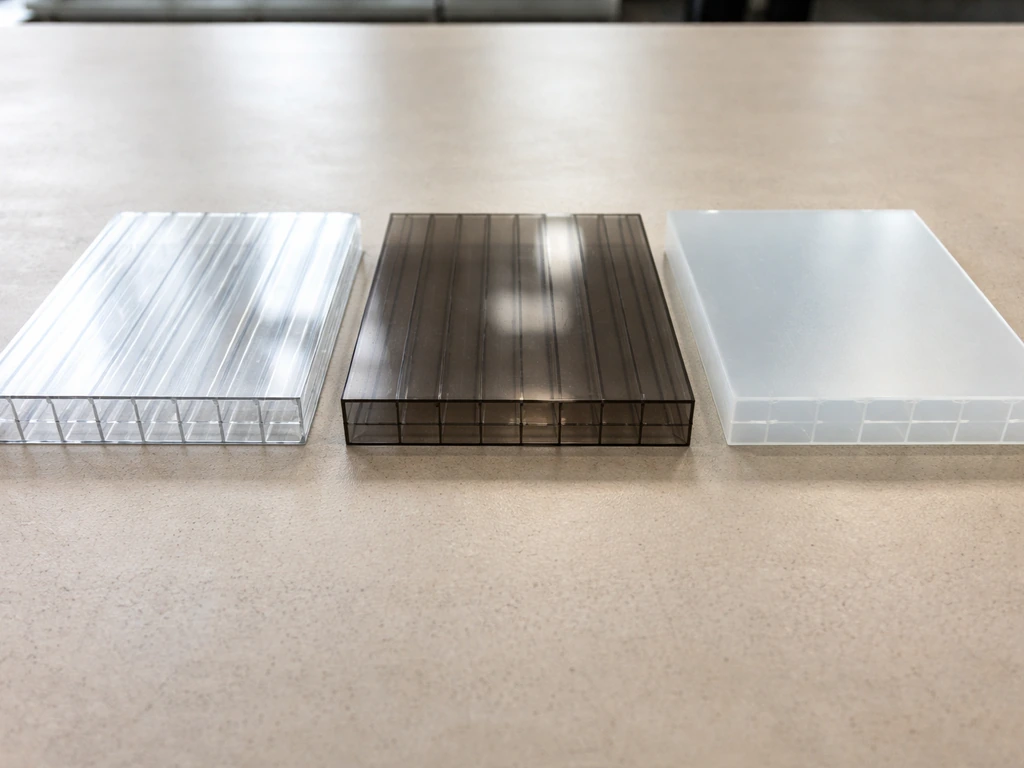
| Material | Light Transmission | Impact Resistance | Snow/Heavy Load | Typical Cost (installed per sq ft) | Best For |
|---|---|---|---|---|---|
| Polycarbonate panels | Good (clear or tinted) | Excellent (hail-rated) | Moderate (check specs) | $16–$35 | Most climates, DIY-friendly |
| Aluminum roofing panels | None (solid) | Very good | Strong with proper framing | $16–$68 | Full rain/shade protection |
| Tempered glass | Excellent (clear) | Good | Heavy, needs robust frame | $24–$46 | High-end aesthetic builds |
| Corrugated polycarbonate | Good | Good | Moderate | $10–$25 | Budget builds, DIY |
Polycarbonate is the most popular choice for a reason. It's tougher than acrylic, handles hail far better than glass, and lets natural light through, which keeps the patio from feeling like a dark shed. Some polycarbonate panel systems like Suntuf carry a 10-year hail damage warranty and a lifetime limited warranty on light transmission, which is a concrete quality indicator worth checking when comparing brands.
For hardware and fasteners, don't cut corners. Use stainless steel or coated fasteners throughout, especially if you're in a coastal or humid environment. Galvanized hardware is a minimum; stainless is better. Cheap zinc-plated screws will rust and stain within a couple of seasons, and they'll fail structurally before the panels do.
Weather protection: rain, sun, wind, and snow
Rain and drainage
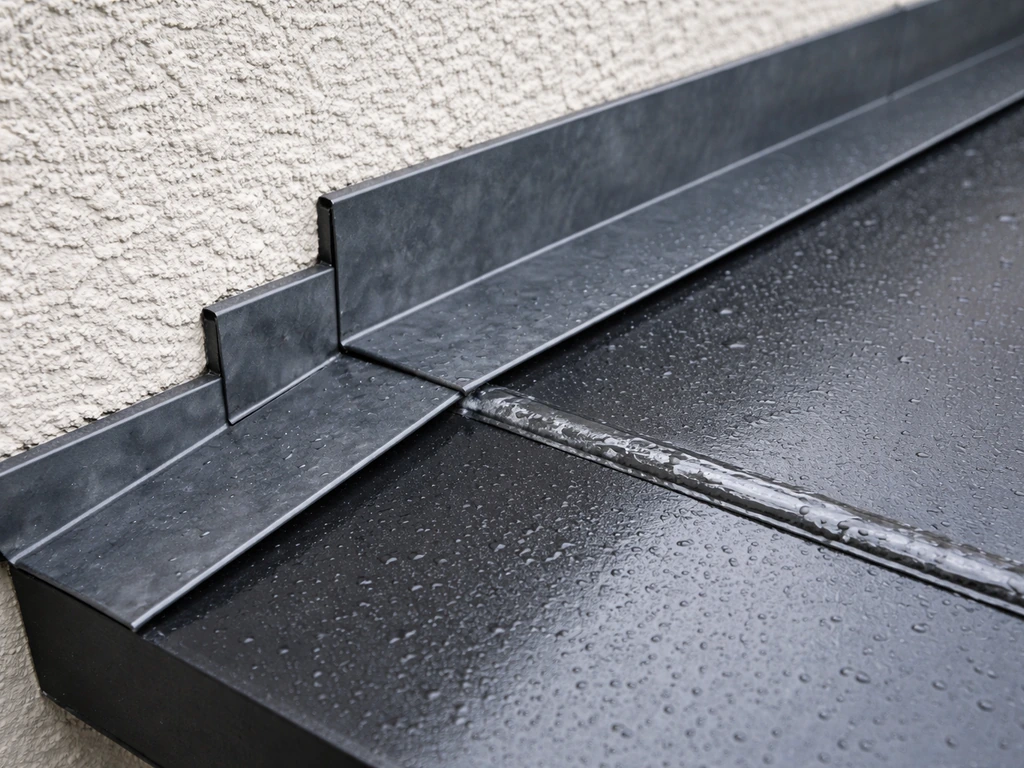
The two highest-risk leak points on any hard top patio canopy are the flashing where the canopy meets the house wall and the seams between panels. At the wall, you need stepped, properly sealed flashing, not just a bead of caulk. Metal flashings, aluminum or galvanized, at panel edges are what prevent rainwater from seeping into the gaps between panels and the support beams. If your current canopy is aging or leaking, a patio replacement canopy top can restore full coverage without changing the entire layout. If a kit or contractor doesn't mention flashing details, that's a red flag. On drainage, make sure your slope directs water away from the house and that you have a clear path for runoff, whether that's a gutter along the low edge or a designed drip edge.
Sun and UV
If you're in a high-sun climate like Texas, Arizona, or Southern California, think carefully about whether you want clear or tinted panels. Clear polycarbonate lets through a lot of light but also a lot of heat. Tinted or bronze panels reduce glare and heat gain significantly. Most quality polycarbonate panels include a UV-protective coating on one side (that side must face up during installation, which is easy to get wrong). Solid aluminum roofing gives you maximum shade but eliminates natural light entirely. If you want patio top shades that stay comfortable in bright sun, consider tinted panels for heat and glare control.
Wind resistance
Wind uplift is a serious structural concern for any overhead patio structure. When shopping for kits or having a custom structure designed, look for products or designs tested to UL 580, which is the recognized standard for evaluating roof uplift resistance under both dynamic and static wind loads. A canopy that isn't engineered for your local wind zone can literally lift off in a severe storm. Your local building department will typically tell you the design wind speed for your area, and any contractor worth hiring will know this number and design to it.
Snow and cold climates
If you're in a snow region, this is where you cannot guess or skip engineering. Snow load isn't just about depth: two feet of snow can weigh anywhere from about 6 psf to 42 psf depending on whether it's light powder or wet, dense snow. Snow load design for patio covers starts with your area's ground snow load, then applies adjustment factors for roof geometry, exposure, and slope. A hard top canopy in Minnesota or New England that isn't designed for local snow loads is a structural liability. Steeper roof pitch helps snow slide off, but the frame itself still needs to be sized for your actual snow load numbers, which a local engineer or reputable contractor can calculate.
DIY vs. hiring a contractor, and what to know about permits
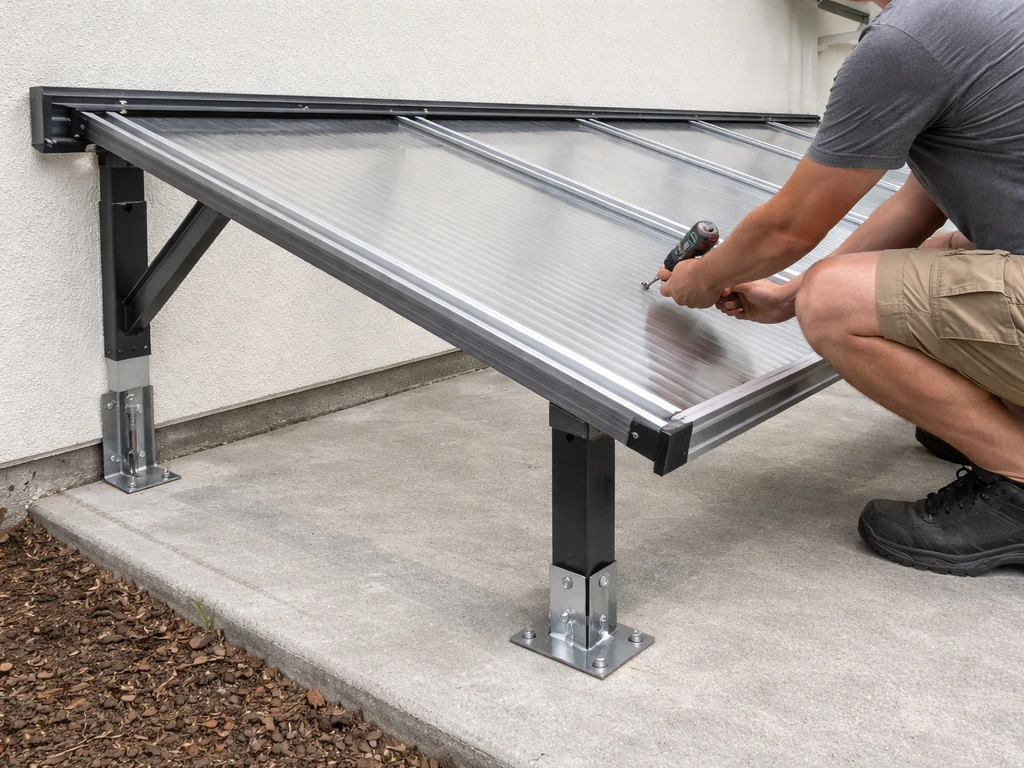
Honest assessment: a simple attached lean-to canopy with polycarbonate panels over a concrete patio is one of the more approachable DIY projects for a handy homeowner. Plastics Canada also notes polycarbonate as a common choice for outdoor roofing applications like patio covers because it provides higher impact resistance than many acrylic options polycarbonate panels. Panel systems come with installation instructions, the framing is straightforward, and you don't need specialized tools. If you've done basic carpentry or deck work, you can likely handle it. Where DIY gets risky is on the structural and flashing details, especially if the attachment point to the house isn't done correctly or if you're in a high-wind or snow-load region.
For anything freestanding, anything over about 200 square feet, or any project in a region with significant wind or snow loads, hiring a contractor is the safer and often smarter financial move. A poorly installed canopy that fails or leaks will cost more to fix than the labor you saved. Get at least three quotes and ask each contractor specifically how they handle flashing at the wall attachment, what wind load the structure is designed for, and whether they pull permits.
On permits: most jurisdictions require a building permit for any permanent attached patio structure. Some freestanding canopies below a certain size may be exempt, but don't assume. Permit requirements vary significantly by city and county. An attached structure that modifies the home's exterior almost always needs a permit, and skipping it can create problems when you sell the house or make an insurance claim. Check with your local building department before breaking ground, and ask specifically about setback requirements, which determine how close to property lines the structure can be.
Real costs, maintenance, and how long these things last
What to budget
Nationally, most homeowners pay between $4,500 and $12,000 for a professionally installed hard top patio canopy, with an average around $8,500. Material-specific installed costs generally run $16 to $68 per square foot for aluminum panel systems and $24 to $46 per square foot for glass. Forbes Home reports typical installed cost ranges, including blank" rel="noopener noreferrer">aluminum patio roof coverings at about $16 to $68 per sq ft and glass patio roof covers at about $24 to $46 per sq ft, for quick budgeting estimates. Polycarbonate panel systems typically land on the lower end of that range. A basic DIY polycarbonate lean-to canopy over a smaller patio can come in under $1,500 to $2,500 in materials if you do the labor yourself, though you'll still need to factor in footings, hardware, and fasteners.
Size, complexity, local labor rates, and whether you need engineering or permits all move the number. A simple 12x16 attached lean-to is very different from a custom L-shaped freestanding structure with gutters and integrated lighting.
Maintenance: keeping it in good shape
Hard top canopies are low-maintenance, not zero-maintenance. For polycarbonate panels, clean them one to two times per year with mild dish soap and warm water, using a soft cloth or sponge. Don't use a pressure washer (the pressure can damage the panel surface and the UV coating), and avoid solvent-based cleaners or anything abrasive, which will scratch and cloud the panels over time. Rinse thoroughly to avoid streaking.
For aluminum frames, check the powder coat annually for chips or scratches, especially at fastener points. Touch up bare metal spots with matching paint to prevent corrosion starting underneath. Clear debris like leaves and pine needles from gutters and panel seams at least twice a year, more often if you have trees overhead. After any major storm, do a quick inspection of flashing, fasteners, and panel edges.
On longevity: a well-built aluminum-framed polycarbonate canopy, properly installed and maintained, should give you 15 to 25 years of reliable service. Glass systems can last even longer but require more careful cleaning and are heavier on the structure. The weak points that fail first are almost always the flashing, the sealant at wall connections, and corroded fasteners, not the panels themselves. Address those details properly at installation and you'll rarely need to think about the structure again.
Your next steps
- Measure your patio and decide on attached versus freestanding layout.
- Check your local building department's permit and setback requirements before buying anything.
- Decide on panel material based on your climate: polycarbonate for most regions, solid aluminum if you want full shade, glass for a premium look.
- If you're in a snow or high-wind region, get a structural engineer or reputable local contractor to confirm load ratings before you build.
- Get at least three contractor quotes if hiring out, and ask each one specifically about flashing details and what wind load the design is rated for.
- If DIYing, buy panels with a documented hail warranty and use stainless steel or coated fasteners throughout.
- Plan your maintenance schedule: twice-a-year cleaning and a post-storm inspection is all most canopies need.
FAQ
Should I choose clear or tinted panels for a hard top canopy for patio, and how do I decide?
Start by matching the panel system to your roof geometry and your local conditions. Clear panels maximize daylight but can create noticeable heat, tinted or bronze polycarbonate cuts glare and heat gain, and solid aluminum blocks light entirely. If you already have a very bright patio, choose tinted, and if you often need visibility for dining or grilling, choose clear but plan for ceiling fans or shade within the patio layout.
Do I need gutters on a hard top canopy, or will the runoff handle itself?
It depends on how the canopy is built and where water needs to go. Many systems can work with a designed drip edge, but if your lowest edge will discharge toward the house, add a gutter or a trough to route water away. The key is continuity, the slope must carry water off the roof to a safe discharge point, and gutter downspouts should be sized for your rainfall intensity.
What should I look for in flashing details when getting a hard top canopy installed?
Yes, especially if the canopy will connect to the house. Look for flashing that includes stepped components at the wall interface (not just surface caulk), and confirm how the system handles the first and last panels at the seams. Before paying, ask the installer to describe the flashing stack order and sealant use, and request a walkthrough of how water is directed away from the attachment point.
How do I choose the right fasteners for a hard top patio canopy in coastal or humid climates?
Do not assume fasteners that came with a kit are correct for your climate. For coastal or humid areas, confirm stainless steel or a high-end coated fastener spec throughout the build, not only the roof sheet screws. Cheap zinc-plated hardware often rusts early and can cause both staining and loosening, which leads to seam leaks over time.
Where do leaks usually start on a hard top canopy for patio, and how do I troubleshoot them?
Most leaks come from detailing, not from the panels themselves. Common trouble spots are the wall attachment flashing, the overlap between roof sheets, and any transitions like where a gutter or drip edge meets the roofing. If you see water near the house after wind-driven rain, prioritize inspection of flashing and sealant lines first, then check seam overlaps and support alignment.
Can I install a hard top patio canopy at a shallow pitch without causing leaks?
Check panel compatibility with your intended roof pitch and overlap design. Some polycarbonate systems require specific minimum slopes and specific overlap dimensions to prevent capillary leaks at seams. If your pitch is shallow, you may need a different kit with different overlap instructions, otherwise water can seep into the seam even if the roof looks covered.
When is DIY risky for a hard top canopy, and what should I verify before building?
Use a conservative approach. Many DIY builds underestimate how rigid the structure must be to handle uplift, sway, and snow accumulation. If the design is freestanding, large, or located in a high-wind area, require proof of uplift resistance and have the engineer or contractor verify footings, anchoring, and member sizing for your wind zone.
Do I always need a permit for a hard top canopy for patio, and what questions should I ask first?
If the canopy is attached to the house, you usually need a permit in many jurisdictions, and modifications can also trigger additional requirements like setbacks or inspection schedules. Even if a small freestanding canopy is sometimes exempt, the exemption rules vary by city and county. Call your local building department and ask what qualifies for exemption, the required setbacks, and whether you need stamped plans.
Why do hard top canopy quotes vary so much, and what hidden costs should I plan for?
Budget for engineering or revisions if your site is complex, for example uneven patio slabs, underground utilities near proposed post locations, a sloped yard, or a roofline that forces odd angles. Also plan for delivery of long components, disposal of old materials, and extra sealant, flashing components, or gutter parts that are not always included in base kit pricing.
How do I calculate the right canopy size and overhang for real rain protection?
Measure the distance from wall to the front edge and account for overhang on all open sides you want covered. Then decide the effective coverage area, not just the roof footprint, because furniture protection depends on where rain can blow. A practical rule is to add overhang where allowed, but also check that gutters or drip edges do not cause runoff to land on doors, steps, or walkways.
In hot, sunny areas, will tinted polycarbonate actually make a hard top canopy for patio feel cooler?
Tint is often the better choice in high-sun climates if you want comfortable use, but it depends on how much shade you get from the orientation. Clear can feel cooler in indirect light but can raise surface temperatures in direct sun, and tinted panels reduce glare more effectively. If you have bright morning sun and glare issues, pick tinted panels, and consider adding side panels or wind screens to reduce lateral sun and rain entry.
What routine maintenance schedule keeps a hard top patio canopy trouble-free?
Plan for maintenance that matches the weak points. Clean polycarbonate with mild soap and warm water, avoid pressure washing, and keep panel seams and gutters free of leaves. For aluminum frames, inspect powder coat chips and touch up bare spots, then check flashing and fasteners after major storms so minor issues do not become seam leaks.
Next Articles
Hard Top Patio Cover Guide: Materials, Sizing, Cost, Install
Choose and install a hard top patio cover with material pros/cons, sizing, costs, code tips, and maintenance.

Do It Yourself Outdoor Patio Ideas: Build, Upgrade, Maintain
DIY outdoor patio ideas for planning, building, upgrading, and maintaining floors, shade, privacy, lighting, and decor.
Quick Fix Patio Ideas for Instant Comfort and Style
Quick fix patio ideas for fast comfort and style: cleanups, repairs, shade, flooring tweaks, and safe upgrades on any bu