
The best screen house for a patio depends on three things: how permanent you want it, what you're trying to block (bugs, sun, wind, or all three), and how much you're willing to spend. A freestanding pop-up screen tent runs $50–$300 and sets up in minutes. A DIY aluminum frame kit runs $2,000–$6,000 in materials. A professionally installed motorized retractable screen costs $1,000–$3,000 per opening. And a fully built screened-in enclosure can land anywhere from $5,000 to well over $15,000 depending on size and finish. If you know what problem you're solving and how long you plan to stay in your home, the right answer becomes a lot clearer fast.
Best Screen House for Patio: Top Picks, Buying & Installation

Phoebe Foster
13 Jul 2026
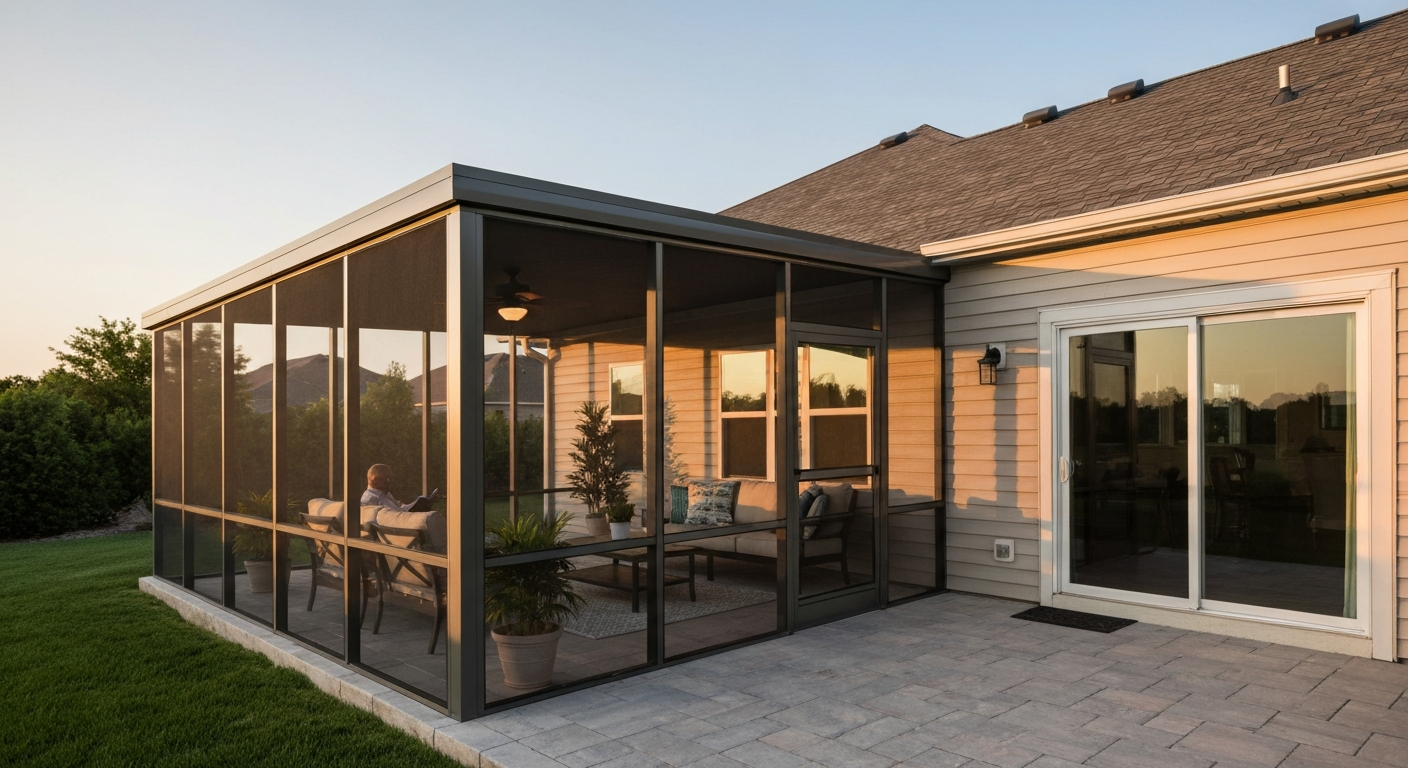
What a patio screen house actually is (and who really needs one)
A screen house is a structure, either freestanding or attached to your home, that encloses an outdoor area in mesh screening. The mesh lets air and light through while blocking insects, reducing UV exposure, and providing a layer of privacy. They range from a basic pop-up canopy with zippered screen walls to a permanent aluminum-framed room with a solid or screened roof. The term overlaps with screened gazebos, screen rooms, and screened-in porches, but the core idea is the same: you want to be outside without being fully exposed.
They make the most sense for homeowners in bug-heavy regions (the Gulf Coast, Southeast, lake country in the Midwest), anyone with a patio that bakes in afternoon sun, and families with pets or kids who spend serious time outdoors. If you're in a dry, low-humidity climate with minimal insects and mild summers, you may find a shade sail or pergola does the job with less hassle. But if mosquitoes, gnats, or no-see-ums are ruining your evenings outside, a proper screen enclosure changes everything.
Answer these questions before you shop
Rushing into a purchase without a clear picture of your setup is how people end up with an undersized tent or an expensive kit that doesn't fit their patio. Run through this checklist first.
- What is the exact footprint of your patio (length, width, ceiling or overhang height)?
- Is your patio attached to the house, freestanding, or partially covered by an existing roof?
- What is your primary problem: insects, sun/UV, wind, lack of privacy, or some combination?
- Do you have pets that will be inside the screen space regularly?
- How long do you plan to use this setup (seasonal, year-round, multi-year)?
- Are you in a coastal, high-wind, or extreme-UV region that demands specific materials?
- Is this a rental or a home you own? (Permanent installs require ownership.)
- What is your realistic budget for materials plus installation, not just the purchase price?
- Are you comfortable with a moderate DIY project, or do you need a contractor?
- Does your local municipality require a permit for screened enclosures or patio covers?
Screen house vs. screened enclosure vs. patio screens: what's actually different
These three categories get used interchangeably online, but they're meaningfully different in cost, permanence, and performance. Understanding the distinction helps you shop in the right category.
| Type | Typical Cost | Permanence | Best For | Limitations |
|---|---|---|---|---|
| Freestanding screen house / tent | $50–$400 | Temporary/seasonal | Camping, occasional use, renters | Limited wind resistance, lower durability |
| DIY aluminum frame kit (screen room) | $2,000–$6,000 materials | Semi-permanent | Homeowners wanting a DIY screen room | Installation errors common; may still need a permit |
| Motorized/retractable screen system | $1,000–$3,000 per opening | Permanent, retractable | Open patios, large openings, modern aesthetics | Professional install required; not a full enclosure |
| Professionally built screened enclosure | $5,000–$15,000+ | Permanent | Full-season use, pool cages, high-end patios | Highest cost; permit almost always required |
| Patio/window replacement screen panels | $30–$200 per panel | Permanent (attached to existing frame) | Rescreening existing porch or sunroom | Requires an existing frame structure |
If you already have an existing porch frame and just need new mesh, you're in replacement-screen territory rather than a new screen house purchase. That's a very different project with its own set of material choices and sizing considerations. On the other hand, if you're starting from a bare concrete slab with no overhead structure, a freestanding kit or a professionally built enclosure is the right path.
Screen house styles and configurations explained
Pop-up and tent-style screen houses
These are the most accessible entry point. Pop-up screen tents use a flexible hub-and-pole system (similar to camping tents) and assemble in under 30 minutes without tools. Sizes commonly run 10x10 to 12x14 feet. They work well for seasonal bug protection on a deck or patio but aren't rated for sustained wind and typically last two to four seasons with regular use. If you're in Florida or the Gulf Coast and mostly want to reclaim your evenings from mosquitoes without a major project, this is a legitimate starting point.
Aluminum frame kits (screen room kits)
Companies like Screen Tight and Screen Porch Living sell pre-extruded aluminum extrusion kits designed for DIY assembly. You get the frame components, screen track, and hardware; you supply the mesh and tools. Material kits for a standard 12x16 room typically run $2,000–$4,000, with custom sizes pushing higher. Reviews are mixed, and the most common complaint I've seen repeatedly is mis-measured or mis-cut parts and undersized mesh orders. These are genuinely doable for a careful DIYer, but larger installs (anything over about 200 square feet of screen area) are usually better handed off to a professional.
Permanent attached screen enclosures
These are contractor-built structures attached to your home's exterior wall. They use aluminum framing, a screened or solid roof panel, and may include a door and electrical. If you're also considering new openings, see our guide to best patio windows for options that complement screened enclosures. This is the highest-cost, highest-permanence option and almost always requires a building permit. In many southern states, this is standard for pool cages and rear patios. Expect $5,000 on the low end for a small attached room, and $15,000 or more for anything with a solid insulated roof or custom finishes.
Retractable and motorized screen systems
Brands like Phantom, Mirage, and MagnaTrack make motorized screens that drop from a housing mounted above the opening and retract when not in use. Installed cost commonly runs $1,000–$3,000 per opening. They're the most visually clean option and preserve your open-air aesthetic when retracted. The trade-off is that they don't form a complete sealed enclosure, and they require professional installation to warranty the motor (typically 5 years on the motor, limited lifetime on the frame components to the original purchaser for brands like Phantom).
Screened gazebos
A screened gazebo is a freestanding structure with a hard roof and screen panels on all sides. It offers better weather protection than a pop-up tent and doesn't need to attach to your house. Quality steel or aluminum screened gazebos run $400–$2,000+ depending on size and frame quality. They're a middle ground between a tent and a full screen room, and they work well on patios where you don't want to run anything through your home's exterior wall.
What actually matters when you're buying: the real criteria
Size and footprint
Most buyers undersize. You want to be able to move furniture around inside comfortably, not just fit chairs. A 10x10 space feels cramped with a table and four chairs. For most households, a 12x16 or larger footprint works better. Measure your patio dimensions precisely before buying anything (see the full measuring guide below).
Frame material
Aluminum is the standard for permanent and semi-permanent screen enclosures. It's lightweight, corrosion-resistant when properly anodized or powder-coated, and available in architectural extrusion profiles (6063 T6 alloy is the industry norm). See Anodizing vs Powder Coating, Protolabs (finish tradeoff guide) for a summary: anodizing yields a durable oxide layer with superior UV/color stability and abrasion resistance, while high‑quality powder coating with proper pretreatment offers strong corrosion protection and broader color choices Anodizing vs Powder Coating — Protolabs (finish tradeoff guide). For coastal installations within a few miles of salt water, specify marine-grade powder coat with proper pretreatment or anodizing per AAMA specifications. Steel is common in budget gazebos but requires paint upkeep to prevent rust. Powder-coated finishes offer more color options than anodizing but can chip; high-quality anodizing is more abrasion-resistant and has excellent UV stability.
Mesh type
Standard 18x14 or 18x16 fiberglass mesh blocks mosquitoes and most flying insects and is the most affordable option. For help choosing the best patio screen material, see our guide on the best patio screen material. If you're dealing with no-see-ums or biting midges (common in coastal areas and near wetlands), you need 20x20 mesh or finer, with the trade-off being reduced airflow and slightly reduced visibility. Pet owners should look at vinyl-coated polyester pet screen (Phifer PetScreen is the benchmark product), which is roughly seven times stronger than standard fiberglass. Solar screen meshes run 65–90% UV/solar blockage and are worth considering if afternoon heat and glare are your primary complaint, though they noticeably reduce both airflow and outward visibility. Manufacturers position solar/sun-control screen meshes (typically blocking about 65–90% of solar/UV) for heat and glare reduction while noting the tradeoff of reduced visible light and airflow; see Screen Enclosure Materials Guide, Right Way Enclosures (materials/mesh tradeoffs) blank" rel="noopener noreferrer">Screen Enclosure Materials Guide — Right Way Enclosures (materials/mesh tradeoffs).
Wind and UV ratings
Permanent structures in hurricane-prone areas or high-wind zones need to be engineered and permitted accordingly. The International Residential Code (IRC), specifically Chapter R301 wind provisions and Appendix I for patio covers, governs minimum requirements, but your local jurisdiction may be more stringent, especially in Florida, coastal Texas, and the Carolinas. Pop-up tents have no meaningful wind rating and should be staked or weighted whenever there's any chance of afternoon storms.
Pet and privacy features
Pet-resistant mesh (vinyl-coated polyester like Phifer PetScreen) is approximately 0.036 inches thick with an openness factor around 36%, which means it still breathes reasonably well while resisting scratching and tearing. For privacy, solar screen with a tighter weave provides one-way visibility from the inside out while limiting how clearly neighbors see in, especially in daylight.
Installation complexity and permits
Pop-up tents require no permits and no tools. Frame kits require basic carpentry skills and likely a weekend or more. Permanent attached enclosures almost always require a permit in any U.S. municipality, and many jurisdictions also require permits when a screened enclosure serves as a pool barrier. Call your local building department before you start, not after. Pulling a permit after the fact is expensive and occasionally requires tearing down work.
Warranty and budget
Budget screen tents typically carry a one-year limited warranty. Aluminum kit manufacturers vary widely. Motorized systems from brands like Phantom carry a limited lifetime warranty on frame components (to the original purchaser) and five years on motors, with installation labor sometimes covered for the first two years, but read the exclusions carefully because mesh and finish wear are often excluded. For any permanent install, get the contractor's labor warranty in writing.
Best screen houses by use-case: ranked picks
Best for insect control
For pure bug defense, the mesh specification matters more than the brand name on the box. If standard mosquitoes are the issue, any quality aluminum-framed screen house or screened gazebo with 18x14 or 18x16 fiberglass mesh does the job. If you're dealing with no-see-ums (very common in Florida, coastal Georgia, and the Texas Gulf Coast), specify 20x20 or finer mesh explicitly. Don't assume the product ships with the right mesh. Many budget kits use a coarser weave that lets smaller insects through. A sealed zip door and perimeter fit matter as much as mesh grade: the best mesh in the world doesn't help if there's a two-inch gap along the base.
Best for sun, UV, and shade
If afternoon heat is your main enemy (think west-facing patios in Phoenix, Austin, or anywhere in the desert Southwest), a solar screen mesh rated at 80–90% UV blockage is worth the upgrade cost. These denser meshes are noticeably darker and do reduce airflow and outward views, so pair them with a ceiling fan or mister inside the enclosure. A permanent attached screen room with a solid insulated roof panel and solar mesh walls is the most effective combination for year-round heat management.
Best for wind and coastal environments
In coastal zones and hurricane corridors, the frame and fasteners matter more than the mesh. Specify marine-grade anodized or powder-coated aluminum with stainless steel (304 or 316) fasteners, following FEMA Coastal Construction Manual guidance for your distance from shore. Motorized retractable screens are popular in coastal Florida and the Carolinas precisely because they can be fully retracted before a storm approaches, removing the screen from the wind load equation entirely. Avoid steel-framed gazebos within a mile or two of salt water unless you're prepared for regular rust management.
Best for pet owners
If dogs or cats will spend time inside the screened space, standard fiberglass mesh will be destroyed within a season. Phifer PetScreen (vinyl-coated polyester, approximately 0.036 inches thick, available in rolls up to 96 inches wide) is the most widely available pet-resistant option and is sold at Home Depot and Lowe's in standard roll lengths. It costs noticeably more per square foot than standard fiberglass but is dramatically more durable. Pair it with a reinforced or magnetic pet door panel if dogs will be going in and out independently.
Best for privacy
Dense solar screen (80–90% shade rating) provides meaningful daytime privacy from outside while still letting you see out. This works well on patios that face a street or a neighbor's yard. It's not total privacy, especially at night when interior lighting reverses the visibility dynamic, but it's a significant improvement over standard insect mesh. Some homeowners combine solar screen on the street-facing panels with standard insect mesh on other sides to balance privacy and airflow.
Best for small patios
For patios under 100 square feet (roughly 10x10), a quality screened gazebo or a motorized retractable screen on the open face is more practical than a full enclosure. Screened gazebos in the $500–$1,200 range from brands like Sojag or Z-Shade offer decent build quality and take up exactly as much space as the patio footprint allows. Measure carefully and subtract at least 6 inches on each side for frame clearance and staking.
Best budget option
A pop-up screen tent in the $80–$200 range does the job for seasonal use if your priorities are insect control and occasional outdoor meals. Brands like Coleman and Gazelle make products that hold up reasonably well with careful use and proper storage. The honest caveat: these are not wind-resistant structures. Any sustained wind above about 25 mph is going to test them, and leaving them up during storms is a reliable way to destroy them. Use them, enjoy them, just stake them and take them down when weather is moving in.
Materials and mesh comparison
| Material | Best Use | Durability | Airflow/Visibility | UV Resistance | Relative Cost | Notes |
|---|---|---|---|---|---|---|
| Fiberglass (standard 18x14) | General insect control | Moderate (tears easily) | Good | Moderate | Lowest | Most common; cheap and easy to replace |
| Fiberglass (no-see-um 20x20) | Biting midges/gnats | Moderate | Reduced vs. standard | Moderate | Low-moderate | Required for coastal/wetland bug control |
| Fiberglass (BetterVue/Hi-Vis) | Clarity and views | Lower than standard | Excellent | Moderate | Moderate | Thinner yarns; not pet or heavy-use rated |
| Solar/sun control screen | Heat and UV reduction | Good | Reduced (65–90% solar block) | Very High (65–90% block) | Moderate-high | Tradeoff: darker interior, less airflow |
| Vinyl-coated polyester (PetScreen) | Pet-resistant spaces | Very High | Good (~36% open area) | Good | High | Phifer benchmark; ~0.036" thick; 96" wide rolls |
| Aluminum mesh | High-traffic, commercial | Highest | Good | Excellent | Highest | Heavy; can dent; best for extreme durability needs |
| Aluminum frame (anodized) | All permanent installs | Excellent | N/A (frame) | Excellent (oxide layer) | Moderate-high | 6063 T6 alloy standard; spec AAMA for coastal |
| Aluminum frame (powder-coated) | All permanent installs | Very Good | N/A (frame) | Very Good | Moderate | More color options; specify marine pretreatment coastal |
| Steel frame | Budget gazebos | Moderate (rusts) | N/A (frame) | Poor unpainted | Low | Requires regular paint/rust maintenance |
How to measure your patio and order the right screen house
More screen house purchases go wrong at the measuring stage than at any other point. Here's how to do it right the first time, whether you're buying a freestanding kit, ordering replacement mesh, or planning a contractor-built enclosure.
- Measure the full length and width of your patio slab or deck surface at floor level. Use a 25-foot tape measure and measure twice. Record in feet and inches, not rounded estimates.
- Measure the height from floor to the underside of any overhead structure (ceiling, roof, pergola beam). If the space is open to the sky, measure to the height you want the screen walls to reach.
- Identify any obstructions: posts, columns, exterior outlets, hose bibs, doorways, and light fixtures. These affect where frame sections will land and where doors need to be positioned.
- For freestanding screen houses and tents, subtract 6–12 inches from each dimension to allow for frame thickness, staking clearance, and a non-binding fit against walls or fences.
- For screen mesh orders, calculate total screen area by adding up each panel: (panel width x panel height) for every opening. Add 10–15% overage for cutting waste and mistakes.
- Match your mesh roll width to your panel width. Standard roll widths are 36", 48", 60", 72", 84", and 96". Ordering a roll narrower than your panel width means seams, which are weak points.
- Check spline channel width on your existing frame before ordering replacement mesh. Common vinyl spline diameters are 0.140", 0.160", and 0.180". Bring a sample to a hardware store or measure with calipers if unsure.
- For permitted enclosures, your contractor or local building department may require a site plan showing dimensions from property lines and distance from the main structure. Measure and sketch this before applying.
- Double-check door clearance: standard screen door frames are 32" or 36" wide and 80" tall. If you have non-standard height or width, flag this before ordering a kit.
- For sloped patios, measure height at both the high and low ends. Screen panels need to be cut to the actual slope, not a flat average, or you'll have gaps at the bottom.
Replacing screen mesh yourself: what you need to know
Rescreening an existing porch or frame is one of the more satisfying weekend projects because the payoff is immediate and the tools are simple. A basic rescreening job on a single panel takes 20–60 minutes once you've done it once. A full porch with multiple panels is a day or two of work. You need a spline roller, a spline removal tool, a utility knife, replacement spline in the right diameter (0.140", 0.160", or 0.180" are the common hardware store sizes), and your mesh roll. The mesh goes over the frame, the spline presses it into the channel, and a utility knife trims the excess flush. The single most common DIY mistake is using the wrong spline diameter: too thin and the mesh pulls loose; too thick and it won't seat in the channel. When in doubt, take a piece of the old spline to the hardware store and match it physically.
Home Depot and Lowe's both stock Phifer-brand fiberglass, aluminum, pet screen, and BetterVue rolls in widths from 36" to 96" and lengths from 25' to 100'. Pet screen and solar/no-see-um specialty meshes cost several times more per square foot than standard fiberglass, but even pet screen at premium pricing is far cheaper than replacing a damaged frame or hiring the whole job out.
DIY vs. hiring a contractor: an honest breakdown
Pop-up tents and screened gazebos are DIY. No question. Rescreening existing panels is DIY. A mid-size aluminum frame kit (under roughly 150 square feet) is achievable for a careful, tool-comfortable homeowner over a weekend or two, but the user reviews on these kits consistently note that cutting errors, mis-measured parts, and frame alignment problems trip people up. For anything that requires a permit, attaches to your home's structure, involves a pool barrier, or is in a high-wind or coastal zone, bring in a licensed contractor. The cost is real, but so is the liability of a permitted structure built incorrectly. Nationally, professionally rescreening an existing porch runs roughly $2,000–$5,000 (approximately $5–$25 per square foot). Building a new screened enclosure from scratch typically runs $25–$120 per square foot for a basic screened addition, and $50–$175 or more per square foot for finished, insulated, or custom work.
Integrating your screen house with other patio features
Screens don't work in isolation. If you're in a hot climate and relying on a screened enclosure for daytime use, pair it with a ceiling fan. Airflow through screened walls is reduced compared to open air, so moving air inside matters more than it does on an open patio. A misting system installed along the perimeter ceiling adds another 10–20 degrees of perceived cooling on dry days, though it's less effective in high humidity. For flooring, existing concrete slabs work fine, but if you're upgrading, pavers, composite deck tiles, or outdoor rugs work well inside a screened enclosure. Just make sure any flooring material allows water drainage so rain blowing in doesn't pool.
Lighting inside a screen house creates a nighttime privacy reversal: when it's dark outside and lit inside, the screen effectively disappears to anyone looking in. If nighttime privacy matters, consider a denser solar mesh on the primary sightline panels, or use low-level ambient lighting rather than bright overhead fixtures.
Maintenance and winterizing
- Rinse mesh panels with a garden hose two to three times per season to clear debris, pollen, and insect buildup that restricts airflow.
- Inspect spline channels and screen edges every spring. Loose or cracked spline should be replaced before a full panel blows out.
- Check aluminum frame joints and fasteners annually for corrosion, especially in coastal or high-humidity environments.
- Touch up any scratched or chipped powder-coat finish promptly to prevent corrosion starting at the bare metal.
- Remove pop-up tents and screened gazebos from their frames before winter or any forecast of heavy snow or ice loading. Store fabric panels and mesh dry to prevent mildew.
- Motorized retractable screens should be fully retracted and the housing wiped down before freezing temperatures arrive. Consult manufacturer guidelines for motor winterization.
- Permanent enclosures with screened roofs should have debris cleared from the screen surface regularly, especially in fall, to prevent pooling water and mesh damage.
- For pet screen areas, check the lower 24 inches of panels each season for punctures or tears and patch or rescreen as needed before damage spreads.
Costs at a glance
| Option | DIY Materials | Professionally Installed | Permit Usually Required? |
|---|---|---|---|
| Pop-up screen tent | $50–$400 | N/A | No |
| Screened gazebo (freestanding) | $400–$2,000 | $600–$3,000 | Rarely |
| Motorized retractable screen | N/A (professional only) | $1,000–$3,000 per opening | Sometimes |
| Aluminum frame kit (screen room) | $2,000–$6,000 | $4,000–$10,000 installed | Often yes |
| Permanent attached enclosure | Not recommended DIY | $5,000–$15,000+ | Yes |
| Rescreening existing porch (mesh only) | $50–$300 in materials | $2,000–$5,000 ($5–$25/sq ft) | Rarely |
Your next steps
Start with the decision checklist earlier in this article and be honest about your budget, your DIY skill level, and how permanent you want the solution to be. If you're replacing mesh in an existing frame, measure your spline channel, pick the right mesh for your primary problem (insects, pets, UV, or privacy), and plan a weekend. If you're buying a new freestanding structure, measure your patio footprint carefully and size up rather than down. And if you're considering a permanent attached enclosure, call your local building department first, get two to three contractor quotes, and ask each contractor specifically about their permit experience and whether they've worked in your wind zone or coastal exposure category. The right screen house for your patio exists at every budget; the key is matching the solution to the actual problem you're trying to solve. For a quick comparison of top options and buying tips, see our guide to the best screen for outdoor patio.
FAQ
What is a screen house for a patio and what styles are available?
A screen house (screened porch/enclosure) is a framed structure with insect/solar mesh that encloses a patio or porch to provide insect protection, shade, and weather mitigation while keeping outdoor exposure. Common styles: attached screened porch (built to house/roofline), freestanding screen room/sunroom kit, retractable/motorized screens for large openings, and temporary pop‑up screen houses. Choose style based on permanence, budget, appearance, and whether you need full framing or only roll‑down screens.
Which materials and mesh types should I consider, and what are the tradeoffs?
Frame materials: aluminum (industry standard) — lightweight, corrosion‑resistant when anodized or powder‑coated; use marine‑grade finishes and stainless fasteners in coastal/salt‑air zones. Wood is aesthetic but needs maintenance. Mesh types: standard fiberglass (good visibility, low cost); BetterVue/invisible mesh (finer yarns → clearer view and airflow, slightly less abrasion resistance); PetScreen (vinyl‑coated polyester) — heavy duty against claws; aluminum mesh — very durable and rigid; solar/UV screen — denser weave to block heat and glare (65–90% solar blockage) but reduces light and airflow. Tradeoffs: finer mesh reduces insects but lowers airflow/visibility; pet/metal screens increase durability but may reduce clarity.
What mesh counts exclude common insects (mosquitoes vs no‑see‑ums) and how does that affect airflow?
Typical insect screens: 18×14 or 18×16 mesh (strands per inch) block most mosquitoes. ‘No‑see‑um’ or fine insect screens are commonly 20×20 (or finer) to exclude biting midges — these reduce airflow and visibility more. Solar/sun-control meshes further reduce visible light and airflow. Choose mesh for the smallest insect you need to block while balancing desired airflow and view.
How do motorized/retractable screens compare with fixed enclosures?
Motorized/retractable screens (factory products) let you open or close large openings on demand, preserving view when retracted and providing bug/solar control when closed. They are more expensive (installed commonly $1,000–$3,000 per opening), often require professional installation for large spans, and have warranties (motors/gears typically 5 years; component warranties vary). Fixed framed enclosures are lower maintenance long‑term, provide constant protection, and are simpler for DIY kits but reduce openness permanently.
How should I measure my patio for a screen house (step‑by‑step)?
1) Measure the plan view: width and depth of the area to be enclosed. 2) Measure wall openings and clearances (from finished surfaces). 3) Measure finished floor elevation and ceiling/roof height at multiple points; note any roof slopes. 4) Note obstructions (steps, railings, ledges, utilities). 5) Measure each screen panel location separately if building panelized or modular kits. 6) For retractable screens, measure frame pocket/heights per manufacturer tolerance. Record dimensions to the nearest 1/8" and double‑check before ordering; for larger/custom jobs, get a contractor/template measurement.
What are the basic DIY vs professional installation steps and when should I hire a contractor?
DIY (typical panel/kit): prepare level foundation/floor, assemble/anchor aluminum frame per kit, cut and fit mesh, install spline with roller, install doors/access points, seal/trim. Standard rescreening of individual panels uses spline removal/roller tools and takes 20–60 minutes per small panel. Professional installation: site survey, structural framing to code, integration with roof, complex custom sizes, motorized screens, coastal corrosion mitigation, and permited work. Hire a contractor when: the enclosure affects roof/structure or foundation, spans are large or need engineering, local permits required, you want motorized systems, or you prefer a warranty on workmanship.
Next Articles
Best Patio Windows Buying Guide: Types, Cost, and ROI
Choose the best patio windows with types, materials, costs, ROI, climate performance, security, and install tips.
Best Patio Screen Material: Compare Fiberglass, Aluminum, More
Compare fiberglass, aluminum, stainless and UV patio screens for insects, airflow, durability, pets, and weather to choo
Do It Yourself Outdoor Patio Ideas: Build, Upgrade, Maintain
DIY outdoor patio ideas for planning, building, upgrading, and maintaining floors, shade, privacy, lighting, and decor.