The best patio top cover for your situation comes down to four things: how much weather protection you actually need, what material fits your climate and budget, how the cover mounts to your house or stands on its own, and whether you can realistically build it yourself or need a contractor. Get those four right and the rest of the decision falls into place pretty quickly.
Top Patio Covers Guide: Choose, Measure, Install

Phoebe Foster
17 May 2026
What a top patio cover actually is (and why it matters)
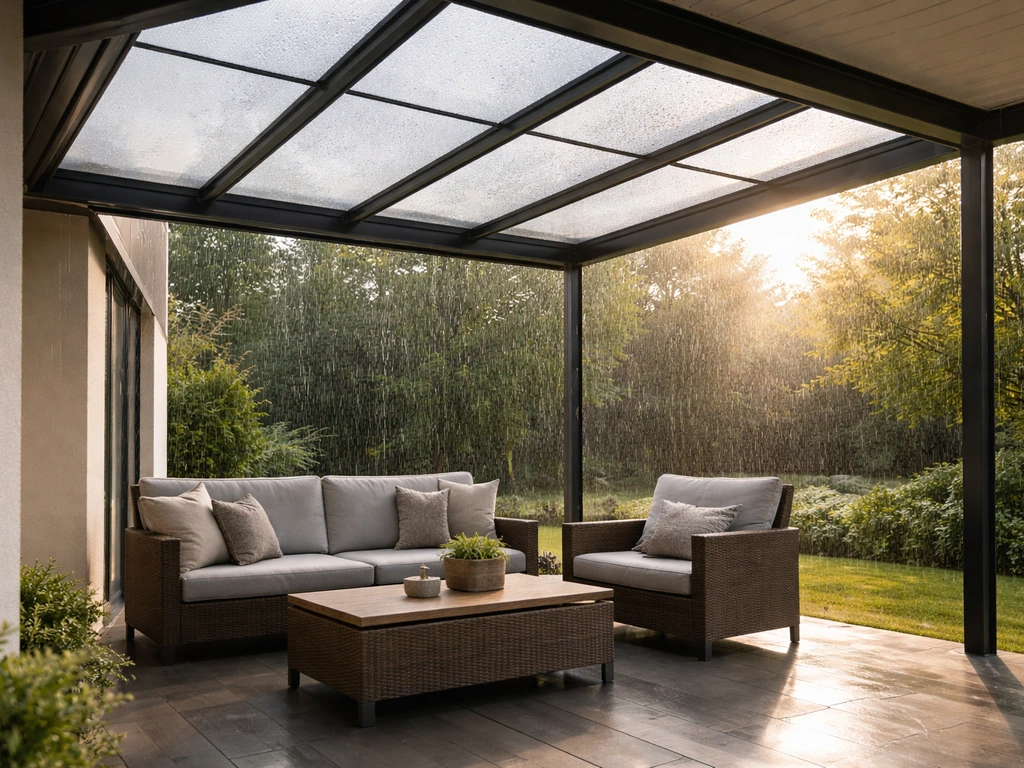
A patio cover, in practical terms, is a roofed structure that gives you real rain and sun protection. That separates it from a pergola, which has an open or slatted roof that filters light but won't keep you dry. When people search for a 'patio top cover' or 'patio cover top,' they usually mean the roof portion of that system: the panel, the solid material, or the roofing layer that sits on top of the framing and actually does the weather work.
That distinction matters because it changes what you shop for. A pergola top upgrade might be a polycarbonate panel kit you drop onto existing beams. A full patio cover system includes posts, beams, rafters, the top covering, and usually a ledger attachment at your house wall. Getting the 'top' part right means understanding how it sits on and interacts with everything below it, including drainage, slope, and structural load.
From a code standpoint, solid-roof patio covers are treated as a building structure. The International Residential Code (IRC) Appendix H governs patio covers specifically, setting minimum design load values and design pressure requirements (a common minimum is 10 psf). IRC Appendix H (including Seattle’s Appendix H) references AH106. 4.
1 and includes minimum design pressure requirements, such as a 10 psf minimum design pressure for patio covers minimum design pressure requirements (a common minimum is 10 psf).
Many counties and cities also have their own plan sheets that require you to specify roof slope, rafter spacing, post/footing size, and ledger attachment detail before a permit is issued. That's not just paperwork, those specs are what keeps a cover standing during a wind event.
Choosing the best patio structures starts with getting the top, materials, and load requirements right under the relevant code guidelines.
Coverage style and layout: what fits your patio
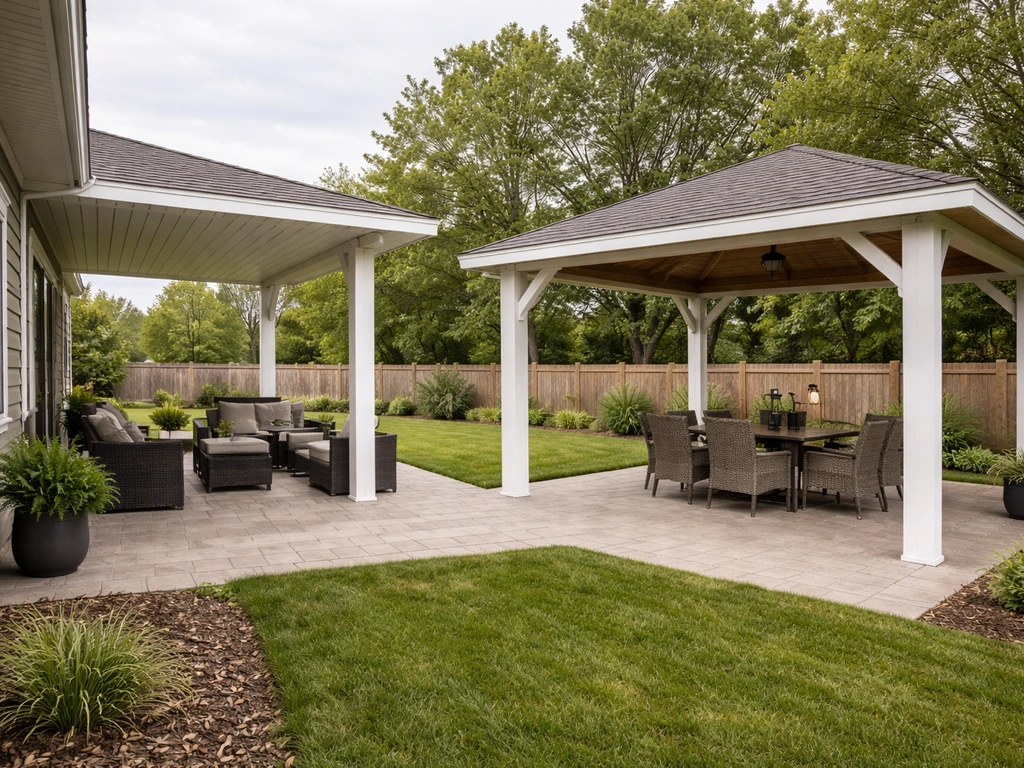
Before you think about materials or budget, figure out the coverage style that actually matches how you use your patio. If you are comparing alternative patio covers, it helps to think about how each option handles shade, weather protection, and heat buildup. The three most common layouts are attached covers (connected to the house), freestanding covers (supported entirely by their own posts), and hybrid systems that use the house for one side and posts for the other. Most homeowners default to attached because it looks integrated and uses the house wall as one support point, but freestanding layouts sidestep a lot of permit and engineering complexity because you're not tying into the home's structure.
- Attached/lean-to: mounted at the house wall with a ledger board, slopes away from the house. Requires flashing, ledger connection detail, and usually a permit. Most common style for covered patios.
- Freestanding: four or more posts with no house connection. Easier to permit in many jurisdictions, more flexible placement, but needs more posts/footings.
- Pergola with solid top: existing pergola structure with polycarbonate, acrylic, or metal panels added to the top. Good option if the framing is already sound.
- Full enclosure/solid addition: essentially a room addition with roofing. Higher cost and complexity, treated more like a room addition for permit purposes.
For coverage area, think about how much of your patio you actually want covered. A partial cover over a dining area reads differently than a full-coverage structure that spans the whole slab. Partial covers are cheaper and faster to build, but if your goal is reliable shade all afternoon or staying dry during a rainstorm, full coverage wins every time. If you are looking for the best patio covers in Las Vegas, focus on full coverage for reliable shade and weather protection full coverage wins every time.
Materials and roof panel options
The top covering material is probably the biggest decision you'll make. To get the right choice for your space, start by comparing the best patio cover styles and materials for your climate and coverage goals best patio covers. If you are trying to figure out the best patio tent option instead, compare how each product handles shade, rain protection, and setup time patio cover. It affects cost, maintenance, how much light gets in, how much heat builds up underneath, and how long the cover lasts before you're replacing panels or repainting. Here's how the main options actually compare.
| Material | Lifespan | Warranty (typical) | Light/Heat | Maintenance | Best For |
|---|---|---|---|---|---|
| Polycarbonate panels (multiwall) | 15–25 years | 10-year anti-yellowing; 5-year hail | Diffused light, moderate heat gain | Low — wipe down annually | Pergola tops, lean-to covers, budget builds |
| Acrylic panels (e.g., ACRYLITE Alltop) | 20+ years | 10-year light transmission + hail | More clarity than polycarbonate | Low — avoid abrasive cleaners | Higher-end pergola covers, sunrooms |
| Aluminum solid panel systems (e.g., Alumawood) | 30–50 years | Lifetime on paint/finish (varies) | Full shade, no light transmission | Very low — repaint every 10–15 years | Full rain/sun cover, hot climates |
| Wood (cedar, redwood, pressure treated) | 15–30 years | None on material, contractor warranty only | Full shade (solid) or partial (lattice) | High — seal/stain every 2–3 years | Traditional aesthetic, custom builds |
| Metal/steel roofing panels | 30–50 years | 30–50 year panel warranties common | Full shade, can be loud in rain | Low — inspect fasteners annually | Farmhouse/modern style, high-rain areas |
| Corrugated polycarbonate | 10–15 years | 10-year yellowing; 5-year hail | High light transmission, high heat gain | Low — rinse regularly | Budget DIY, greenhouse-style covers |
Aluminum solid-panel systems like Alumawood are the most popular choice in hot, sunny climates like the Southwest because they block heat completely, require almost no maintenance, and are engineered to specific wind load specs. Polycarbonate and acrylic panels are better when you want natural light under the cover, they're common on pergola-style builds. Just know that any clear or translucent panel will build heat underneath on summer afternoons, so in places like Texas or Arizona, a solid aluminum top typically performs better for comfort.
On warranties: read the fine print. Most polycarbonate and acrylic panel warranties cover yellowing and hail separately, and the hail warranty is usually shorter (five years non-prorated is common). More importantly, most manufacturer warranties are conditional on correct installation. If your panels are improperly installed or exposed to conditions outside their spec, you may not have a valid claim.
Sizing, measurements, and mounting
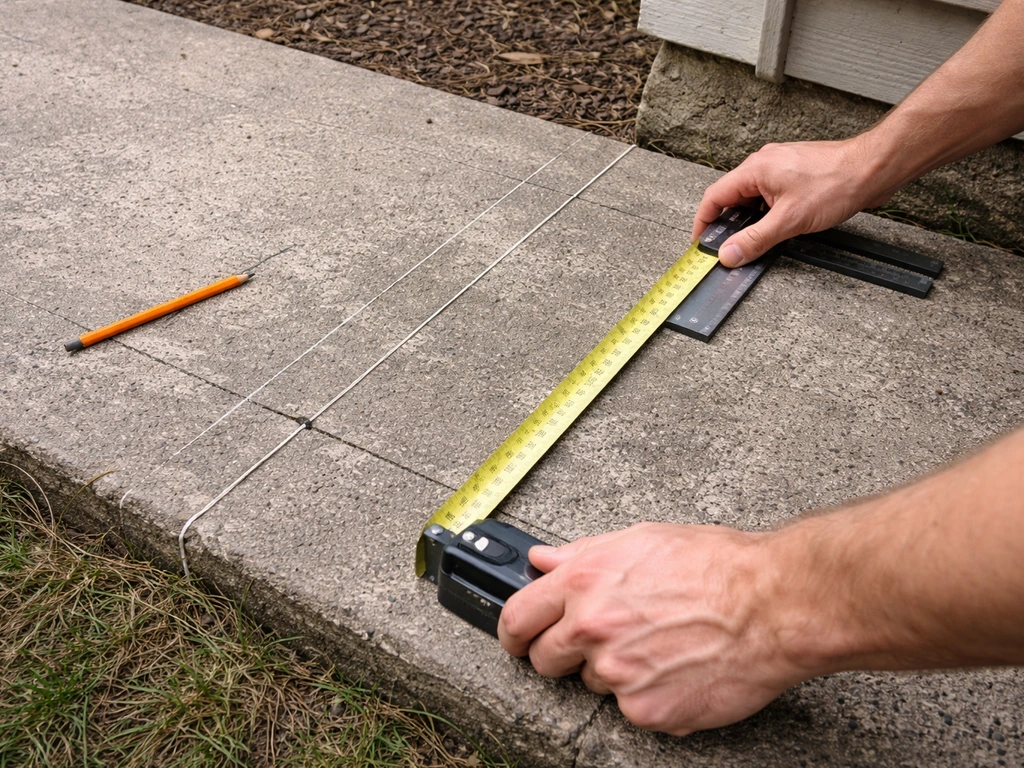
Measuring for a patio cover sounds straightforward until you're standing outside with a tape measure realizing your patio isn't perfectly square and your house wall has a dryer vent right where the ledger needs to go. Here's how to approach it practically.
- Measure the patio slab or deck footprint in both directions. Write down the exact dimensions, not rounded numbers.
- Decide how much overhang you want beyond the slab edge (typically 12–18 inches on the open sides).
- Measure the height at the house wall (where the ledger attaches) and where the outer edge of the cover will land. This determines your slope.
- Check for obstructions on the house wall: vents, windows, electrical outlets, hose bibs. These affect where the ledger can go.
- Confirm the wall framing material — ledgers must bolt into structural framing (studs or rim joist), not just siding or sheathing.
- For freestanding covers, locate where posts will sit and check for underground utilities before digging any footings.
Roof slope is a detail a lot of DIYers underestimate. Most local codes require a minimum slope for solid-roof patio covers, a common minimum is 1/4 inch per foot of run, which is enough to drain water off the roof without pooling. On a 12-foot deep cover, that's 3 inches of height difference between the high end (at the house) and the low end (at the outer edge). If you're ordering a pre-engineered kit, the slope is usually built into the design, but you need to verify it matches your local drainage requirements.
Rafter and beam sizing depend on span. Pre-engineered kit manufacturers provide engineering packets that specify post spacing, beam size, rafter size, and footing diameter for different spans and wind load zones. If you're custom-building, you'll need a structural engineer or a contractor who can size members to your local code. Don't guess on this, undersized rafters can fail under snow load or high winds.
Climate and performance: matching your cover to your weather
Where you live should drive a big chunk of your material and design choices. A cover that works great in the Pacific Northwest (where rain is the main enemy) isn't necessarily the right call in the Texas Hill Country (where heat and UV are the real problems) or in the Upper Midwest (where snow loads and wind are the concern in winter).
| Climate/Region | Primary Challenge | Best Cover Type | Key Design Detail |
|---|---|---|---|
| Southwest (AZ, NV, CA desert) | Intense heat and UV | Solid aluminum panel system | Maximum shade, light-colored finish to reflect heat |
| Southeast/Gulf Coast (TX, FL, LA) | Heat, humidity, and heavy rain | Solid roof with gutters | Good slope for drainage, rust-resistant hardware |
| Pacific Northwest (WA, OR) | Frequent rain, mild temps | Solid roof or polycarbonate (good drainage) | Proper slope and gutter system are critical |
| Midwest/Great Plains | Wind, snow load, temperature swings | Solid engineered cover, steel or aluminum | Wind uplift anchorage, snow load rating in specs |
| Northeast | Snow, ice, wind | Solid roof, steep pitch preferred | Snow load compliance, avoid flat panels that hold ice |
Wind uplift is one of the most underestimated risks in patio cover installations. IRC Appendix H sets minimum design pressure requirements, and many pre-engineered kits are rated for specific wind speeds (often 90–110 mph for standard residential use). In high-wind zones like coastal areas or tornado-prone regions, you need a cover specifically engineered for that wind exposure. The anchorage at the post bases and the ledger-to-house connection are the two most critical points for wind resistance.
For drainage, a properly sloped roof that dumps water off the outer edge is the baseline. But in high-rain climates or when the cover is large, you should add a gutter system to route runoff away from your foundation. Gutters for patio covers typically run $8–$15 per linear foot installed and connect to a downspout that directs water at least six feet from the house foundation. It's not a glamorous add-on, but skipping it is one of the most common mistakes homeowners regret after installation.
DIY vs hiring a contractor: honest advice on both paths
You can absolutely DIY a patio cover if you're comfortable with basic framing, concrete work for footings, and following a detailed plan. Pre-engineered aluminum cover kits (like Alumawood or similar) are designed to be homeowner-installable and include engineering packets with every dimension, post spacing, and hardware spec you need. The honest caveat: 'DIY-friendly' doesn't mean easy. Footing work, ledger attachment, and proper flashing are where most DIY mistakes happen, and those mistakes can be expensive to fix.
Hiring a contractor makes the most sense when: your cover attaches to the house (ledger connection adds complexity), you're in a jurisdiction with strict permit/engineering requirements, you want electrical work (fans, lighting) included, or the project is large and involves custom sizing. Attaching to the house adds labor, flashing work, permit complexity, and sometimes requires engineering stamps depending on your municipality. Permit fees typically run $100–$500, but complex custom projects with engineering can push higher.
Budget-wise, a basic DIY polycarbonate or aluminum kit for a 12x16 foot cover might run $1,500–$4,000 in materials. A professionally installed solid aluminum cover at the same size typically starts around $5,000–$10,000 depending on region and complexity, and can go higher with add-ons. Get at least three quotes and make sure each one specifies the same scope (materials, permits, footings, electrical if needed) so you're comparing apples to apples.
Add-on features worth thinking about before you build
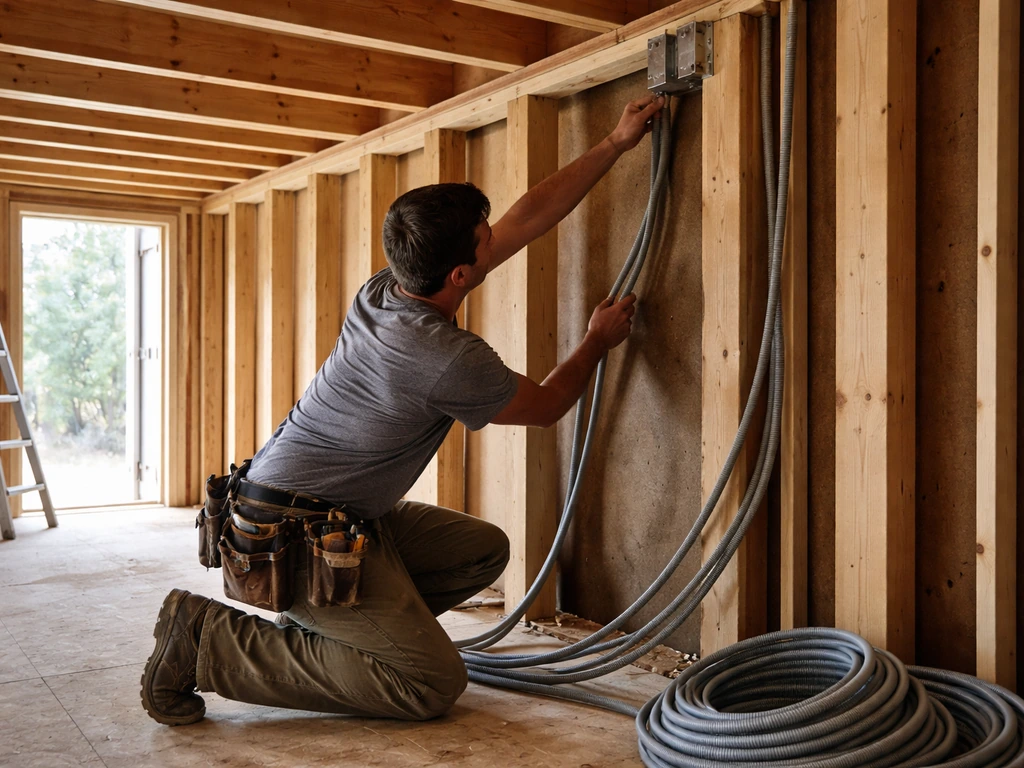
The best time to plan add-ons is before installation, not after. Running electrical conduit through posts or ceiling joists is straightforward during construction and expensive to retrofit. If you think you might want a ceiling fan, recessed lighting, or outdoor outlets within the next few years, rough in the wiring now even if you don't install the fixtures immediately. A ceiling fan runs $200–$500 installed when it's part of a new build; adding it later after drywall or finished trim is in place costs more.
- Ceiling fans: biggest comfort upgrade in warm climates. Requires electrical rough-in. Size the fan to the cover area (52-inch fan for spaces up to 225 sq ft, 60-inch or larger for bigger covers).
- Misters: very effective in dry climates (Southwest), less useful in humid climates (Southeast). Requires a water line and optionally a small pump for pressure.
- Patio heaters: extend your season in cooler climates. Electric heaters need wiring; propane or natural gas heaters need a fuel line or tank access.
- Gutters and downspouts: essential for high-rain areas and large covers. Route downspouts away from the foundation.
- Lighting: string lights, recessed LED, or pendant fixtures. All require electrical. LED fixtures are the lowest maintenance long-term.
- Louvered roof systems: a premium upgrade that lets you adjust shade and ventilation. Worth considering if you want a more flexible system — this is a topic worth exploring separately.
Cooling and shade add-ons like misters and fans work best when they're designed into the cover system, not bolted on as afterthoughts. The structural framing needs to support fan weight, and misting systems need to be installed so they don't spray water onto electrical components. Plan those details with your contractor or as part of your kit design before anything goes up.
Installation checklist, questions to ask, and mistakes to avoid
Whether you're doing this yourself or hiring someone, running through this checklist before and during installation will save you headaches. The most common and costly mistakes are all avoidable with a little upfront attention.
Before you start
- Confirm permit requirements with your local building department (not just county — city rules can differ).
- Check HOA rules if applicable — some communities have height, material, or color restrictions.
- Verify your patio slab can support post footings, or plan for new poured footings next to the slab.
- Call 811 (in the US) to mark underground utilities before any digging.
- Check house wall framing location with a stud finder before marking ledger bolt locations.
- Confirm the cover material and kit are rated for your local wind zone and, if applicable, snow load.
During installation: the details that matter most
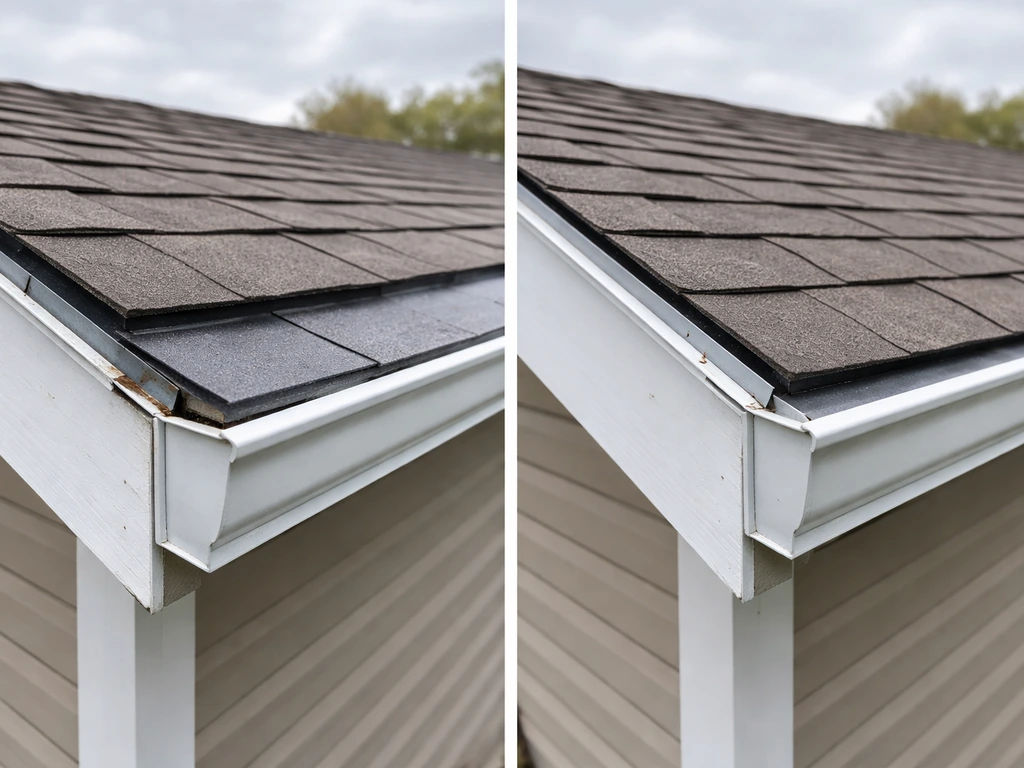
- Flash the ledger correctly. Z-flashing behind the ledger board and lapped over the siding below is the standard approach. Flashing errors are the number-one cause of water infiltration and rot at the house wall — do not skip or rush this step.
- Confirm roof slope as you build. Use a level and tape measure to verify the slope before installing panels.
- Set posts plumb and brace them before pouring footings or anchoring — small errors compound fast.
- Torque fasteners to spec. Over-tightening polycarbonate or acrylic panels causes cracking; under-tightening causes leaks.
- If adding electrical, get the rough-in inspected before covering it with panels or trim.
- Schedule footing inspections before pouring concrete — most jurisdictions require this.
Questions to ask any contractor before signing
- Are you licensed and insured for this type of work in my state/county?
- Will you pull the permit, or is that my responsibility?
- Is the design engineered for my local wind zone and snow load if applicable?
- What does your warranty cover, and for how long? Is it a workmanship warranty, a material warranty, or both?
- Who handles the permit inspections — you or me?
- What's included in the quote? (Confirm: footings, ledger flashing, panels, gutters, electrical rough-in if needed)
- Do you have references from similar attached patio cover projects in my area?
Common mistakes to avoid
- Mis-sizing: Ordering a kit before measuring carefully, especially failing to account for roof overhang, ledger height, and slope height difference.
- Wrong slope or no slope: Flat or near-flat roofs trap water, cause leaks, and often don't meet code minimums.
- Skipping gutters: On any cover larger than about 10 feet deep, water dumping off the edge will erode landscaping and splash back onto the house.
- Ignoring wind uplift: Using undersized post anchors or skipping through-bolts at the ledger is a structural failure waiting to happen.
- Adding electrical without a permit: Fans and lights added without inspection can cause insurance issues and are a safety risk.
- Not reading warranty conditions: Many panel warranties are void if the installer doesn't follow the manufacturer's installation spec, or if the panels are installed in the wrong orientation.
If you take one thing from all of this: don't let the cover's 'top' be an afterthought. The panel material, slope, flashing, and drainage are what determine whether your patio cover performs for 30 years or becomes a maintenance problem in five. If you want results that last, focus on quality patio covers by matching the right materials and weather-ready design to your local conditions. Get those fundamentals right, whether you're building it yourself or hiring a pro, and the rest of the project is just details. If you want more control over airflow and shade, it helps to compare the best louvered patio cover options for your climate.
FAQ
Do I need a permit for top patio covers, even if I buy a pre-engineered kit?
Often, yes. Many jurisdictions treat solid-roof patio covers as structures, so you may need a permit for the ledger attachment, footings, and any specified structural loads. Kits can simplify design, but you still typically provide the kit engineering packet plus your local measurements for plan review.
What’s the easiest way to handle a roof slope when my patio area isn’t level?
Use your highest and lowest points on the patio slab to establish the roof run, then confirm the slope translates to the kit’s required rise at the ledger end. If your patio floor is crowned or slopes toward the house, you may need to shim posts or adjust footing heights so the top covering drains correctly.
If I choose polycarbonate or acrylic panels for more natural light, how can I reduce heat buildup?
Pick a tinted or bronze-tint panel option if available, and consider a partial solid-baffle approach (solid top sections plus translucent sections) instead of fully clear coverage. Also, adding a ceiling-height air gap if your kit allows can reduce how much radiant heat you feel under the roof.
How do I know whether my wind rating is enough for my address?
Match the kit’s rated wind speed or design pressure to your local hazard zone and confirm it covers your exposure type (coastal, open terrain, tornado-prone). Pay extra attention to anchorage details at the post bases and the ledger connection, since these are the first points to fail during uplift.
Should I install gutters on every top patio cover, or only in rainy climates?
In rainy areas or for larger covers, gutters are usually worth it because they protect the foundation and prevent water from cascading onto walkways. If you skip them, make sure the roof overhang and discharge point place runoff well away from the house (often several feet) and don’t let it dump toward landscaping that can create constant moisture problems.
Can I mount a top patio cover to a stucco wall, and what’s different about flashing?
Yes in many cases, but ledger attachment must land on the proper structural framing behind the finish. Flashing and sealant details matter more with stucco because water can travel behind the wall surface if the ledger and penetrations are not handled correctly.
What’s the most common measurement mistake when sizing top patio covers?
Assuming the patio is perfectly square. Measure diagonals and verify post line locations before ordering, then re-check that the ledger line aligns with where the house structure can accept fasteners. If you have a dryer vent or other obstacle, plan for offset layouts rather than forcing the ledger into a service line area.
Do electrical add-ons like fans and outlets require engineering changes to the top patio cover?
They can, especially ceiling fans. The fan load and bracket attachment point need to be supported by framing designed for that load, and conduit routing must avoid weakening members. If you’re using a kit, confirm the manufacturer supports electrical rough-in and identify where penetrations are allowed.
What maintenance should I expect for aluminum solid-panel systems versus polycarbonate tops?
Aluminum panels usually need periodic cleaning and inspection of fasteners, caulking, and drainage pathways. Polycarbonate and acrylic typically require more attention to cleaning method to avoid haze, and they can yellow over time depending on the UV exposure and panel grade.
Are warranty differences between clear panels and solid aluminum tops important?
Yes. Panel warranties often separate issues like hail damage and yellowing, with hail coverage usually having a shorter timeline. For aluminum solid tops, focus on finish coating terms and what conditions void coverage, especially around installation method and whether the system was installed exactly per the kit specifications.
When should I hire a contractor instead of DIY for top patio covers?
Hire a pro if you need ledger attachment complexity, live in a jurisdiction with strict submittal requirements, or want custom elements like recessed lighting, built-in speakers, or integrated misting. Also consider hiring help if your site requires significant footing corrections or if you’re not confident about waterproofing and flashing around the house connection.
How can I prevent water from dripping near the house after installation?
Verify that the roof slope leads water to the outer edge and, if adding gutters, that downspouts direct runoff away from the foundation. During build, confirm flashing is installed to shed water away from the ledger line, and check that any panel seams or overlaps are oriented correctly for your drainage direction.
Next Articles

Do It Yourself Outdoor Patio Ideas: Build, Upgrade, Maintain
DIY outdoor patio ideas for planning, building, upgrading, and maintaining floors, shade, privacy, lighting, and decor.
Quick Fix Patio Ideas for Instant Comfort and Style
Quick fix patio ideas for fast comfort and style: cleanups, repairs, shade, flooring tweaks, and safe upgrades on any bu
Cheap Do It Yourself Patio Ideas: Budget Build Guide
Budget DIY patio ideas with step-by-step flooring, prep tips, cost ranges, upgrades, and safety mistakes to avoid.