The best patio in Kitsilano is the one that matches your lot size, handles the rain without pooling, and actually gets used. For most Kits homeowners, that means a properly sloped concrete or paver patio with a pergola or retractable cover, built by a contractor if the site has grading complexity, or assembled from a quality kit if the ground is reasonably level and you have a weekend or two to spare. Costs run roughly $60 to $150 per square foot for a professionally built patio depending on materials and complexity, while prefab modular systems start well under that if you go DIY.
Best Patio Kitsilano: Kits vs Builds and Choosing Guide

Phoebe Foster
12 May 2026

What 'best patio' actually means for a Kitsilano home
Kitsilano lots are typically narrow, around 33 feet wide by 122 feet deep. That geometry shapes almost every patio decision. You are usually working with a back yard that is not huge, and you need to balance outdoor living space against things like a garage, a laneway home, or a garden. So 'best' is less about grandeur and more about getting the most usable, comfortable square footage out of what you have.
Think about how you will primarily use the space before you look at a single material or product. A couple who wants a quiet evening space with container plants needs something completely different from a family running a dog and two kids, or a host who throws summer dinners for ten people. The use case drives layout, surface material, privacy requirements, shade coverage, and how much you spend. Here are the most common scenarios in Kits:
- Entertaining and dining: You want a solid, level surface at least 12 by 16 feet, a covered area for rain, and good lighting. Budget $8,000 to $20,000+ for a contractor build.
- Family use with kids and pets: Prioritize slip resistance, easy cleaning, and a surface that handles muddy paws. Concrete pavers or textured porcelain work well here.
- Small urban retreat: Even a 10 by 10 patio with a pergola and a couple of chairs transforms a backyard. This is where prefab kits shine and keep costs reasonable.
- Privacy-focused spaces: Narrow lots mean close neighbours. Factor in a fence, lattice, or planter wall as part of the design from day one.
- Accessibility needs: A flush, slip-resistant surface with no raised edges matters if anyone in the household has mobility considerations. Ground-level concrete slab or large-format pavers are ideal.
Budget range matters too. A simple DIY modular deck system over a flat backyard can come in under $3,000. A mid-range paver patio with drainage and a shade sail sits in the $8,000 to $15,000 range. A full build with a louvered pergola, outdoor kitchen rough-in, and French drain system can easily reach $30,000 or more. None of those numbers are wrong, they are just different projects.
Best patio materials and layouts for Kitsilano homes
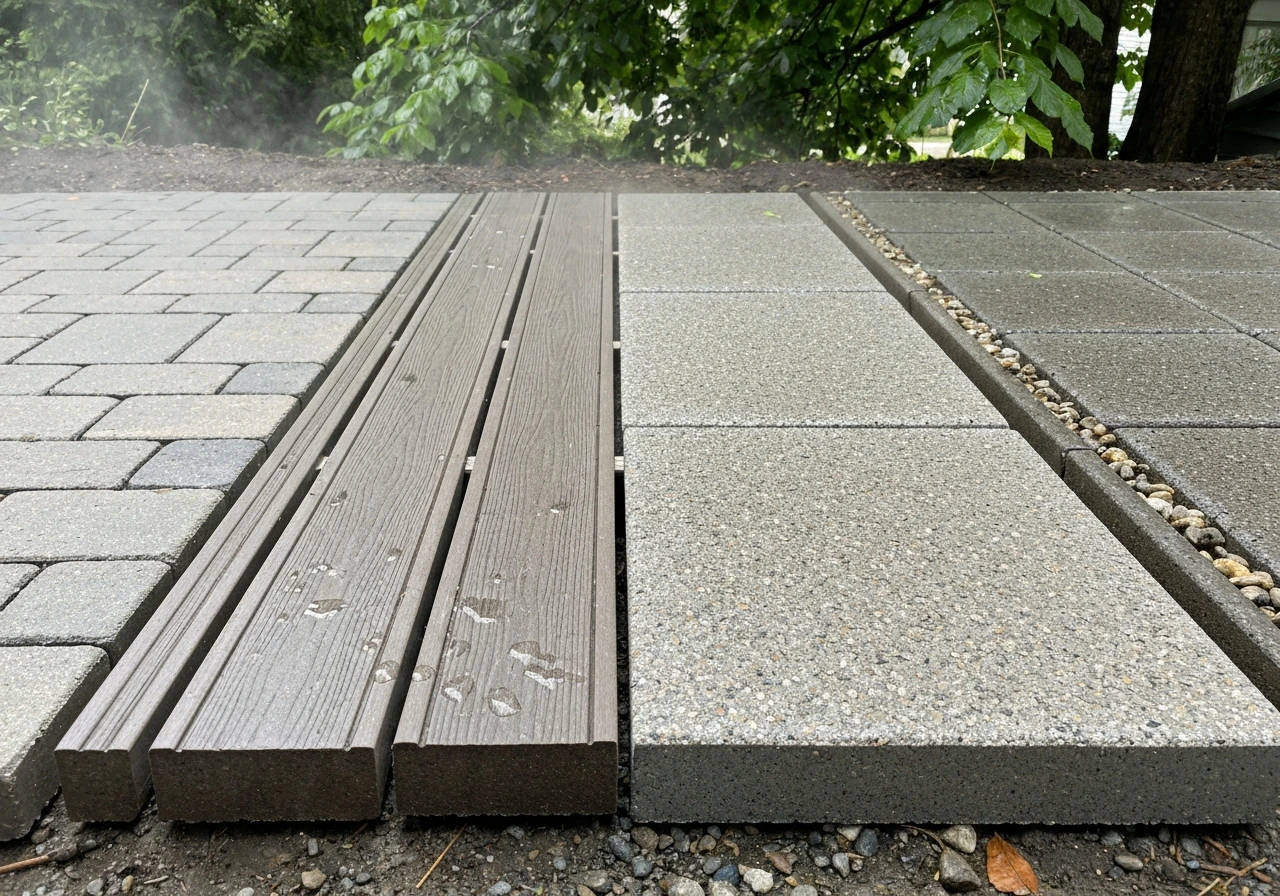
Because Vancouver's west side gets consistent rainfall and Kitsilano lots are often shaded by mature trees or neighbouring houses for part of the day, material durability and drainage performance matter more here than in drier climates. Here is how the main options stack up.
| Material | Durability | Slip Resistance (Wet) | Typical Cost (installed) | DIY-Friendly | Best For |
|---|---|---|---|---|---|
| Concrete pavers | Excellent | Good (textured) | $20–$45/sq ft | Yes, with prep | Most Kits yards, versatile layouts |
| Porcelain pavers (2cm) | Excellent, freeze-thaw resistant | Very good (ZeroSlip/textured) | $35–$70/sq ft | Moderate (wet-saw needed) | Contemporary homes, pool areas |
| Poured concrete slab | Very good | Moderate (can be improved with sealer) | $15–$30/sq ft | Not recommended DIY | Simple, clean base for covered areas |
| Natural stone (flagstone/granite) | Excellent | Variable | $40–$80/sq ft | Difficult | High-end aesthetic, irregular layouts |
| Modular composite/wood decking | Good (varies by brand) | Good if textured | $15–$40/sq ft | Yes | Raised/sloped sites, quick installs |
| Recycled-glass pavers | Good, UV stable | Very good (ASTM wet >0.6) | $40–$75/sq ft | Moderate | Design-forward builds, wet zones |
Concrete pavers are the workhorse choice for most Kitsilano projects. They handle freeze-thaw cycles, they are repairable (you can pull and replace individual pieces), and they come in enough styles to match both the heritage character homes and the modern infill builds common in the neighbourhood. Porcelain pavers are gaining ground fast because they are UV, stain, and freeze-thaw resistant and genuinely look sharp on contemporary homes, but they require a wet saw with a porcelain-rated blade and need proper expansion gaps during installation, which pushes them toward the contractor or experienced DIYer camp.
For layout, most Kits backyards work best with a primary patio zone directly off the kitchen door (your dining and lounge area), and optionally a secondary smaller pad further back if the yard is long enough. Keep the main patio at least 12 by 14 feet for comfortable dining. If your yard is very narrow, go rectangular and run the length rather than the width to preserve lawn or garden space on the sides.
Weather-proofing your patio for Kitsilano conditions
This is where a lot of Kits patios fail. Vancouver gets consistent rain through fall, winter, and spring, and even summer evenings can bring a surprise shower. If your patio is not set up for water management and covered at least partially, it sits empty nine months of the year. Getting this right from the start is worth the extra planning.
Slope and drainage: the non-negotiables
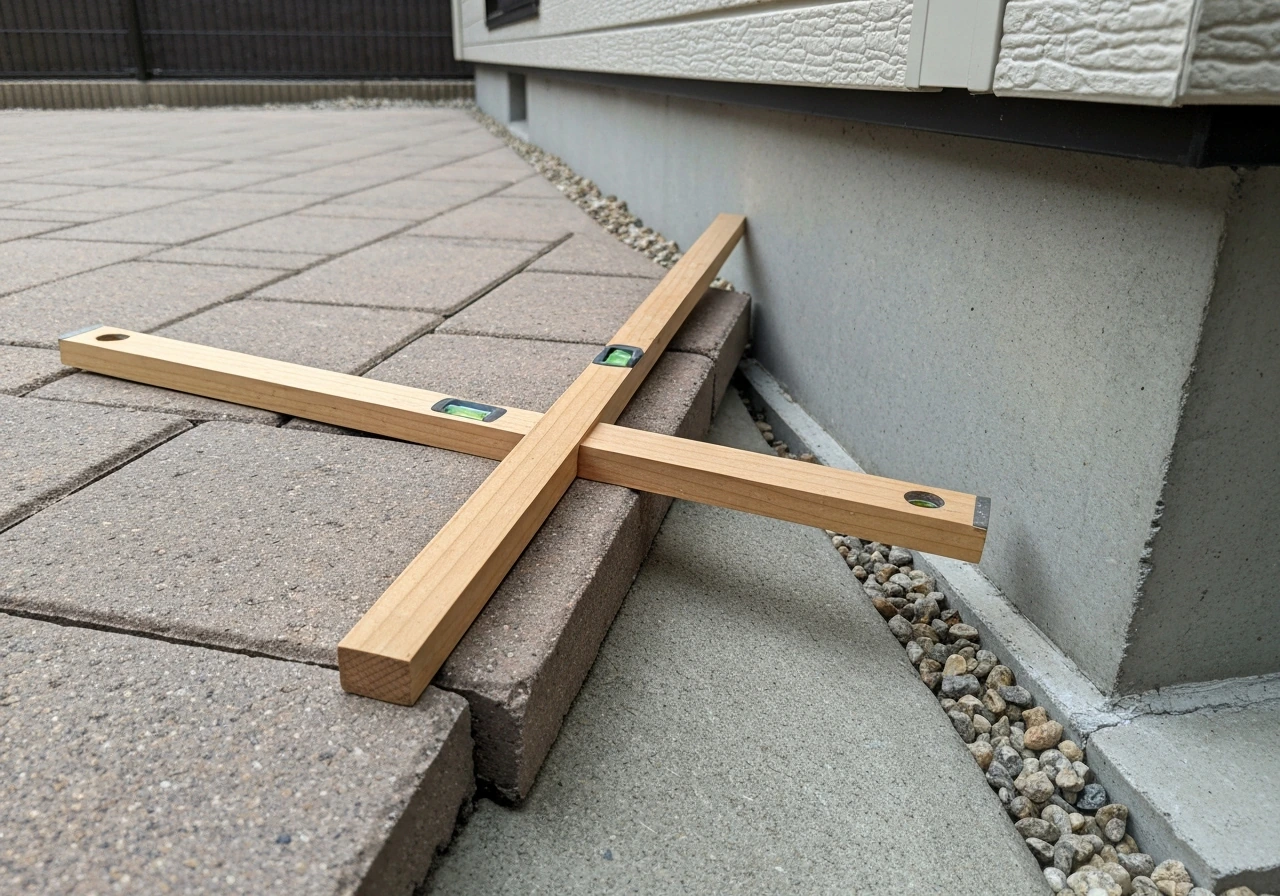
Every patio surface in this climate needs a minimum 2% slope away from your house foundation, roughly a quarter inch drop per foot. That translates to about one inch of drop every eight feet. Do not skip this. Flat-looking patios that actually drain correctly use a 'flat-not-level' installation concept where the surface appears even to the eye but is subtly tilted to move water. For challenging grades or sites where water naturally flows toward the house, a French drain around the patio perimeter is a smart addition that Vancouver paving contractors commonly install.
Edge restraints also matter more than most people expect. Perimeter strips staked into the aggregate base keep pavers from shifting over years of Vancouver's wet-dry-wet cycling. Skipping them is one of the most common reasons patio edges start to separate and lift within a few seasons.
Covers, shade, and rain protection
A covered area is close to essential if you want year-round use. Local suppliers in Vancouver carry a full range of options. Fixed or motorized louvered pergolas are the most popular premium choice because you can adjust the louvers to let in sun or close them fully against rain. Retractable PVC pergolas and motorized awnings give you flexibility at lower cost. Glass roof pergolas look spectacular but add significant cost. For simpler setups, retractable shade sails or a freestanding canopy work well for seasonal coverage. If budget is tight, a good quality waterproof retractable awning over the back door is a reasonable starting point that you can build out from later.
Slip resistance and surface treatment
Wet surfaces are a real hazard in this climate. When comparing paver products, look for a minimum dynamic coefficient of friction (DCOF) of 0.42 in the wet condition per ANSI A326.3 standards as a baseline. Better products exceed this. Porcelain pavers marketed with ZeroSlip or similar texture ratings and recycled-glass paver lines with tested ASTM wet values above 0.6 both clear this bar comfortably. If you have an existing concrete patio that gets slippery, a retrofit anti-slip sealer applied to concrete or pavers (available at Canadian Tire and similar retailers) is a low-cost fix that adds traction without replacing the surface.
Protecting furniture and finishes
UV from Vancouver's summer sun and moisture from fall-through-spring rain are both hard on outdoor furniture. Stick with powder-coated aluminum frames, teak, or high-density polyethylene (HDPE) materials for anything you plan to leave outside year-round. Use breathable furniture covers during wet seasons rather than plastic covers that trap moisture. Treat any natural wood surfaces (decking, pergola posts, furniture) with a penetrating oil or stain rated for exterior use before the first wet season hits.
Comparing patio kits: what to look for before you buy
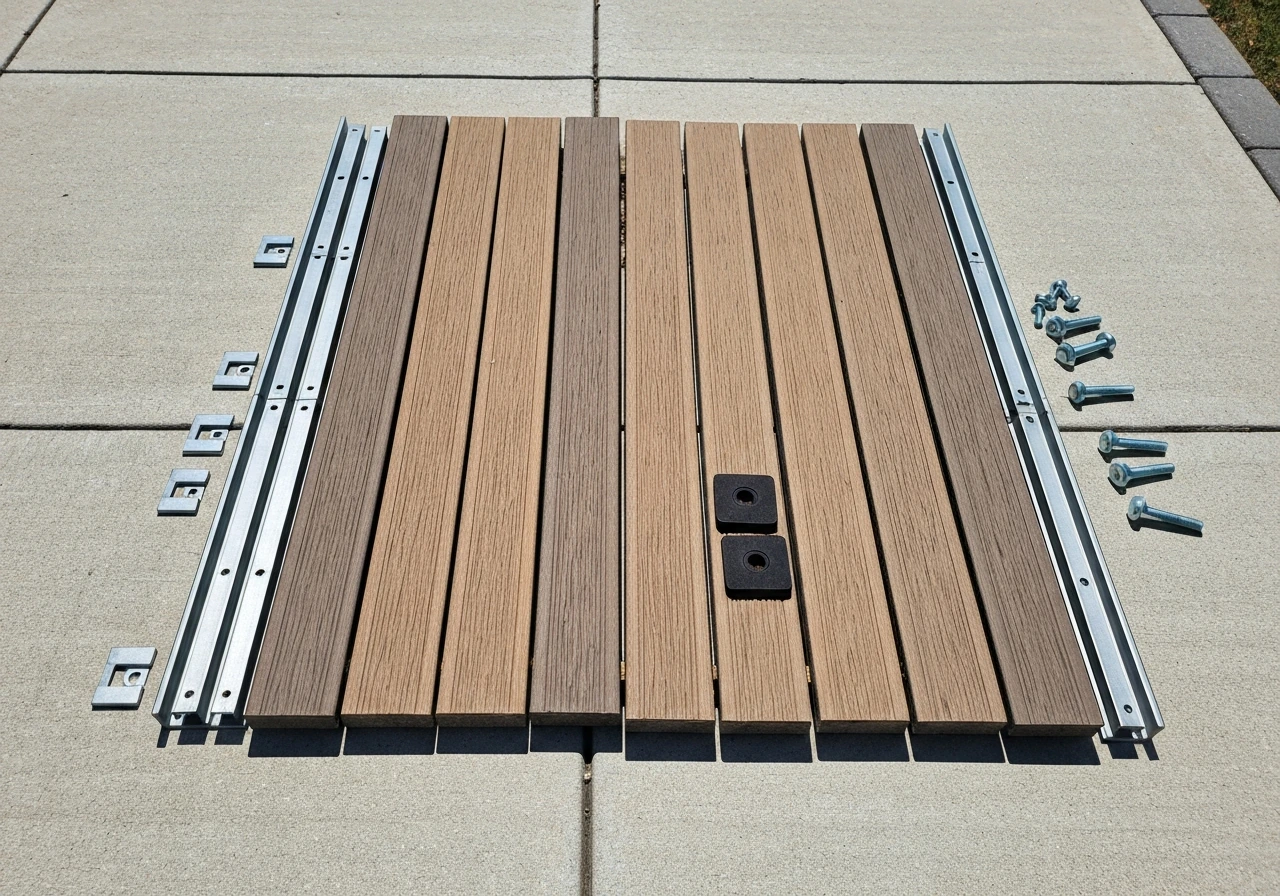
Prefab and modular patio systems have improved a lot in the last few years. A modular decking kit can cover a 10 by 10 foot area, some include edge pieces and hardware, and higher-end systems like pedestal-based modular decks come with 25-year limited warranties. But not all kits are created equal and the gap between a good kit and a bad one matters a lot once it is installed in a Vancouver backyard.
Here is what to check before buying any patio kit or prefab system:
- What is actually included: Surface panels, edge restraints, fasteners, and base-prep guidance should all be in the box or clearly documented. Kits that require you to source additional components separately often end up costing more than advertised.
- Base preparation requirements: Every solid patio kit needs a prepared sub-base. If the product claims you can lay it directly on grass or loose soil, be skeptical. A well-compacted sand-gravel base is the minimum for long-term stability.
- Tolerances and fit: Check reviews specifically for how well pieces align after installation. Poor tolerances mean gaps, trip hazards, and water getting underneath the surface.
- Expansion gaps: Outdoor surfaces expand and contract with temperature. Porcelain and composite systems especially need specified gap spacing between panels to prevent buckling.
- Material quality and UV stability: Ask whether the surface material is UV-rated and freeze-thaw tested. This matters a lot more in Vancouver than in warmer climates.
- Warranty terms: A 25-year limited warranty means something different from a 2-year warranty. Read what the warranty actually covers (material defect vs installation failure vs fading).
- Maintenance requirements: Some systems need annual sealing, some need periodic re-sanding of joints, and some are genuinely low-maintenance. Know what you are committing to.
- Add-on compatibility: If you want to add a pergola, planters, lighting, or a heater later, check whether the system accommodates attachments or upgrades.
One specific caution for anyone considering porcelain-style paver kits: do not compact them with a standard plate compactor. Belgard notes that porcelain pavers should be installed with only the base compacted, not the installed porcelain surface, which is why they should not be compacted with a standard plate compactor blank" rel="noopener noreferrer">do not compact them with a standard plate compactor. Belgard's installation guidance blank" rel="noopener noreferrer">explicitly warns against plate-compacting certain porcelain products, which can crack them. Some porcelain systems require a rubber mallet and hand tamping instead. If this is outside your comfort zone, it is a signal to bring in a contractor for that portion of the work at minimum.
DIY vs hiring a contractor: honest comparison
The decision between DIY and hiring out comes down to three things: the complexity of your site, your realistic skill level and available time, and whether the project triggers permits. Kitsilano lots are not always simple terrain, and a grading or drainage problem can turn a weekend project into a month-long headache if you are not set up for it.
| Factor | DIY | Contractor |
|---|---|---|
| Best site conditions | Flat or nearly flat, good drainage, no major grading | Sloped, poor drainage, roots, or uneven sub-base |
| Skill needed | Basic leveling, compaction, cutting (some materials) | Full grading, drainage, structural work |
| Time commitment | 1–3 weekends for a small patio | 1–2 weeks (you are hands-off) |
| Risk points | Poor compaction, slope errors, improper edge restraints | Contractor quality varies, need to vet carefully |
| Permit handling | You are responsible, easy to miss | Good contractors handle or advise on permits |
| Cost | Lower (materials + rental equipment) | Higher, but less risk of redo costs |
| When it is worth it | Simple modular/kit installs on level ground | Any time drainage, grading, or structure is involved |
DIY makes the most sense for modular composite or wood deck systems on reasonably level ground, or for smaller paver projects where you are comfortable with base compaction and have access to a plate compactor rental. The failure points to watch for are compaction (under-compaction causes settling and shifting within a season or two) and slope (even a small error in drainage direction causes pooling that gets worse each winter). If either of those is uncertain, a contractor is worth the cost.
Contractors are clearly worth it when your site has any significant slope, when the project involves a covered structure (pergola or attached roof), when you want a French drain, or when the patio is adjacent to the house foundation. A good Metro Vancouver patio contractor will also flag any permit requirements before work starts, which protects you. Get a minimum of three quotes, ask specifically about base preparation approach (a contractor who glosses over this is a red flag), and check that they carry liability insurance.
What it actually costs: ranges and upgrade paths
Patio costs in Metro Vancouver generally run from $60 to $150 per square foot for a professionally built patio covering materials and labor. That spread is wide because a basic poured concrete slab with minimal prep sits at the low end, while a large-format porcelain paver system with a French drain, edge lighting, and a motorized louvered pergola sits at the high end. Here is how realistic upgrade paths look for a typical Kitsilano backyard:
- Entry level DIY (modular deck kit, 10x10 ft): $1,500 to $3,500 in materials. Good for a flat site, quick to install, portable if you move or rent.
- Mid-range DIY paver patio (concrete pavers, 200 sq ft): $3,000 to $6,000 including base materials, plate compactor rental, edge restraints, and leveling sand. Budget a full weekend plus prep time.
- Contractor-built concrete paver patio (200 sq ft, basic drainage): $12,000 to $18,000. Includes site prep, compacted sub-base, edge restraints, and finished surface.
- Contractor patio with covered pergola (200 sq ft patio + 12x12 pergola): $20,000 to $35,000 depending on pergola type. Louvered motorized systems add $8,000 to $15,000 over a basic wood pergola.
- Full outdoor living build (patio, drainage, kitchen rough-in, pergola, lighting): $35,000 to $60,000+. This is the full transformation for a Kits home that you plan to stay in long-term.
A practical upgrade path for a budget-conscious homeowner is to start with a solid contractor-built paver patio base and simple shade sail, then add a pergola or retractable awning in year two, and outdoor heaters or string lighting in year three. The base work is the most critical investment and the hardest to redo later. Covers and furniture are relatively easy to add or upgrade incrementally.
Finding local help and your next steps today
Measure and document your site first
Before you call anyone or buy anything, spend 30 minutes measuring your backyard and sketching it out. Note the overall dimensions, where the back door is, where the sun hits at different times of day, where water tends to pool after rain, and how much grade change there is from the house to the back fence. That single sketch will make every contractor conversation more productive and help you compare quotes on equal footing.
Permits: what to check at a high level
In the City of Vancouver, any construction project or change of land use on private property can require a building permit. A simple ground-level paver patio generally does not trigger a permit. But the moment you add an attached covered structure, a raised deck over a certain height, or any work close to the property line, you may need one.
The City of Vancouver's permitting requirements also note height thresholds for elevated structures, so if your patio includes any raised decking component, check with the city before starting. This is especially relevant if you are on a sloped lot and the patio surface ends up more than roughly 60 cm above grade at any point. When in doubt, call the city's development and building services front counter and describe the scope. It is a free call and takes ten minutes.
Questions to ask contractors and kit suppliers
- What sub-base preparation do you include and what thickness of compacted aggregate base are you providing?
- How do you handle the drainage slope and what is your standard grade away from the foundation?
- Do you install edge restraints as part of the patio scope, or is that extra?
- Have you pulled permits for comparable projects in Vancouver, and will this project require one?
- What is your warranty on installation (separate from the material warranty)?
- Can you show me completed projects in Kitsilano or the broader west side?
- For kit suppliers: what DCOF/slip resistance rating does this surface carry in wet conditions?
How to find reputable local help
Start with word of mouth from neighbours in Kits who have had patio work done recently. Kitsilano has a dense network of homeowners who share contractor recommendations freely on local Facebook groups and Nextdoor. To get the best patio builders in Brisbane, compare drainage-focused quotes and recent project photos before you decide best patio builders Brisbane.
Houzz and Google reviews are useful for vetting, but focus on reviews that specifically describe site conditions and drainage outcomes rather than just aesthetics. Ask for a minimum of two local references you can contact directly. For patio kit sourcing, local landscape supply yards and hardscape distributors in the Metro Vancouver area will have better product knowledge than big-box retail for anything beyond modular decking systems.
If you are comparing this project to what homeowners in other markets face, the planning process is similar whether you are in Kitsilano, Surrey, or other Metro Vancouver communities, though site-specific factors like lot size, drainage, and neighbourhood character vary. The permit and design standards framework described here is specific to the City of Vancouver, so if your property is technically outside city limits, confirm requirements with your own municipality.
Your action plan for this week
- Measure your backyard today: overall dimensions, door location, sun exposure, and any obvious drainage issues.
- Decide on your primary use case (entertaining, family, quiet retreat) and set a realistic budget range.
- Shortlist two or three material types based on your site and style (concrete pavers for most, porcelain or composite if you want a more modern look).
- Check the City of Vancouver permit front counter online or by phone to confirm whether your planned scope needs a permit.
- Book quotes from at least three local patio contractors, bringing your site sketch and use-case description to each.
- If kit systems interest you, visit a local landscape supply yard to see surface materials in person before committing to anything online.
The best patio for your Kitsilano home is the one you will actually use. If you are looking beyond Kitsilano, the same planning checklist can help you choose the best patio Surrey homeowners can enjoy through the wet season. Get the drainage and base right, pick a surface that handles rain without becoming a skating rink, add at least some weather cover so the space works more than three months a year, and then furnish and decorate to taste.
A local team that specializes in the best patio builders Perth-style projects can help you translate your design into durable materials, correct drainage, and a timeline that fits your home. If you are searching for the best patio in Kitchener, the same fundamentals apply: drainage, materials that handle weather, and a layout that fits how you actually live outdoors.
That order of priorities is the thing most people get backwards, and it is the difference between a patio that gets used every day and one that sits soggy and empty by October.
FAQ
How do I prevent pooling if my yard already slopes toward the house?
Yes, on Vancouver properties you should plan for a drainage “safety margin.” Even if you set the patio to the correct slope, rain can still run off adjacent grades toward your surface. During setup, verify that downspouts and any eaves trough runoff discharge away from the patio area, or reroute them before you install pavers, otherwise you can get repeat pooling at expansion joints and perimeter edges.
Is it ever safe to use a plate compactor on porcelain pavers from a patio kit?
A plate compactor can be risky for porcelain-style pavers beyond just Belgard’s guidance. If your kit uses porcelain panels, only compact the base layer to spec, then use the product’s recommended method for the paver surface (often hand tamping or a rubber mallet approach). If you are unsure, do a small test section on scrap pieces, because cracking usually shows up after a freeze-thaw cycle.
Do patio kit warranties cover mistakes with base prep and slope?
If you choose a kit and the base is done poorly, warranty coverage often becomes limited. Before buying, ask whether the warranty is void if your installer does not follow their compaction, slope, and edge restraint requirements, and confirm what documentation they expect (photos of base compaction, materials used, and slope check).
What joint mistakes cause patios to crack or lift around the house?
For year-round use, plan on movement joints where materials meet, especially where the patio touches the house or any raised elements. Use the kit’s specified gap spacing and don’t lock the patio rigidly to the foundation. Even with correct slope, lack of movement space can cause spalling, cracking, or lifted edges after seasonal wet-dry cycling.
Can I add a pergola or wiring after installing a paver patio kit?
If you’re adding a pergola or shade system after the patio is finished, anchor points matter. Prefer posts that land on stable base areas (not just paver slabs) and confirm whether you need new footings or core drilling. If you’re planning electrics for lights or heaters, run conduit sleeves before final decking or paver installation so you don’t have to cut finished surfaces later.
At what point does a patio project likely require a permit in Vancouver?
It depends on where you are in the City of Vancouver process, but generally you should not assume a “no permit” situation once you are building anything that is attached, elevated, or changes drainage. Raised platforms, attached covers, and work near property lines can trigger requirements. If your work includes a raised deck component, confirm the height thresholds with the city before you start digging.
How do I choose a paver surface that stays grippy in shaded Kitsilano backyards?
For traction, the wet-condition DCOF number is useful, but you should also look at the surface texture and maintenance. A patio can meet the wet slip rating and still feel slippery if it gets algae buildup in shaded spots. Plan for cleaning access (hose reach or a brush-and-wash routine) and consider choosing finishes that resist staining in low-sun areas.
Where should I inspect first if I want to catch patio problems early?
Most patios fail first at edges and transitions, not in the center. If you can only inspect one area, focus on perimeter restraint, the border where the patio meets lawn or stairs, and any changes in elevation. Early signs include tiny gaps growing after rain, rocking pavers, or sand migrating from the edge.
Can adding a French drain hurt my landscaping if I route the water wrong?
If your patio is near a garden, avoid burying downspout drains or French drains without confirming where the discharge will go. In wet climates, redirecting water to low spots can create a new problem in the landscape. A practical check is to map the path water takes after a heavy rain (or a hose test) and confirm your drainage outlet can handle it.
Is an anti-slip sealer a good alternative to replacing a slippery existing patio?
Yes, but do it deliberately. If you apply an anti-slip sealer, test it on a hidden section and confirm it won’t significantly change appearance or gloss. Also reapply based on the product’s maintenance schedule, because sealers wear down over time and repeated wet seasons can reduce traction benefits.
Next Articles

Do It Yourself Outdoor Patio Ideas: Build, Upgrade, Maintain
DIY outdoor patio ideas for planning, building, upgrading, and maintaining floors, shade, privacy, lighting, and decor.
Quick Fix Patio Ideas for Instant Comfort and Style
Quick fix patio ideas for fast comfort and style: cleanups, repairs, shade, flooring tweaks, and safe upgrades on any bu
Cheap Do It Yourself Patio Ideas: Budget Build Guide
Budget DIY patio ideas with step-by-step flooring, prep tips, cost ranges, upgrades, and safety mistakes to avoid.